Midea Portasplit - universal hose pass-through


Print Profile(7)


Description
Finally, the time has come - my Midea Portasplit has arrived. Every summer, the city feels hotter, and I want to be able to sleep well again during the summer months. I plan to operate the Portasplit in a stationary setup throughout the summer and not have to dismantle it every time it rains. I also don’t want insects coming in through an open window.
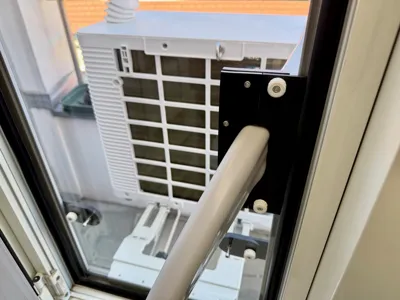
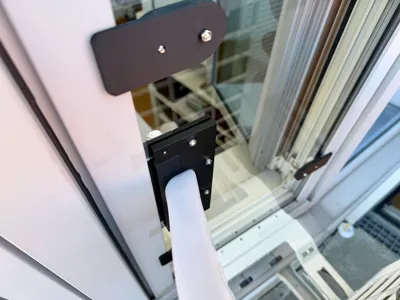
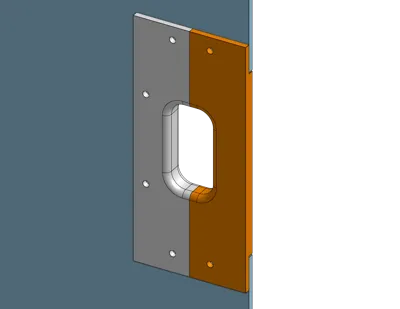
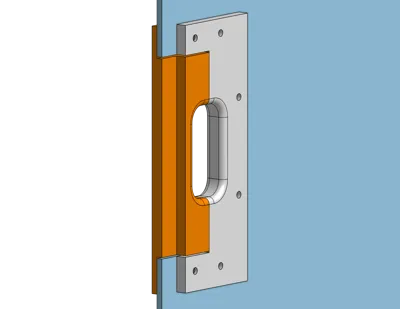
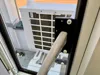
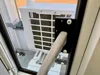
Every window is different. For example, I have flush-mounted aluminum windows without standard dimensions. The hose pass-through I developed should work for any window, provided a 4 mm acrylic glass panel is used and a “universal cutout” is planned before cutting. For sealing my window, I had a 4 mm acrylic glass GS panel (not XT!) laser-cut. One part of the hose pass-through is permanently screwed to the panel, while the second part is flexible and only screwed on once the Portasplit hose is in position. Therefore, the cutout must be placed at the edge of the panel.
The clamps shown in the photo are not part of the print files, as every window is different and they must therefore be custom-made.
I hope you enjoy the comfort of this hose pass-through as much as I do and can enjoy cool indoor temperatures without annoying insects or water ingress from rain.
I look forward to your feedback on whether this model helps you seal your window :-)
Edit:
I’ve added additional print profiles for panel thicknesses from 5 mm to 10 mm, each with an extra 0.5 mm spacing. I’m using the 4 mm version myself, and the rest of the description refers to that. The 9 mm and 10 mm versions may require supports during printing, and of course longer screws for mounting.
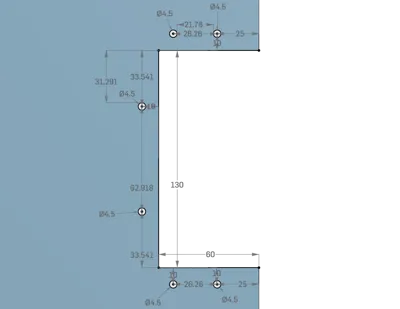
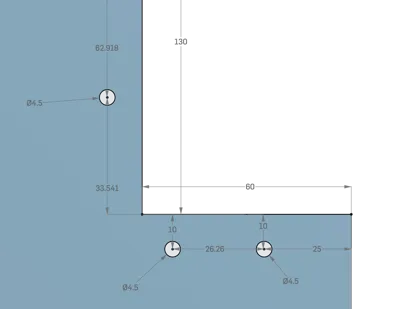
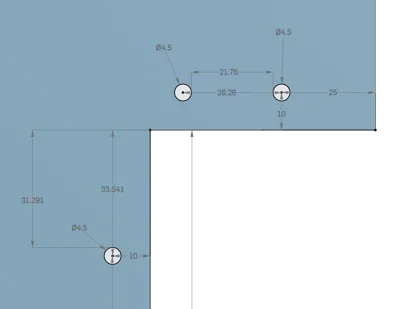
„Universal cutout“
I have added three images showing the dimensions for the “universal cutout” so that you can take them into account when cutting the panel. One image shows the overall view, one the upper half, and one the lower half.
Assembly of the hose pass-through:
- Print both parts
- Add a pause to the fixed part during printing to insert the square nuts
- Slide the fixed part onto the acrylic panel and secure it with 4 screws
- Check whether the flexible part can be inserted flush
Installing the panel in the window:
- Put the outer part of the Portasplit through the window
- Insert the acrylic panel into the window, pass the Portasplit hose through the cutout, and secure the panel to the window
- Place the Portasplit hose into the fixed part of the hose pass-through and hold it in position with one hand
- Position the flexible part of the hose pass-through and secure it with the two knurled screws
- Done :-)
Important notice:
The panel must be 4 mm thick and have a cutout plus drill holes according to the provided dimensions. It is better to use acrylic glass GS instead of XT, as it is less prone to cracking due to stress from the screw connections.
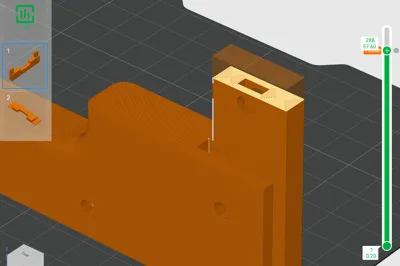
When printing the fixed part, a pause needs to be added to insert the two square nuts. I’m not sure whether MakerWorld will carry over my planned pauses for you. I’ve attached a screenshot showing where I set the pause.
List of materials:
- 2× M4 square nuts 7×2.2 mm (Amazon: “ProRaje M4 A2-070 (V2A/304)” ASIN B0F412QQ32)
- 4× M4 hex nuts
- 6× M4×20 screws
- Optional: printed M4 knurled screw handles as quick-release (+ 2× M4 hex nuts) I used these knurled screws: https://makerworld.com/de/models/170177-knurled-m3-m8-thumbscrews?from=search#profileId-189005
The materials cost me about €65 in total, but it was worth every cent to me.
Both models can even be printed on a Bambu Lab A1 Mini.
Both parts can be printed without supports. I know PETG would be better for these parts, but I didn’t have any on hand. Since this window faces north and receives no direct sunlight, I used PLA+.
Comment & Rating (17)