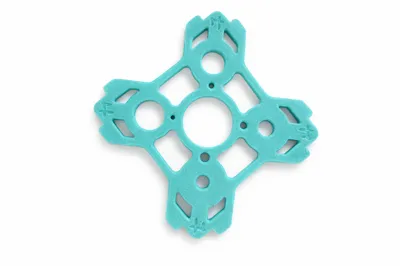
DimensionPro V2 The Ultimate 3-Step XY Calibration


Print Profile(1)
Description
🏆 DimensionPro V2: The Ultimate 3-Step XY Calibration System
Stop fighting with parts that don't fit! Most standard calibration cubes only focus on one thing and mix up different physical errors. This system is a professional, 3-step workflow (plus an optional fine-tuning phase) designed to mathematically reverse-engineer how Bambu Studio process geometry.
By physically separating Shrinkage, Hole Compensation, and Contour Offsets, this tool achieves sub-0.02mm dimensional accuracy, even with notoriously difficult engineering materials like ABS, ASA and other.
⚠️ IMPORTANT: PRE-REQUISITES
For this tool to work, your printer must be "mechanically honest." Before you start printing the gauge:
- Flow Rate Calibration: Calibrate your Extrusion Multiplier/Flow Ratio first! Over-extrusion will completely invalidate dimensional measurements. In printers like H2C RIGHT and LEFT hotend use different flow rate !!
- Pressure Advance (PA/K-Factor): Ensure your corners are sharp and not bulging.
- Bambu H2 Series: It is highly recommended to run the Vision Encoder calibration and ensure your belt tension is correct to maintain strict dimensional stability.
👑 Why V2 is better than anything else? (The "Contour Last" Method)
In FDM printing, when you apply X-Y Hole Compensation, the slicer often "steals" material from the outer walls to make room for the hole adjustments. This causes the overall outer dimensions of your part to shrink. DimensionPro V2 fixes this by calibrating the Contour Offset AFTER the Hole Compensation, ensuring a perfect 100.00mm fit every time without overlapping errors.


📖 HOW TO USE (The Professional 3-Step Workflow)
STEP 1: GLOBAL SHRINKAGE (Print 1)
- Set Shrinkage to 100%, X-Y Hole Comp to 0, and X-Y Contour Comp to 0.
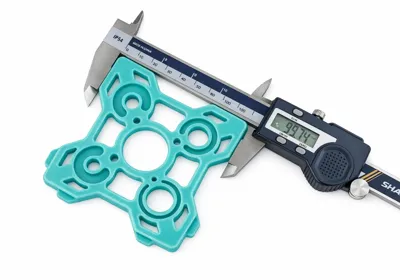
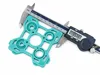
Print the gauge. Measure the Outer X and Outer Y (100mm). XY markings are on the bottom/top side. Take 3 random measurements (M1/M2/M3) for Outer X and Outer Y.


- Input measurements into Step 1 in the provided Excel Calculator.
- Result: Apply the calculated FINAL SHRINKAGE to your filament settings. This establishes your global material scale.

STEP 2: HOLE COMPENSATION (Print 2)
- Print the gauge again with the new Shrinkage applied.
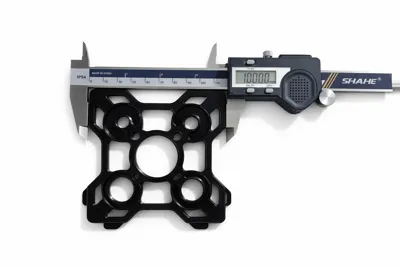
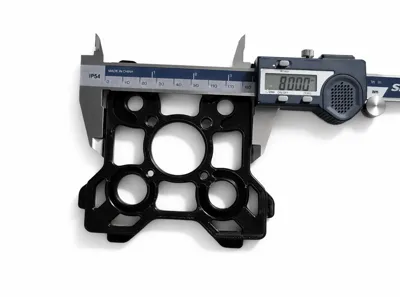
Measure the internal holes. Take 3 random measurements (M1/M2/M3) for each hole.

- 💡 CRITICAL PRO-TIP: You must choose your design focus! Slicers only use ONE global value for all holes, but small holes shrink differently than large ones.
- Mechanical/Hardware Focus: Measure and input holes from 3mm to 8mm. (Ignore the large ones).
- Large Geometry Focus: Measure and input holes from 10mm to 30mm. (Ignore the small ones).
- Result: Apply the calculated NEW HOLE COMP to your Slicer (Quality -> Precision).

STEP 3: CONTOUR CALIBRATION (Print 3 - The Master Fix)
- Print the gauge for the 3rd time (with Shrinkage AND Hole Comp applied).
- Measure the Outer 100mm and 80mm boundaries . You will notice the outer dimension might have shifted slightly due to the Hole Comp. Take 3 random measurements (M1/M2/M3) for each hole.
- Input these measurements into the Step 3 table.
- Result: Apply the FINAL CONTOUR to your Slicer. This is the master fix that brings your wall thickness and outer dimensions back to a perfect 100.00mm.

🌟 BONUS STEP: FINE HOLE TUNING (Optional Print 4)
- Need aerospace tolerances for press-fit bearings or heat-set inserts? Print the gauge one last time with all three parameters applied, and use Step 4 in the Excel sheet for a micro-adjustment.

⚙️ Technical Highlights
- Pure Logic: Replaces confusing priority weights with pure dimensional delta math.
- Dynamic Data: The Excel sheet works perfectly even if you only measure the specific holes you care about.
- Floating Point Protection: All formulas use strict ROUND(..., 3) rounding to perfectly match the Slicer's internal math logic.
(Don't forget to download the Smart Excel Calculator from the files section!)
License
You shall not share, sub-license, sell, rent, host, transfer, or distribute in any way the digital or 3D printed versions of this object, nor any other derivative work of this object in its digital or physical format (including - but not limited to - remixes of this object, and hosting on other digital platforms). The objects may not be used without permission in any way whatsoever in which you charge money, or collect fees.
Comment & Rating (26)