Search models, users, collections, and posts
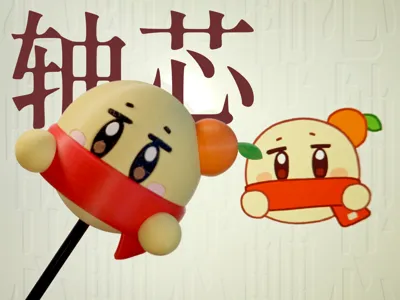
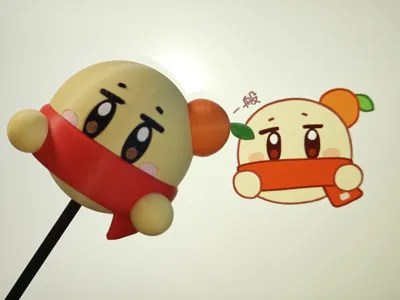
"Zhong Xin" Virtual Streamer Joi Fan Image
IP Report


Print Profile(1)

0.2mm layer, 2 walls, 10% infill
Designer
3.3 h
8 plates
Open in Bambu Studio
Boost
0
0
0
0
0
0
Released
Description
Content has been automatically translated.
I've wanted to try making small things for a long time. The round and simple structure of Zhong Xin felt perfect!
This time, I tried designing some magnetic structures that are easy to expand, so Zhong Xin can change outfits in the future.
Reference Image (Source)


Assembly
- The model's dimensions are approximately 8x6.4x6cm (including the orange), and approximately 16cm high after inserting the punching stick accessory.
- The face and orange require simple assembly (right picture). No glue is needed, so the fit is tight. Please use a flat surface or a handy tool to assist with installation.
- The remaining parts are connected with magnets. The magnets are ∅6x3mm N52round magnets, totaling 12 pieces.
- Insert the magnets through the opening and push them inwards until they snap into place (see image below). When installing, pay attention to the magnet's polarity.
⬇️Parts to be installed Assembled appearance⬇️


Printing and Filament
- Pre-plated by color. The upper part and blush use AMS, and the rest is single-color printing.
- The model in the real-shot image uses a 0.2mm layer height. You can try reducing the layer height for better results.
- The model in the real-shot image was printed using JAYO PLA Classic, with the following colors:
- Black, White, Cherry Red, Lemon Yellow, Sun Orange, Sakura Pink
- The leaves and the brown color of the eyes in the real-shot model were printed in white, then colored with acrylic markers.
Known Issues
- The supports for the orange are a bit difficult to remove and require some tools.
- The magnets in the hand tend to detach. Other than using glue, no better solution has been found yet.
What Else
- Shapr3D project files and exported STEP files have been uploaded. Everyone is welcome to improve upon them.
- This model is for non-commercial use only. Please use the original link for sharing.
- Need commercial authorization? Please message me.
- For other questions or suggestions, feel free to communicate in the comments section and via private message.
- I just realized I forgot to add the scarf tag…
Follow Joi_Channel thank you nyaa 🍊~

Boost Me (for free)
Thank you thank you thank you, you are so kind you are so kind you are so kind
License
This user content is licensed under a
Creative Commons Attribution-Noncommercial-Share Alike
Comment & Rating (0)