Retro Guinness tap boxlight box No Beer Comes Near


Print Profile(1)
Bill of Materials


- LED NEON light strip, 2m (trim-able) x 1: x 1:
Description
Description
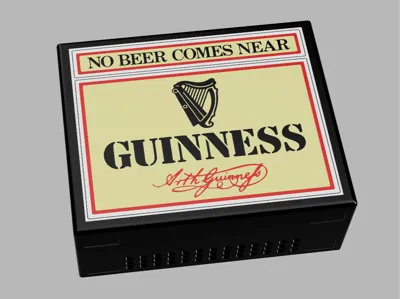
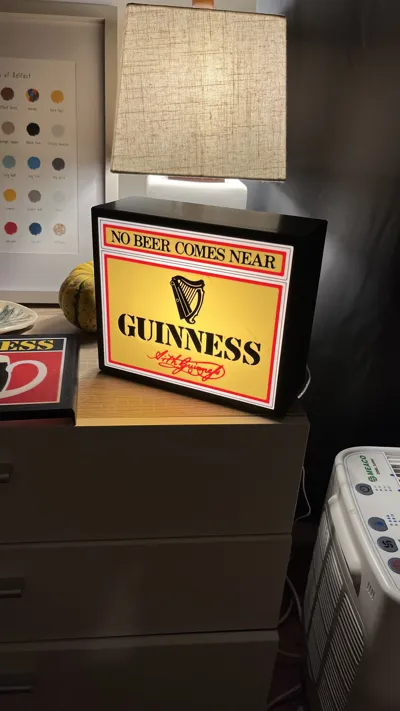
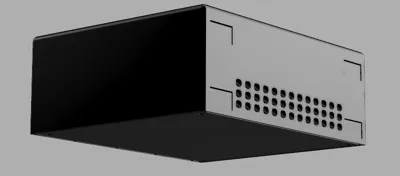
Retro Guinness tap box light box ‘No Beer Comes Near’ version
Guinness is an incredible famous brand with a rich history, unfortunately if you've ever tried to find some of their classic memorabilia you will see this reflected in the price. The classic ‘tap boxs' seen in pubs across the world can cost in to the triple digits, and the 3d models I have come across don't have quite the right look to them.
Cue my economical recreation.
This is the ‘No Beer Comes Near’ version, for the version ‘Classic’, please see my other model here: https://makerworld.com/en/models/2734639-retro-guinness-tap-box-light-box#profileId-3031450
Materials
Depending on the LEDS you choose to use the light box can get warm, therefore a higher temperature material, such as PETG is recommended as a minimum. I used the following materials and found they gave a very good colour match to the original, however if a warm tone of LED is used, I'm sure most similar colours will work. If you wish to use Bambu colours, I've included in the bill of materials, the most similar colours they offer for PETG.
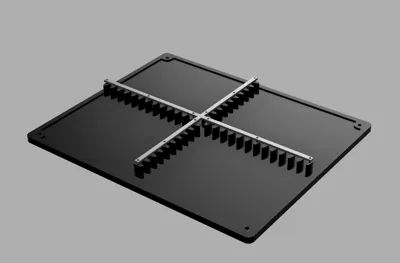
I found a 5v LED strip to be too dim, and a wall plug higher wattage one did the trick, you will need and LED strip that can be cut to length, I used roughly 1.4M of mine, and ideally you want a warm white strip.
- Sunlu PETG - White
- Sunlu PETG - Black
- Elegoo Rapid PETG - Beige
- Esun PETG - Fire Engine Red
- LED Neon light strip - Lamomo COB LED Strip Light, 2M Warm White Dimmable Led Lights Strip with Remote, Flexible Waterproof Silicone Neon Rope Light for Bedroom, Kitchen, Outdoor, 3000K, 24V
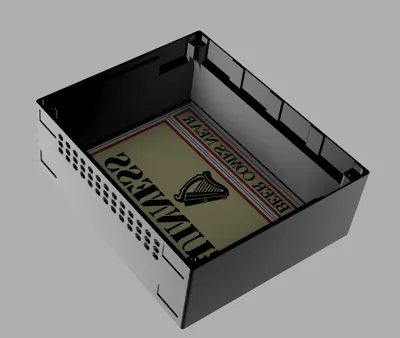
- 4x M3 heat threaded inserts (max insertable depth on body is 8mm)
- 4x M3x10 socket head screws
- 12x M2x8 socket head screws (optional - see assembly instructions)
Print instructions
The colour print sequence for graphic (the first three layers) has been set in the print profile (therefore, ensure to use my print profile for correct results), to run from lightest to darkest and back down again. This reduces the chance of a darker colour mixing in and ruining one of the lighter coloured layers (along with setting purge to maximum).
I found a bed temperature of 70 C worked best, and I used glue stick + textured PEI buildplate.
No supports were needed for this print, with the black Sunlu PETG performing flawlessly for me on the overhangs.
This is a large model, so depending on your set up a slight bit of warping can occur, therefore you may choose to use bed clamps. I didn't use clamps, and the results were still very satisfactory.
Finally, for the LED cable to exit out of the back, I've added a negative modifier with zero walls, and zero infill on the back plate 3d print profile, this can be moved around and modified as you desire to suit your set up.
Assembly
The lightbox is relatively simple to assemble, requiring four M3 heat threaded inserts to be inserted on the main body. Your LED strip should be coiled around the guides on the back plate in a circular motion working outwards, starting with the non-cabled end in the middle. For best results the strip should be on its side with the light portion shining inwards towards the centre. This can then be secured either by using the printed securing cross and the 12 M2 bolts, or by running a piece of thread through the islets that you will find on each guide. I attached the cable connection wire to the back of the backplate using hotglue.
Disclaimer: Please note this is an electrical project and in choosing to construct and use this, you do so at your own risk.
Happy printing!
Any boosts, ratings and comments would be greatly appreciated.
Boost Me (for free)
License
You shall not share, sub-license, sell, rent, host, transfer, or distribute in any way the digital or 3D printed versions of this object, nor any other derivative work of this object in its digital or physical format (including - but not limited to - remixes of this object, and hosting on other digital platforms). The objects may not be used without permission in any way whatsoever in which you charge money, or collect fees.
Comment & Rating (0)