Rotopax Anti-Tamper Device

Print Profile(8)

Description
RAT – Rotopax Anti-Tamper Cap Security Device
Free 3D Printable Model | Version 1.0 | April 2026

WARNING: You need intact factory ratchet cap and ratchet ring on the Rotopax can for this thing to work. No exceptions.
Introduction
There are devices commercially available to secure Rotopax cans, including the mounts with the built-in barrel lock and the Gorilla Clamp (which I personally use), but not much in the way of making the cap resistant to tampering. There's one available (priced at $50 per unit), but it requires you to remove the factory ratchet ring that prevents the cap from loosening from vibration, as well as using tubular locks that are prone to jamming. So I decided to make my own.
My goals were as follows:
- The product needs to utilize the existing hardware included with the factory Rotopax without any modification and/or removal.
- Ability to use padlock of user's choice: The product should be able to use any padlock that is within a certain specification range.
- Minimal requirement for outside material: The majority of the product needs to be 3D printed, with little reliance on commercial components.
- Preserve the ability of the Rotopax cans to be stacked.
After some trials and errors, and then about a month of field testing, I present to you… The Rotopax Anti-Tamper (RAT) Device.
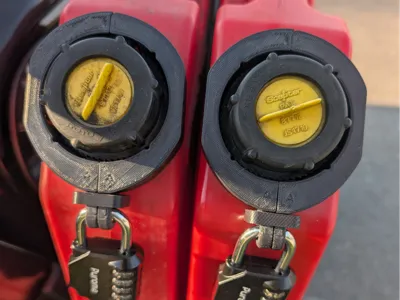
The RAT works by interlocking with the factory anti-vibration ratchet ring and ratchet cap of the Rotopax. This makes the cap impossible to remove unless one resorts to outright destruction.
Think about it--you have an off-road vehicle set up, complete with spare fuel in your Rotopax. You worry that someone will just take it off and steal the thing, so you either utilize the locking Rotopax mount or install the Gorilla Clamp. But what deters someone from just opening the cap with ease to siphon the fuel, or pour something inside to contaminate it?
This device won't stop the determined thief/vandal armed with drills, knives, etc. It will, however, make your Rotopax cans from visually being an easy target of opportunity, and will keep opportunists moving along.
Another consideration is the legal aspect. An unsecured Rotopax cap means fuel theft would be the only potential charge. With the RAT in place, however, a thief would have to damage or destroy the container, the RAT and/or the lock to access the fuel. This could lead to additional charges for vandalism and property damage. It also helps demonstrate that you took reasonable steps to secure your property, which can strengthen your position if any legal issues arise.
(Note: I am not an attorney. This is not legal advice. Please consult a qualified professional if you have any legal questions.)


Models
There are two different sizes of RAT, with each of them having two different options for reinforcing the holes that the shackle is inserted through:
- (A): Tall version, sits flush with the height of the cap, designed to accommodate flanged sleeve bearing, stronger overall
- (B): Tall version, sits flush with the height of the cap, designed to accommodate unflanged sleeve bearing or tube, stronger overall
- (C): Short version, about 2/3 height of the cap, designed to accommodate flanged sleeve bearing, weaker but lower profile
- (D): Short version, about 2/3 height of the cap, designed to accommodate unflanged sleeve bearing or tube, weaker but lower profile

I personally recommend printing this using ASA, especially if you plan for extended or constant exterior use. ASA has good resistance to gasoline and diesel, so occasional exposure won't hurt it, as long as you prevent constant immersion. I printed mine using Inland ASA (rebranded PolyLite ASA). I did test print using Inland PETG Plus (rebranded eSUN PETG), and the print came out good. I also printed these using 0.4mm and 0.6mm nozzles, and both diameters were successful.
You will need to source some additional material to reinforce the holes the lock's shackle is inserted through. If you don't, the hole will eventually elongate/wear out from repeated use.
You also need an appropriately sized padlock. Shackle diameter should be 1/4 inch, with minimum of 3/4 inch gap. I personally use the Puroma combination lock (ASIN: B07Q5MNHMZ) for my application, but you can use any padlock of your choosing as long as you can fit it.

Print Settings
Printer used: Bambu Labs A1 with enclosure
Nozzles used: Bambu Labs A1 0.4mm and 0.6mm hardened
Build plate used: CryoGrip Glacier (Engineering Plate selected in Bambu Studio) with Bambu Labs liquid glue
Filaments used: Inland/PolyMaker PolyLite ASA and Inland PETG Plus
Material: ASA (preferred) or PETG
Nozzle: 0.6mm (preferred) or 0.4mm
Layer height: 0.3mm if using 0.6mm nozzle, 0.2mm if using 0.4mm nozzle
Wall generator: Arachne
Walls: 6 with embedding the wall into the infill
Top surface pattern: Rectilinear
Top shell layers: 5
Top shell thickness: 3mm
Bottom surface pattern: Rectilinear
Bottom shell layers: 5
Bottom shell thickness: 3mm
Internal solid infill pattern: Rectilinear
Sparse infill pattern: Gyroid with infill combination enabled
Sparse infill density: 25%
Supports: Tree (Auto)
Brim: None required
Additional Materials
Depending on the material you can get your hands on, you will need to pick which design to print. Brass is the best choice of material, but polyoxymethylene (POM) is a close second. PTFE tube will also work due to how slick it is, but it doesn't have the durability of brass or POM, and will need to be changed occasionally from wear and tear.
From the most to least desirable material type:
- Brass Dry Unlubricated (DU) PTFE-coated bushing: The best in terms of durability from being a metal and slickness it gets from the PTFE coating.
- Polyoxymethylene (also known as POM and under the trademarked name Delrin): Second only to the DU bushing. Self-lubricating, but not as long-lasting as brass DU bushing as the coating will transfer to object being rubbed against the surface and wear out over time.
- PTFE: Very slippery, but not suitable for extended outdoor usage.
- If you want to use flange sleeve bearings made out of brass or POM, you will need to use (A) for the tall version and (C) for the low profile version.
- Ideal dimensions are 8mm bore, 10mm OD, 1 to 1.2mm flange thickness, and up to 15mm flange diameter.
- Brass is the better choice of material, but POM can also be used. It can also be cut to desired length.
- Amazon ASIN for brass flange sleeve bearing: B0FPBMJX9Q or B0CGDVQY4S
- Amazon ASIN for POM flange sleeve bearing: B0FH2F7GXN or B0FH2SJSQK
POM is very resilient to being cut, so I recommend putting the sleeve bearing into the hole, using a box cutter to cut some grooves into it, and then using a pair of pliers to break it off at the cut grooves.
- If you want to use unflanged material, you can go with (B) or (D) versions. The models for the unflanged material have tiny little lips to prevent the material from slipping out.
- Brass is obviously the best material, but you can also use PTFE tubing in a pinch.
- Amazon ASIN for brass unflanged sleeve bearing: B07SN3RBKW
For PTFE tube, as long as the ID is 8mm and OD is 10mm it should work fine. Just stick some tube into the hole, then use a razor blade or box cutter to cut it to proper length.
- Brass is obviously the best material, but you can also use PTFE tubing in a pinch.

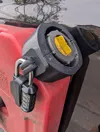
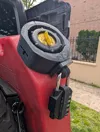
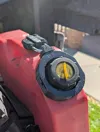
Installation
On the bottom of all RAT models are four lips. The lips need to be placed below the ratchet ring.
Here are pictures and shapes to make it easier to understand:


Final Words
I think this might work with the Scepter fuel cans, but I haven't had an opportunity to test it out.
Hopefully this will provide a small peace of mind for those who leave their Rotopax can(s) attached to their vehicles.
IMPORTANT DISCLAIMER & TERMS OF USE
This 3D printable RAT cap security device for Rotopax containers is provided free of charge and strictly “AS IS” with NO WARRANTIES of any kind, express or implied.
BY DOWNLOADING, PRINTING, OR USING THIS DESIGN YOU AGREE THAT:
- It provides only mild to moderate deterrence against casual tampering, siphoning, or contamination. It will not deter determined criminals willing to damage or destroy the container. No device guarantees complete protection.
- You assume full responsibility for print quality, material choice, testing, proper installation, and compliance with all local laws.
- The creator shall not be liable for any damages, losses, theft, vandalism, injury, or other harm arising from the use, misuse, or failure of the Design or printed device — including actions by third parties. The creator’s total liability is limited to $0 USD.
If you do not agree to these terms, do not download or use this Design.
License
You shall not share, sub-license, sell, rent, host, transfer, or distribute in any way the digital or 3D printed versions of this object, nor any other derivative work of this object in its digital or physical format (including - but not limited to - remixes of this object, and hosting on other digital platforms). The objects may not be used without permission in any way whatsoever in which you charge money, or collect fees.
Comment & Rating (3)