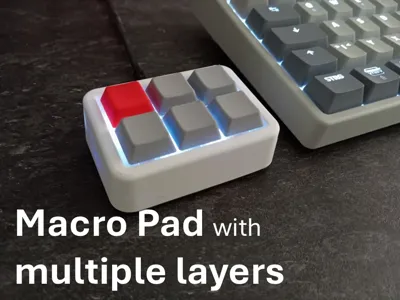
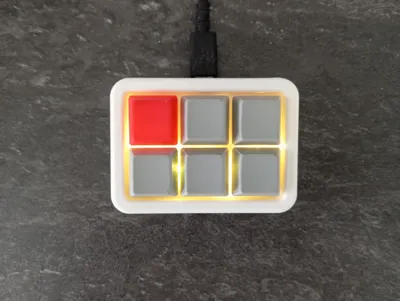
Macro Pad 3x2 Macro Keyboard | multiple layers


Print Profile(1)
Bill of Materials
- solid copper wire x 1: I used soldering wire but I would not recomment it. See step 1.1
- keycaps for mx x 6: printed mine
- esp32-s3 super mini x 1: s3 not c3!! c3 does not support hid
- WS2812 LED strip 5v x 4:
- some wire x 1:
- m3x6mm heat inserts x 4:
- m3x6mm screws x 4:
- mechanical switches mx x 6:
Description
This is my macro pad. It runs on CircuitPython and is powered by an ESP32-S3 Super Mini. You can have multiple layers, switching between them is as easy as pressing the button in the upper left corner. You can edit the code that each layer has its own light.
Changing the buttons is verry easy but if you need help with any of those steps feel free to send me a message or a comment.
Assembly Instructions:
1.0 Build everything:
1.1
Print out every part and melt the heat insterts into the plastic body.
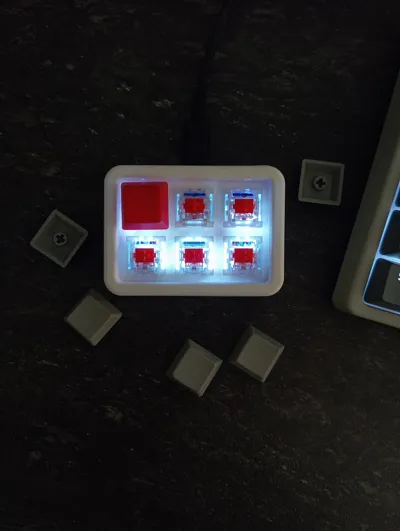
Insert the MX switches into the 3D-printed housing and secure them with hot glue if necessary.
Now connect one big solid copper wire to each pin of the button.
(I used normal soldering wire but I would not recomment it, solid coper wire is the best option.)

1.2
Solder a cable to each switch.

1.3
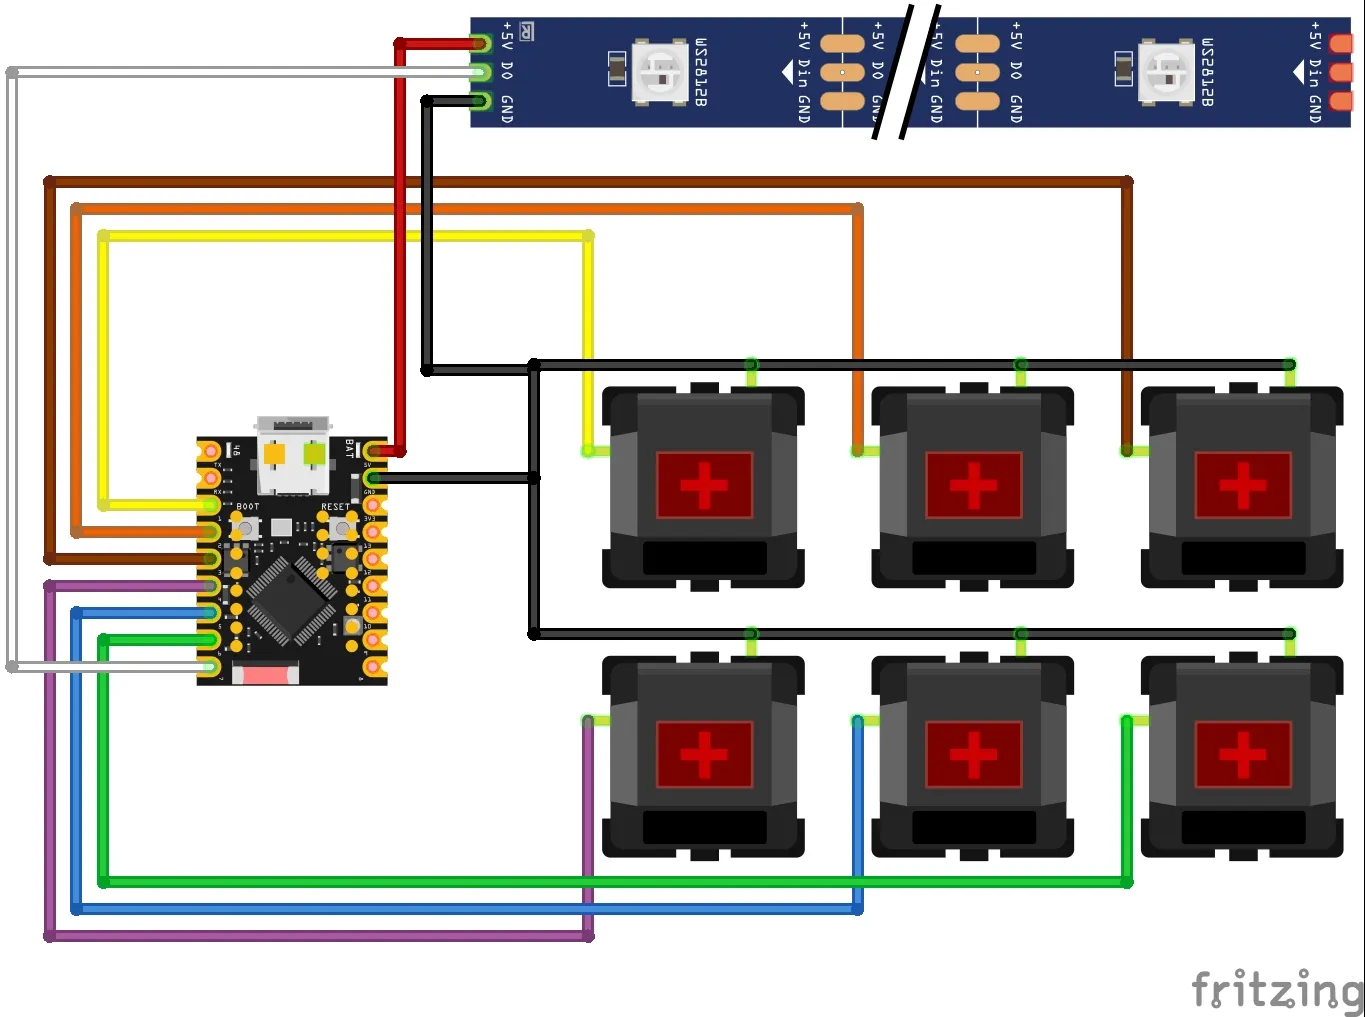
Use a drop of hot glue to attach the ESP and the base. Cut 4 LEDs from a WS2812 LED strip and glue them to the base as shown in the picture.
Now solder everything like in the diagram.

1.4
I highly recommend to put some anti sliding pads under the Macro Pad because the screws might scrub against your table and the overall feel will improve.
1.5
If you printed it out of white filament you might want to add some electrical tape on the inner walls to prevent light leaking out.
The hardest part is now complete!!
2.0 Flash the ESP32-s3 super mini with the official CircuitPython firmware:
2.1
Pick up your ESP32, press the BOOTSEL button, and connect the ESP32 to your PC while continuing to hold down the button. Wait at least 2 seconds, and only then can you release the BOOTSEL button. This makes shure you can flash the firmware onto your ESP32.
2.2
Open the official CircuitPython website, and flash your ESP. The website has very good step by step instructions so I wont go deeper in here.
https://code.circuitpython.org/
Troubleshooting:
If the ESP32 disappears and reappears every second, repeat step 2.1
Now you should see a new drive called "CIRCUITPY"
3.0 Custom Buttons
3.1
Download the “MacroPad.zip” file and extract it.
I had to upload it to my Google Drive here is the link:
https://drive.google.com/file/d/16J8FaDnoWh3g7HPIsaC9tBNlD_BnWS1A/view?usp=sharing
(If there are any problems with the link let me konw)
You will finde a folder called "CIRCUITPY".
Copy and overwrite all the internals onto your CIRCUITPY drive that shows up earlier. Unplug the the MacroPad and plug it back in.

-------------------------------------------------------------------------------
If you just want to build it you dont care about this:
The Code:
If you don't trust people with there google drive scroll all the way down you will find the code there.
For the libraries I used the 10.x:
- adafruit_hid
- adafruit_pixelbuf
- neopixel
https://circuitpython.org/libraries
-------------------------------------------------------------------------------
3.2
You can open up the "code.py" in any editor. I use VS Code.
If you made any changes save and overwrite the code.py and disconnect the MacroPad and plug it back in.
This makes shure alle the code can run properly.
--- Disable Layers ---
you can disable layers by changing the line L[1]_AKTIV to "False"
to anable it just write "True"
--- Change Color ---
you can change the color by edeting the L[2]_COLOR Line to your favourite color.
it is normal RGB it goes from 0-255
--- Change buttons ---
you can change buttons by edeting the Lines with the L[1]_B[1] Lines.

Some Keycodes:
| Keycode | Description |
|---|---|
| Keycode.WINDOWS / Keycode.GUI | Windows Key / Command Key (Mac) |
| Keycode.LEFT_CONTROL | Left Control (Ctrl) |
| Keycode.RIGHT_CONTROL | Right Control (Ctrl) |
| Keycode.LEFT_ALT | Left Alt / Option (Mac) |
| Keycode.RIGHT_ALT | Right Alt / Alt Gr |
| Keycode.LEFT_SHIFT | Left Shift |
| Keycode.APPLICATION | Menu / App Key |
| Keycode.ENTER | Enter / Return |
| Keycode.ESCAPE | Escape (Esc) |
| Keycode.SPACE | Spacebar |
| Keycode.BACKSPACE | Backspace |
| Keycode.DELETE | Delete |
| Keycode.TAB | Tab |
| Keycode.UP_ARROW | Up Arrow |
| Keycode.DOWN_ARROW | Down Arrow |
| Keycode.LEFT_ARROW | Left Arrow |
| Keycode.RIGHT_ARROW | Right Arrow |
| Keycode.HOME | Home |
| Keycode.END | End |
| Keycode.PAGE_UP | Page Up |
| Keycode.PAGE_DOWN | Page Down |
| Keycode.F1 to Keycode.F12 | Function Keys F1 to F12 |
| Keycode.PRINT_SCREEN | Print Screen |
| Keycode.SCROLL_LOCK | Scroll Lock |
| Keycode.PAUSE | Pause / Break |
| Keycode.A to Keycode.Z | Letters A through Z |
| Keycode.ONE to Keycode.ZERO | Numbers 1 through 0 |
[Not Recommented]
Just download the files and the code from my google drive but if you dont want to do that or it dont work here is the Code.
(Feel free to edit the code to your liking and share it in the comments!)
Code:
import board
import digitalio
import usb_hid
import neopixel
import time
import supervisor
from adafruit_hid.keyboard import Keyboard
from adafruit_hid.keycode import Keycode
# =========================================================
# 1. HARDWARE-SETUP
# =========================================================
# Onboard-LED Setup um das blaue Blinken zu stoppen
onboard_pixel = neopixel.NeoPixel(board.IO48, 1)
onboard_pixel.fill((0, 0, 0))
EXT_PIXEL_PIN = board.IO7
NUM_PIXELS = 10
HELLIGKEIT = 0.5
LAYER_PIN = board.IO1
B1_PIN = board.IO2
B2_PIN = board.IO3
B3_PIN = board.IO4
B4_PIN = board.IO5
B5_PIN = board.IO6
# =========================================================
# 2. LAYER-KONFIG
# =========================================================
# --- Disable Layers ---
# you can disable layers by changing the line L[1]_AKTIV to "False"
# to anable it just write "True"
# --- Change Color ---
# you can change the color by edeting the L[2]_COLOR Line to your favourite color.
# it is normal RGB it goes from 0-255
# --- Change buttons ---
# you can change buttons by edeting the Lines with the L[1]_B[1] Lines.
# If you want to look at some keycodes look in the MakerWorld description.
# --- Standart ---
L1_AKTIV = True
L1_COLOR = (80, 200, 255)
L1_B1 = (Keycode.LEFT_CONTROL, Keycode.LEFT_SHIFT, Keycode.M)
L1_B2 = (Keycode.LEFT_CONTROL, Keycode.LEFT_SHIFT, Keycode.D)
L1_B3 = (Keycode.LEFT_CONTROL, Keycode.C)
L1_B4 = (Keycode.LEFT_CONTROL, Keycode.V)
L1_B5 = (Keycode.LEFT_CONTROL, Keycode.A)
# --- Fusion 360 ---
L2_AKTIV = True
L2_COLOR = (255, 107, 0)
L2_B1 = (Keycode.LEFT_CONTROL, Keycode.Y)
L2_B2 = (Keycode.LEFT_CONTROL, Keycode.Z)
L2_B3 = (Keycode.LEFT_SHIFT, Keycode.D)
L2_B4 = Keycode.E
L2_B5 = Keycode.ESCAPE
# --- LAYER 3 ---
L3_AKTIV = False
L3_COLOR = (0, 0, 255)
L3_B1 = Keycode.F1
L3_B2 = Keycode.F2
L3_B3 = Keycode.F3
L3_B4 = Keycode.F4
L3_B5 = Keycode.F5
# --- LAYER 4 ---
L4_AKTIV = False
L4_COLOR = (255, 255, 0)
L4_B1 = Keycode.F6
L4_B2 = Keycode.F7
L4_B3 = Keycode.F8
L4_B4 = Keycode.F9
L4_B5 = Keycode.F10
# --- LAYER 5 ---
L5_AKTIV = False
L5_COLOR = (255, 0, 255)
L5_B1 = Keycode.Q
L5_B2 = Keycode.W
L5_B3 = Keycode.E
L5_B4 = Keycode.R
L5_B5 = Keycode.T
# --- LAYER 6 ---
L6_AKTIV = False
L6_COLOR = (0, 255, 255)
L6_B1 = Keycode.Y
L6_B2 = Keycode.U
L6_B3 = Keycode.I
L6_B4 = Keycode.O
L6_B5 = Keycode.P
# --- LAYER 7 ---
L7_AKTIV = False
L7_COLOR = (255, 127, 0)
L7_B1 = Keycode.Z
L7_B2 = Keycode.X
L7_B3 = Keycode.C
L7_B4 = Keycode.V
L7_B5 = Keycode.B
# --- LAYER 8 ---
L8_AKTIV = False
L8_COLOR = (127, 0, 255)
L8_B1 = Keycode.H
L8_B2 = Keycode.J
L8_B3 = Keycode.K
L8_B4 = Keycode.L
L8_B5 = Keycode.M
# --- LAYER 9 ---
L9_AKTIV = False
L9_COLOR = (0, 255, 127)
L9_B1 = Keycode.N
L9_B2 = Keycode.M
L9_B3 = Keycode.COMMA
L9_B4 = Keycode.PERIOD
L9_B5 = Keycode.FORWARD_SLASH
# --- LAYER 10 ---
L10_AKTIV = False
L10_COLOR = (255, 255, 255)
L10_B1 = Keycode.SPACE
L10_B2 = Keycode.ENTER
L10_B3 = Keycode.BACKSPACE
L10_B4 = Keycode.ESCAPE
L10_B5 = Keycode.TAB
# =========================================================
# 3. LOGIK
# =========================================================
ALL_LAYERS = [
{"active": L1_AKTIV, "color": L1_COLOR, "keys": [L1_B1, L1_B2, L1_B3, L1_B4, L1_B5]},
{"active": L2_AKTIV, "color": L2_COLOR, "keys": [L2_B1, L2_B2, L2_B3, L2_B4, L2_B5]},
{"active": L3_AKTIV, "color": L3_COLOR, "keys": [L3_B1, L3_B2, L3_B3, L3_B4, L3_B5]},
{"active": L4_AKTIV, "color": L4_COLOR, "keys": [L4_B1, L4_B2, L4_B3, L4_B4, L4_B5]},
{"active": L5_AKTIV, "color": L5_COLOR, "keys": [L5_B1, L5_B2, L5_B3, L5_B4, L5_B5]},
{"active": L6_AKTIV, "color": L6_COLOR, "keys": [L6_B1, L6_B2, L6_B3, L6_B4, L6_B5]},
{"active": L7_AKTIV, "color": L7_COLOR, "keys": [L7_B1, L7_B2, L7_B3, L7_B4, L7_B5]},
{"active": L8_AKTIV, "color": L8_COLOR, "keys": [L8_B1, L8_B2, L8_B3, L8_B4, L8_B5]},
{"active": L9_AKTIV, "color": L9_COLOR, "keys": [L9_B1, L9_B2, L9_B3, L9_B4, L9_B5]},
{"active": L10_AKTIV, "color": L10_COLOR, "keys": [L10_B1, L10_B2, L10_B3, L10_B4, L10_B5]},
]
ACTIVE_LAYERS = [l for l in ALL_LAYERS if l["active"]]
def make_pin(p):
io = digitalio.DigitalInOut(p)
io.direction = digitalio.Direction.INPUT
io.pull = digitalio.Pull.UP
return io
switch_btn = make_pin(LAYER_PIN)
btns = [make_pin(B1_PIN), make_pin(B2_PIN), make_pin(B3_PIN), make_pin(B4_PIN), make_pin(B5_PIN)]
kbd = Keyboard(usb_hid.devices)
pixels = neopixel.NeoPixel(EXT_PIXEL_PIN, NUM_PIXELS, brightness=HELLIGKEIT)
curr_idx = 0
last_switch = True
last_states = [True] * 5
led_manuell_an = True
layer_press_time = 0
layer_hold_triggered = False
while True:
# Sleep Mode / PC Off
if not supervisor.runtime.usb_connected:
pixels.fill((0, 0, 0))
onboard_pixel.fill((0, 0, 0))
time.sleep(1)
continue
# Onboard-Pixel Off
onboard_pixel.fill((0, 0, 0))
if led_manuell_an:
pixels.fill(ACTIVE_LAYERS[curr_idx]["color"])
else:
pixels.fill((0, 0, 0))
# Layer button logik
if not switch_btn.value:
if last_switch:
layer_press_time = time.monotonic()
layer_hold_triggered = False
last_switch = False
if not layer_hold_triggered and (time.monotonic() - layer_press_time) >= 3.0:
led_manuell_an = not led_manuell_an
layer_hold_triggered = True
elif switch_btn.value and not last_switch:
if not layer_hold_triggered:
curr_idx = (curr_idx + 1) % len(ACTIVE_LAYERS)
last_switch = True
# Makro button
current_keys = ACTIVE_LAYERS[curr_idx]["keys"]
for i, btn in enumerate(btns):
if not btn.value and last_states[i]:
time.sleep(0.02)
if not btn.value:
k = current_keys[i]
if k is not None:
if isinstance(k, (list, tuple)):
for key in k: kbd.press(key)
else:
kbd.press(k)
last_states[i] = False
elif btn.value and not last_states[i]:
k = current_keys[i]
if k is not None:
if isinstance(k, (list, tuple)):
for key in k: kbd.release(key)
else:
kbd.release(k)
last_states[i] = True
time.sleep(0.01)
[Code end]
If there are any question or mistakes I made let me know in the comments or sende me a message.
Hope you like it!!
Boost Me (for free)
Thanks!!
If you have any questions fell free to send my a massage.
@AgentTropenfish
License
You may create derivative works based on this object, provided that all such derivative works are published exclusively on the MakerWorld platform and include proper attribution to the original creator. You may not share, upload, host, distribute, or publish this object—or any derivative work of this object—on any other digital platform, marketplace, or distribution channel. Commercial use of this object and any derivative works is strictly prohibited. This includes, but is not limited to, selling, renting, sublicensing, or using the object in any context in which you receive monetary compensation or other financial benefits.
Comment & Rating (15)