08 - 15 Honda Accord / Acura TSX Speaker Adapter

Print Profile(1)
Description
08 - 15 Honda Accord / Acura TSX Speaker Adapter
This adapter was originally designed for a 2009 Honda Accord IX (Japan / Europe / Australia), but should fit models made between 2008 - 2015.
I am assuming this will also work for an Acura TSX of the same generation for other regions, but I am not certain, so any feedback is welcome.
This model is designed to work with both the original size speakers and aftermarket 6 ¾" / 17cm speakers.
I used a set of Pioneer TS-G1710F's.
This model includes:
- Speaker Bracket / Adapter
- Top Mount (Replaces original top mount in cases where this is broken / missing)
- Bottom Mount (Two of these are required, replaces the hooks on the original mounting bracket)
A handful of nuts and bolts will also be required. I used:
- 3x M4 nuts (nylocks probably best)
- 3x M4 Bolts ~35mm long or so with a circular head and recessed torx drive
- 4x M4 Bolts ~ 18mm long or so, same circular head and recessed torx drive
- A screwdriver with an appropriate bit matching the head of the bolts
- Some foam or felt (to reduce vibration)
Once the model is printed, you must remove the door card from the vehicle. There are many excellent guides on how to do this available on YouTube. I used this one.
Once your door card is removed, the original speaker must be removed from the door along with its mounting basket. This involves undoing the original top screw and pulling the bottom clips up and away. In my case, it was stuck to the door fairly tight, so I used a small plastic pry tool to pry it away (and broke the clips in the process). Then simply unclip the wiring harness from the speaker (Be careful not to damage this when pulling the speaker out).
Next, if you have a missing / broken original top clip, replace it with the one that you have printed from inside the door. The shallow side should be facing out towards you.
Then in the two bottom slots where the original speaker was hooked on, press in the two printed bottom brackets from inside the door. Again, the shallow side should be facing out towards you.
Next, add some felt / foam padding to the rear of the printed speaker bracket in the spots where it will contact the door. I used some 5mm foam pads with a sticky back designed for furniture feet, but pretty much anything that's soft will do in a pinch.
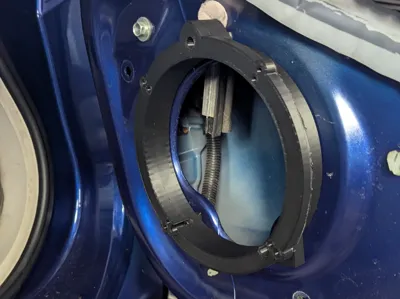
Next, line up the main speaker bracket with the holes in the top / bottom mounts. Then push through your long M4 bolts and tighten up the nuts on the opposite end. this can be a bit fiddly, but I found you can get a small pliers in there easily enough to hold the nut while you tighten.
Once you are happy that the mounting bracket is good and tight against the door it is time to install the speaker. DO NOT FORGET to connect your new speaker up to the wiring harness before mounting. You can either:
cut up the original harness and install a pair of female spade connectors
or
- cut the plug off the old speaker and just connect your new speaker up to that, saving the original harness.
Next, line up the mounting holes in your new speaker with those in the printed mounting bracket. I just threaded my bolts straight into the plastic mount, but a better idea might be to use a heat-press threaded insert or a longer set of bolts and some nuts.
And that's it!
Please feel free to comment any suggestions, I am aware there are some issues with the ease of install of this design, but it seems to be working fine for now. I will eventually have a look into a new and improved design whenever I decide to replace the back door speakers & your feedback would be valued.
Please also feel free to modify & re-upload this design if you have any ideas for improvements / compatibility with other vehicles.
Comment & Rating (1)