Search models, users, collections, and posts

M12 | Shotgun Prop

Print Profile(3)

All
X1 Carbon
P1S
X2D
H2D Pro
H2S
H2C
X1E
P1P
A1
H2D
P2S
X1
A2L
A1 mini

Default Profile
Default Profile
Designer
60.3 h
8 plates
4.0(1)

Stock, Ergonomic
Stock, Ergonomic
Designer
13.9 h
2 plates

12 gauge, 2-3/4" shell, inert
Designer
4.7 h
4 plates

Open in Bambu Studio
Boost
213
463
73
18
199
21
Released 

Bill of Materials

Bambu Filaments
Select all
Red (10200) / Filament with spool / 1kg
Gold (13405) / Filament with spool / 1 kg
Black (10101) / Filament with spool / 1kg
List other parts
  • M3 Circlip (Optional) x 2:
  • M2x8mm Self-tapping SHCS x 1:
  • M4x8mm Self-tapping SHCS x 7:
  • M4x25mm SHCS x 1:
  • M4x30mm SHCS x 1:
  • M4x35mm SHCS x 1:
  • M4x10mm FHCS x 2:
  • 2.5x45mm Steel Pin x 1:
  • 2x10x0.3mm - Shell Release Arm Spring x 1:
  • 3x10x0.6mm - Safety Selector Spring x 1:
  • 4x5x0.6mm - Extractor Spring x 1:
  • 4x15x0.6mm Spring - Trigger/Hammer x 2:
  • 4x40x0.6mm Spring - Lifter Arm Spring x 1:
  • 7x5x0.6mm - Shell Interruptor Spring x 1:
  • 12x210x1mm - Action Spring x 1:

Description

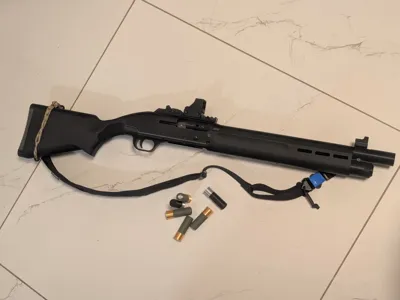
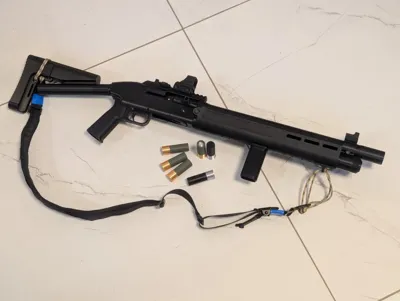
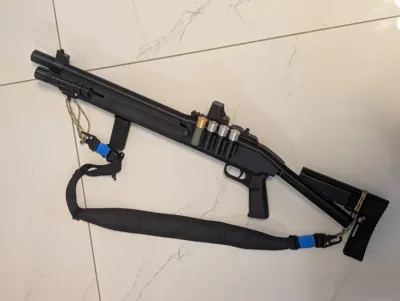
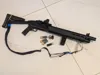
Introducing the M12: a new, fairly modular 12 gauge shotgun. Combining with highly detailed parts and functional assembly, this models offers the experience of handling a weapon and shotgun building experience.

This model consists of 83 individual components, providing realistic detail and rewarding assembly process. Be it for cosplay, a prop collection, or just funsies, the M12 offers an authentic and well built system.

Boost Me (for free)

A token of appreciation if you like this model 🎖️🏆

Membership

This is a way to support my work, to help me continue creating more models, and allow you to make adaptations of your own Your support is a tremendous push to keep doing what I enjoy most and share my efforts with you.

Join


- Features -

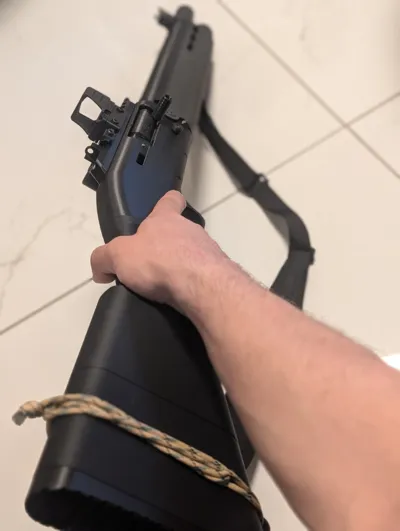
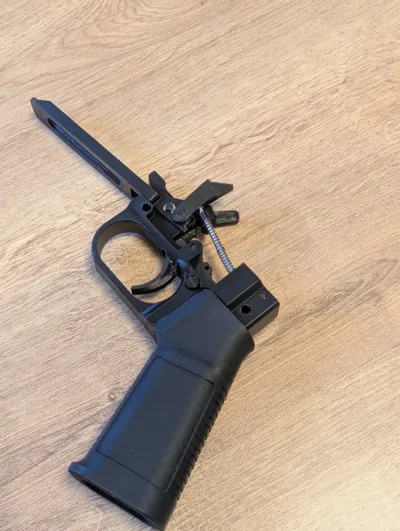
Modular design: featuring replaceable firing unit, forend, barrel and more
Functional Mechanisms:

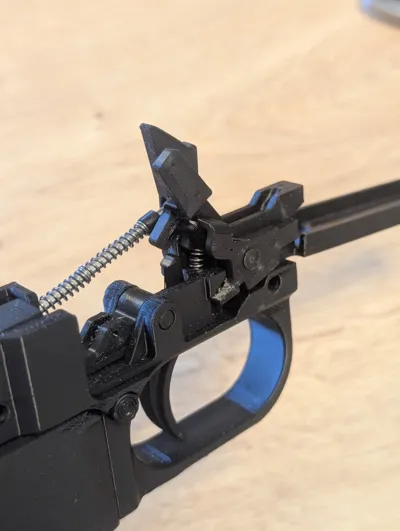
  • Actuated safety switch, trigger and hammer
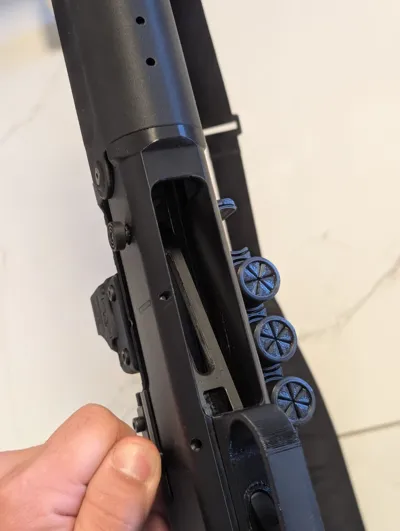
  • Reciprocating bolt and shell lifter
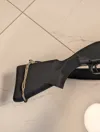
  • Swappable buttstock pads
  • Compatibility with underbarrel mounting
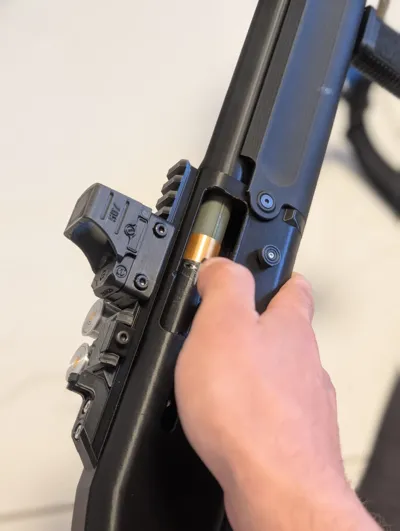
  • Chambering and extraction (manual load only)

Safety Features:

  • Plugged (solid) barrel and magazine tube
  • No firing pin channel (or space for it)
  • No channel for striking hammer
  • Hammer is used for audible and tactile feeback only

Customization:

The model is highly customizable with all parts replaceable, including the receiver, barrel and magazine tube, handgrip, sights, forend and more, to truly allow you to make this shotgun your own.

Attachments and upgrades, such as dummy red dot sights, flashlights and more are available HERE, expanding the possibilities of your build.


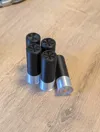
12 gauge shells included: comes with inert 12 gauge 2-ž" ammunition
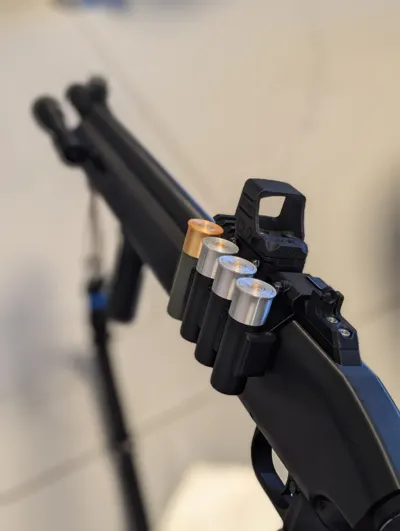
Accessories: comes with a fixed iron sights, a picatinny mounted shell carrier and a sling mount


- Instructions -

Assembly and Fitting:

Required tools:

  • S1.5/2.5/3 Hex Key
  • Pliers/7mm Socket
  • 2-150mm Steel Punch
  • Mallet/Hammer

Required consumables:

  • Acrylate glue/2-part epoxy

Included step-by-step instruction for all modules. Easy to follow, full of visual ques and text instructions.
Compatibility:
Compatible with 2-½" up to 3" 12 gauge shells that meet the SAAPI dimnesional specifications
Compatible with picatinny rail and M-LOK accessories


- Support -

Contact:
If you encounter any issues with printing, assembly, etc., please leave a comment below or email me at: vissidus@gmail.com
-or join my discord channel
I'll do my best to help you resolve any and all issues I can

If you've printed the model and enjoyed playing with it, a follow and a like would be greatly appreciated!


Disclaimer: the Author assumes no responsibility or liability for any misuse and damage caused by the contents of this publication. The model and individual parts contained in this publication are not intended to be used to perpetrate any illegal activity.
Under no circumstances shall the Author of this model and publication be liable for any alterations made to the contents of this publication by any party aimed to construct a firearm.


Documentation (7)

Assembly Guide (7)
Firing Unit - Assembly Guide.pdf
Barrel Magazine Tube - Assembly Guide.pdf
Bolt - Assembly Guide.pdf
Buttstock - Assembly Guide.pdf
Forend - Assembly Guide.pdf
Receiver - Assembly Guide.pdf
Actuator Arm Rod - Assembly Guide.pdf

Comment & Rating (73)

(0/1000)

I had the FOREND Part 1 fail (fall) around 3-4 hours in and only picked up hours later (lots of spaghetti :( ), so trying do them separately and added some more forced supports to hopefully keep them up. I can't seem to find all the parts that go into the Actuator Arm Rod, are they present in the current model?
(Edited)
The designer has replied
0
Reply
The actuator arm rod is a steel shaft that is bought, it's both too short and too thin to be printable and hold itself against the pressure of the springs. That being said, if you don't care about the lifter interacting with the bolt (lifting shells when chambering) or being spring loaded (returning to the 'down' position), it's not required The only part printed for the rod is a bushing that is glued onto the shaft and acts as a linear limiter, which is found in the default profile.
0
Reply
Replying to @Vissidus :
ah okay. Great modeling, but unfortunately the print profiles aren't ideal. No brim on large tall objects (PLATE 1), is just wasteful and prone to failure. Had it fall at the 3.5 hour mark of a 4 hour print, and then take out the other. PLATE 4 with the large object and minimal plate point prone to failure, had that fail 4 hours in of a 11 hour print. PLATE 6 bolt charge handle set to the small point and not the opposite, prone to failure (failed in my print) and then PLATE 7 and no brim and lots of high activity and log print time of the small plate base resulted in failure. Most of those would be solved with a better bed brim or base for the object to be more secure during long prints. I've wasted at least 300-400g of filament on multiple print failures at long periods into a print. Sadly I guess I'll need to cut my losses, I don't have another 19 hours and 425g of filament, with the chance of all failures again.
(Edited)
0
Reply
Replying to @Rumbaar :
As noted in the printing profile description, it's been tested on an X1C with specific environment, chamber parameters and material. Your mileage may vary depending on different settings, which is something you need to account for, especially after experiencing failure. Unless you're printing enclosed, even the P1s will require modifications. I'm sorry you had multiple failures on some of the parts, but the choice of orientation stems not only from printing standpoint but from assembly and post processing considerations as well.
(Edited)
0
Reply
Do you have plan for a full-stock attachment? Btw nice model again.
The designer has replied
designer
2
Reply
What do you mean by a "full-stock attachment"?
0
Reply
Replying to @Vissidus :
Something like this. Idk what it's called.
2
Reply
Replying to @BouncingBall :
Um, yea, that's possible
2
Reply
Would it be acceptable to replace the M4×25 and M4×35 screws with M4×30 screws instead?
The designer has replied
1
Reply
I'll update the BOM after comparing against the parts, there's probably a mistake, 25s don't sound right I'll update with another comment when it's done
0
Reply
Replying to @Vissidus :
ok thank you
0
Reply
Replying to @user_1405874875 :
I've reviewed the model, and the screws are as follows: The M4x25mm is for the handgrip only, and the screw is behind the trigger and there isn't enough space for anything longer than 25mm. If need be, you can print a spacer for the screw (like a washer) and use a 30mm or 35mm screw with the spacer as is. The 35mm can be replaced with a 30mm screw if the charging handle extension is modified, but the current length is what I found around the minimum what I'd say is comfortable to interact with.
(Edited)
0
Reply
Are all the parts movable or are they exact replicas?
The designer has replied
0
Reply
Some parts are moveable (trigger, safety, hammer, bolt, shell interruptor, shell lifter) They just don't have any function behind them due to raised safety regulations It's not a replica as it is my own design
1
Reply
Replying to @Vissidus :
thanks It would be great if you could also make a short pump version using the Wire method.
0
Reply
Replying to @bigzed :
Not sure what you mean by "wire method", but it's in the works
0
Reply
hey vissidus what hapened to the 2k11 c2 model did you take it down or the makerworld took it down
The designer has replied
1
Reply
Revoked by MakerWorld, unfortunately. I'm reworking the models in hopes the new revision is compliant with the guidelines which, also unfortunately, provide no clear criteria as to what is allowed and what is forbidden.
0
Reply
Replying to @Vissidus :
I really want the 2k11 model. Can you send me a copy?
0
Reply
Replying to @FGa114514 :
It's available on my discord server for now
0
Reply
I’m working at the world shooting center in Illinois and I have seen one but with wood furniture and this model is is exactly like it
The designer has replied
designer
2
Reply
Would've be awesome if you could upload a picture of the one at the complex
0
Reply
if I see it again I will
0
Reply
well I think it was one it looked very similar
0
Reply
Print Profile
Default Profile
Great model design, but have a number of changes I'd suggest for anyone printing this on a P2S or in general. To avoid higher risk for print failures. Plate 1: Rotate 180 degree the Magazine Tube Part 1, and enable tree supports. Which will hardish to remove, but I had that fail twice at the top thread in original setup Plate 4: As it's set to 100% infill, and had failure of FOREND Part 1, I rotated them to flat straight up, and still had a failure in the last 30 layers, but used as is. You'll get print artifacts at the minimum section throughout that part in either config (flat or ~45 degree) Plate 6: Swap the BOLT charger handle 180 degree so the larger section is on the plate, as had it fall over with the small end on the bed. Plate 7: Had the Handgrip failed twice, and had to swap it to have the bottom to the bed. Most of the failures were at the fuzzy edge and infill knocking it over.
0
Reply
Congrats to 2.5k followers🥳🥳
The designer has replied
designer
3
Reply
Thank you 🥳
1
Reply
Replying to @Vissidus :
you're welcome. looking forward to seeing more models from you
1
Reply
could you make a Winchester model 1897 please and it’s okay if you really don’t want to make one
The designer has replied
0
Reply
I'm not a fan of these really old repeating arms, so most likely not, seeing there's already a great one available for download
(Edited)
0
Reply
thanks
0
Reply
the only ones I found can’t be loaded or shell eject by it’s okay I can make it work
0
Reply
Boosted
Thank you just finished printing and came out perfect
The designer has replied
designer
1
Reply
Cheers, thank you for the feedback! Hope to see some photos as well
0
Reply
Boosted
Replying to @Vissidus :
Just waiting for the springs
0
Reply
Did you print as is, from the default profile, and no print failures? What printer you using?
0
Reply

License

If you want to use this model commercially, please join my membership.
Join Now
This user content is licensed under the MakerWorld Exclusive License.

You may create derivative works based on this object, provided that all such derivative works are published exclusively on the MakerWorld platform and include proper attribution to the original creator. You may not share, upload, host, distribute, or publish this object—or any derivative work of this object—on any other digital platform, marketplace, or distribution channel. Commercial use of this object and any derivative works is strictly prohibited. This includes, but is not limited to, selling, renting, sublicensing, or using the object in any context in which you receive monetary compensation or other financial benefits.