Secret Safe - Socrates


Print Profile(1)
Bill of Materials


Description
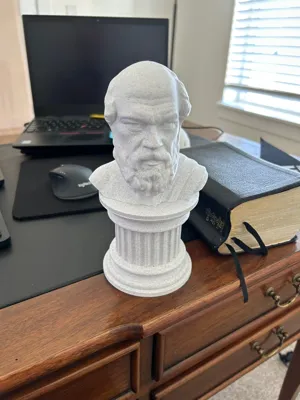
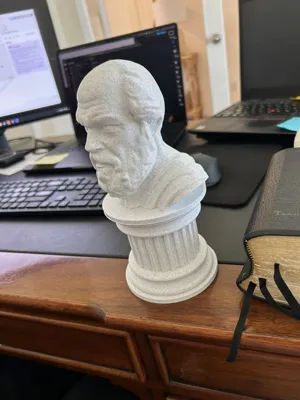
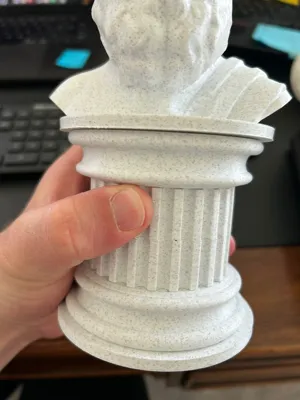
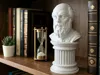
The Philosopher's Secret - Socrates Secret Safe
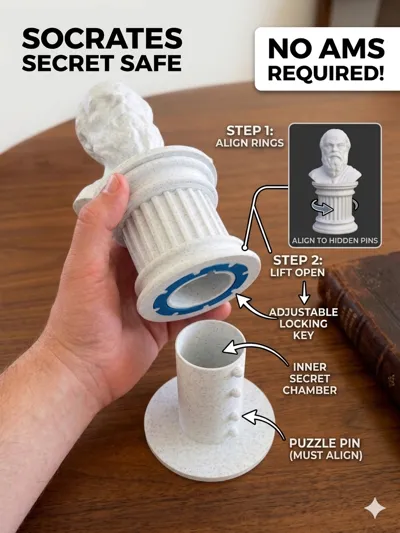
This bust with plinth serve as a clean, sophisticated desktop ornament or conversation piece, doubling as a clever "secret safe" or gift box. Keep small treasures, keys, or jewelry secure inside its hidden chamber. The best part is showing off the alignment of the disguised code rings to reveal what's inside.
Features:
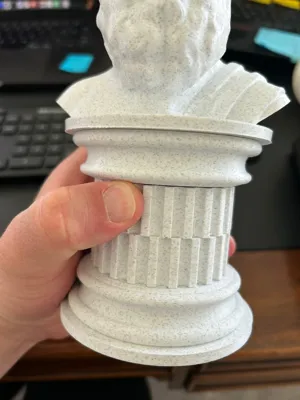
- Aesthetic Appeal: Modeled as a classic philosopher's bust (reminiscent of Socrates) resting on a beautifully fluted and geared column.
- Customization: The provided Socrates bust was generated using the Make My Statue feature in MakerLab (which appears to have had a recent update). Feel free to use your own custom bust. All it takes is a hollow space near the bottom filled in with a 3mm plate and negative of the connector piece included in the 3mf. If you need help, feel free to comment or DM me.
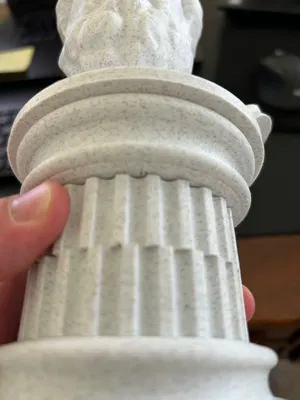
- Code-Based Lock: The outer column sections feature miniscule Greek characters that can be selected in different combinations during assembly for custom codes. Once assembled, only correctly aligning the rings to match your code will unlock the central chamber.
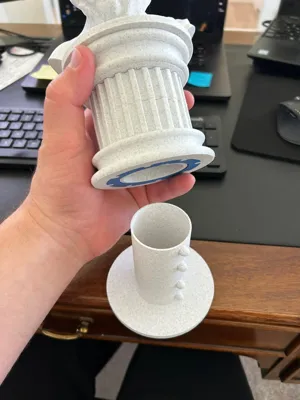
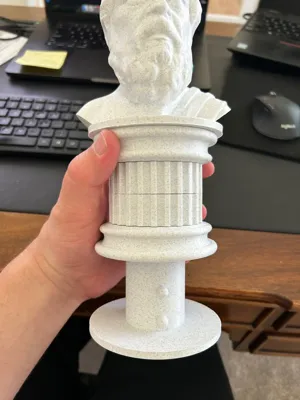
- Hidden Chamber: An inner cylinder contains a decent sized storage compartment to conceal whatever fun surprises you can fit.
Assembly & Alignment:
The design utilizes a pretty common locking mechanism adapted to disguise the spinning rings and hide the characters of the code. Assembly is straightforward based on the printed components:
The Plinth
Prep: There are a lot of flat round pieces in this print. Please be sure to clean your build plate ahead of time because even subtle warping can give away the disguise of the plinth rings and tip off guests. The code rings do print with supports to enable a smooth outer finish and ensure that the final assembly isn't revealed in this way.

The supports should NOT need to be meticulously processed to get a good fit with the inner key rings. If you make sure all of the big pieces are taken care of there should be enough tolerance for the key rings to snap into place.Combine Mechanics: Press the alternately colored (mine are blue) inner notched key rings into their corresponding outer code rings. Whichever letter the inner cutout on the key ring points to on the outer ring is the character that will make up that sequence of the final code combination.

Choose wisely. The key rings are not easy to get out once snapped into place. There are two of each kind of ring and the direction does not matter when snapping in the rings.
Assemble Plinth: Press each assembled ring over the outer sleeve of the plinth.

They should align snugly but check to make sure the two column rings (geared) are places with their characters facing each other.

This is important.
Secure and Close: Once all rings are stacked, align the code you have chosen and simply insert the inner sleeve/chamber.

You should then be able to rotate any of the ring assemblies freely. If they do not spin or are jammed, remove the inner sleeve and ensure that the two inner most rings (geared) are facing each other.
Enjoy: Set the top philosopher bust in place, rotate the rings to randomize, and align the geared sections to let the space between them blend into the marble texture of the plastic.

The bust
Choose one of the two available permanent connectors and snap it into the underside of the bust. This part SHOULD flex in easily without stressing the plastic.

Carefully align BOTH of the connector arms just inside the appropriate slots on your plinth (take care on which direction you face your bust if that matters to you). You need to push straight down fast so that both arms flex equally and you don't stress or break the connector as you connect the bust with the plinth.

If you break the connector, don't worry. The connector is printed as a cheap solo part so that you don't have to reprint the entire bust or plinth sleeve. (BTW if you have a better printable method for joining two flat pieces permanently LMK). Pull the connector out with some pliers and grab the other connector piece to try again. If you decide to swap out the bust later on too, just break it off the top of the plinth. Again, the connector pieces are easily replaceable.

Boost Me (for free)
Want to see more secret vaults? Drop me a boost and an idea!
I enjoy designing but I am fully aware that my models could be improved. If you have trouble with this or any of my designs, please include feedback with your ratings so I know what to work on. If you really like this design and want to see more like it, please reach out and let me know what you'd like to see! I love reading comments!
Boost Me (for free)
If I get enough credit for a multi-color native printer I'd love to start pushing out some multi-color profiles. Your boosts help me get there!
License
You may create derivative works based on this object, provided that all such derivative works are published exclusively on the MakerWorld platform and include proper attribution to the original creator. You may not share, upload, host, distribute, or publish this object—or any derivative work of this object—on any other digital platform, marketplace, or distribution channel. Commercial use of this object and any derivative works is strictly prohibited. This includes, but is not limited to, selling, renting, sublicensing, or using the object in any context in which you receive monetary compensation or other financial benefits.
Comment & Rating (4)