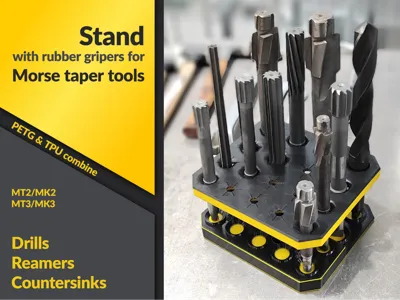
Stand with rubber grips for Morse taper tools


Print Profile(1)
Description
Boost Me (for free)
If you would like to support me, feel free to give me a boost! Thanks!
Thanks for your interest in this model!
Check out my other model of a milling cutter holder stand!

DESCRIPTION
A rack with rubber grips for reamers, countersinks and drill bits fitted with Morse taper - MT2 and MT3. The organiser is designed to keep large tools tidy, ensure they are easily accessible and visible, and, above all, prevent the tool blades from knocking against each other (which could lead to faster wear and blunting).
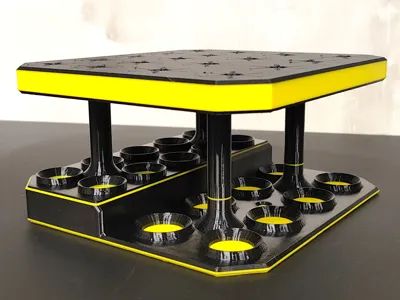
The stand consists of two parts – a base with columns and an upper shelf for holding tools. The upper part is the most interesting feature here, as it is a thick PETG sheet fused during printing with a thin layer of TPU. The stand has two rows of holes of different diameters (30 and 35 mm), designed to fit MT2 and MT3 Morse taper sizes. The holes are partially covered by rubber grips, which allow a tool with a shank diameter much smaller than the hole diameter to be placed in a given hole, whilst the tool will still stand upright.
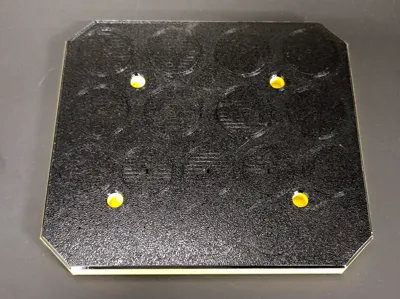
The lower base features “cups” that restrict the movement of the tool tip to prevent it from tilting too much once inserted. The “cups” also come in two sizes (adapted to Morse taper sizes). The lower level is designed for MT3, and the upper for MT2 (raised for easier tool removal). The base also features two holes for screwing the stand to a worktop or shelf. However, this is not necessary – the stand stands on its own.
Printing the base is straightforward and requires no special measures or supports.
Just remember to print it in PETG, as the columns connecting to the top section feature ‘lock’ elements that need to flex during assembly before springing back into place. PLA, rather than bending, could snap, as it is stiffer than PETG.
Sure, you can try PLA, but just in case, remember what I told you ;-)

Printing the upper section is an interesting experience if you’ve never printed anything with TPU before, let alone had the chance to combine it with PETG in a print.
Here, too, you must use PETG, as it bonds with TPU to form a virtually unbreakable bond. PLA bonds very poorly with TPU.
If you have TPU compatible with AMS printing, you can use it for this print; however, I’m concerned that this type of rubber will be too stiff after printing for the model to function properly. I recommend printing this part using an external filament feeder, switching from PETG to TPU during a pause. I used TPU with a hardness of 85A.
When applying the first layer of TPU to PETG, it may seem like it’s not going very well - that the rubber isn’t adhering exactly where it should, and the lines aren’t precise. However, be patient and don’t panic. As you apply subsequent layers, you’ll see that everything is fine and it will ultimately turn out exactly as it should.
 |  |  |  |
TPU prints slowly, and this 2-mm-thick rubber surface takes just as long to print as 66% of the time it takes to print a 15-mm-thick PETG substrate. So please be patient :-)
MONTAGE
Before assembly, you need to remove the supports from the holes beneath the TPU layer on the top tray. Press firmly with your thumb on the TPU layer, and the PETG discs should pop out of the holes on their own.
 |  |  |  |
IMPORTANT! If you plan to screw the stand to a tabletop or shelf, do so before assembling the two parts together. Once assembled, accessing the mounting holes will be very difficult. It is possible to disassemble the model again, but it may be troublesome and carries the risk of breaking the locks.
Next, align the columns on the base with the holes in the top tray. Make sure they line up properly - they cannot be assembled the wrong way around. Next, tap the top tray lightly with your fist in the areas where the columns are located underneath, pressing it down onto the columns until you feel distinct resistance. The locks should snap into place, and the assembly is now complete.
 |  |
Now the tool rack is ready, and you can start putting your tools in it. Enjoy! :-)

If you are having problems with the ANY model sticking to the table during printing, check what you can do:
- Make sure the plate is clean, degreased and dry. If necessary, wash it under warm water with soap/dishwashing liquid and dry it thoroughly with a paper towel.
- You can use special plates with increased adhesive properties, such as Bambu Plate SuperTack or CryoGrip, which will not only give you peace of mind about the success of your print, but also allow you to print at much lower bed temperatures.
- Apply a brim around the model (OTHER tab in Bambu Studio).
- Use a special printing adhesive or even just a regular paper glue stick, which also increases adhesion.
- In extreme cases, you can use spray hair gel (e.g. Hegron), but remember that it is difficult to remove from the plate afterwards to clean it - technical acetone and a spatula/scraper are very helpful.
If you need help with this print or have a fitting issue that cannot be solved simply by scaling the model, let me know in the comments. I will definitely get back to you :-)
License
You may create derivative works based on this object, provided that all such derivative works are published exclusively on the MakerWorld platform and include proper attribution to the original creator. You may not share, upload, host, distribute, or publish this object—or any derivative work of this object—on any other digital platform, marketplace, or distribution channel. Commercial use of this object and any derivative works is strictly prohibited. This includes, but is not limited to, selling, renting, sublicensing, or using the object in any context in which you receive monetary compensation or other financial benefits.
Comment & Rating (0)