Search models, users, collections, and posts

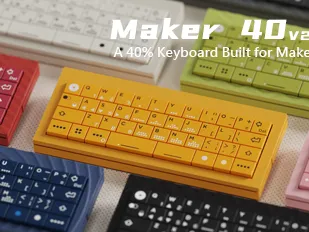
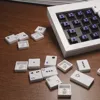
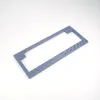
Maker40 V2 3D printed 40% mechanical keyboard

Print Profile(7)

All
P1P
X1E
P1S
H2D Pro
A1
X1
H2C
X1 Carbon
X2D
H2D
H2S
P2S
A2L
A1 mini

Maker40  keycaps  with/without ams  including all options
Maker40 keycaps with/without ams including all options
Designer
24 h
9 plates
5.0(1)

0.2mm layer, 2 walls, 15% infill
Designer
17 min
1 plate

0.1mm layer, 3 walls, 15% infill  Dual PCB Design
0.1mm layer, 3 walls, 15% infill Dual PCB Design
Designer
19.8 h
4 plates

0.1mm layer, 2 walls, 15% infill  Textured top panel
0.1mm layer, 2 walls, 15% infill Textured top panel
Designer
33.7 h
8 plates
Click to see more

25
47
123
0
131
89
Released 

Description

20260428 update: 

The issue with the keyboard plate has been rectified.

20260511 update:

Fixed several known file bugs and updated the tutorial for the dual PCB solution.


Please note the following points:


 1. Although most tests on the V2 model have been completed, the model may still contain defects. You may send your feedback to info@Xtia.design. The design team will continue to optimize the project. 

2. In the future, we may partially open-source the STL files (to facilitate project iteration and allow community designers to share slicing experiences with different materials and models). After all, the main cost of crowdfunding goes to hardware, and the PCB and STL print files cannot function independently. 

3. XTIA will continue to support the MAKER 40 project for at least 6 months, so you do not need to worry about the model being unmaintained. 


Some known points for attention: 

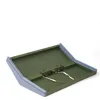
-Please refer to the slicing examples for the model printing orientation. - If the keycaps are difficult to assemble, you may reduce the printing flow rate (increase assembly clearance). 

-Supports are not required for the magnet mounting holes in any orientation; avoid generating supports inside the holes. - Print dimensions are strictly optimized for the P1 series.

 - Select support types according to all reference slicing examples to prevent printing failures caused by supports exceeding the print area.


Documentation (1)

Other Files (1)
Request for Address Collection.txt

Comment & Rating (123)

(0/1000)

Love the design. Sound profile is great, prints beautifully once set up, and assembly is straightforward. A few bits of feedback: Plate holes are rotated slightly clockwise. Not a dealbreaker, but perfect alignment would really nail the aesthetics. Switch cutouts are snug. I ended up seating all switches into the plate first before pressing into the PCB. Not terrible, but requires patience. The top plate sits well with the magnets, but some alignment tabs with the case would help keep it perfectly steady once placed. Importing the profiles brings everything in as a single part -- you have to split manually, and some components don't play nice with auto-alignment after that. Most importantly: via/vial connection doesn't seem to be working. Can't remap keys or adjust RGB in its current state. Would love to see this addressed. It is kind of the whole point of a configurable board. Overall still a solid build. Hope to see these things sorted in a future revision.
The designer has replied
1
Reply
VIA needs to import the JSON file. VIAL has passed rigorous testing and works directly out of the box. The design team will work overtime over the weekend to resolve other remaining issues.
0
Reply
Replying to @XTIA :
I will double check VIAL in the morning my time. Very possible it was a hub/port bug! As for VIA, happy to help test/debug. Hit me up if needed.
0
Reply
Replying to @XTIA :
Vial doesn't work for me either. I tried both the native and web versions and they can't detect the keyboard.
0
Reply
Print Profile
0.16mm layer, 2 walls, 15% infill
The 5 stars is ONLY for Richysss print profile. Thank you @Richysss. The profile should have been provided from the outset by XTIA, but I'll get to that later. I used Eryone PLA Burnt Titanium blue for the base for it's colour and glittery sparkle. The top plate and keys were CookieCAD PLA Pale Pink Elixir. This filament looks amazing with a salmon pink colour, an iridescent mother of pearl sheen, and sparkling glitter throughout. i used a spectrum effect smooth plate for the top plate and also used a 0.2mm nozzle for the keys. The abrasive glitter meant that I sacrificed a 0.2mm nozzle to get the keys to come out nicely, but it was worth it. I decided to make a single PCB keyboard using the dual-PCB base so I have the option to switch up to a dual-keyboard at a later date. The assembly was easy enough to follow once the video was uploaded. I've not had the chance to sort out the VIA/VIA-L/firmware stuff yet but I'll be looking into that in the coming days.
GIF
2
Reply
I have a lot of criticism to make about this crowdfunded project. This is the second project I've pledged for and I know there are some limitations regarding pledges and linking them with a member's profile, so I don't blame XTIA for asking for personal info via email. What I find to be a problem is the apparent lack of prior preparation so that the pledges could hit the ground printing 30 days after the end of the crowdfunding. Not only were the models in an unfinished/untested state, but they had obvious issues that should have been spotted before upload. Like the squares of the keyplate not being straight. Like the dual-PCB design not getting uploaded until a week later. Like no print profiles made available for easy printing from Bambu Studio or Bambu Handy. I'm going to expand on this last point.
0
Reply
Replying to @ZenithUK :
XTIA, you ran a crowdfund project on Makerworld, a model catalogue run by Bambu Lab for Bambu Lab printers. Simply providing the model STL files and expecting everyone to prepare them for printing on their own printer isn't good enough! You should have provided fully tested model PROFILES with appropriate orientation, painted supports, brims, speeds etc. I use Bambu Studio and have some printing experience so I can take the models and modify the settings. Plenty of people only use Bambu Handy so they wouldn't have the capability to modify and print STL files properly. They would be reliant on good quality model profiles to print off from the mobile app. It used to be that 3D printing was an enthusiast activity and you could expect operators to have technical knowledge. Bambu Lab have commoditised 3D printing by marketing printers that don't require deep technical knowledge to operate and automate a large part of the printout workflow.
0
Reply
Replying to @ZenithUK :
Bambu Lab have built a whole ecosystem of printers, filament, accessories and models that ordinary folks can participate with. XTIA, I think you looked upon crowdfunding as a way to drive some sales of your keyboard hardware and only provided a token effort to provide the model files. If I sound negative it is because I feel this project was poorly executed compared to my previous keyboard crowdfunded project. I'm not a novice at either mechanical keyboards nor 3D printing, but I expected a lot more polish and effort on the part of the creator to provide the deliverables in a format that are accessible to a larger majority of the project backers. So I thank you for my beautiful keyboard, but I won't be recommending your kit to anyone else. I wasn't expecting Ducky or Keychron quality for the hardware but I was expecting more support with finished and complete printing profiles.
0
Reply
WHY
The designer has replied
0
Reply
I don't quite understand. We have received customer reports regarding misaligned keycap stems, and we are currently investigating the issue.
0
Reply
Replying to @XTIA :
The M,N,B,V,C,X,Z keycaps have a missing first layer on the letter itself
0
Reply
Replying to @Richysss :
That a customers print profile. paint the white deeper, use a smaller nozzle, or/and enable arachne wall generator. it doesnt show white there because the lines are too thin
0
Reply
Has been printing great so far but I am having a problem with Dual-PCB keycaps. It appears that the "C", "V" and arrow keys have differing thicknesses according to the slicer and when I have tried to print them. I am using a .2mm nozzle to try and get the most detail from the keys and the rest look pretty good. Can you fix this?
The designer has replied
0
Reply
Edit: I tried increasing the initial layer height and had to max it out to .14 for the .2mm Nozzle. On the slicer side it seems fine, but we will see if it will actually print.
0
Reply
We have received all your feedback. We will centrally rectify all minor issues collected so far within this week.
0
Reply
Replying to @XTIA :
@XTIA I am really at my wits end with these key caps. has there been any tolerance considerations in terms of the MX style stems? I can’t get the caps to reliably fit even the stock switches. I can’t use X-Y hole adjustments either because of the color painting. I tried a .4 nozzle and .2 nozzle. any tips would be greatly appreciated.
(Edited)
0
Reply
The issue with the keyboard plate has been rectified.
The designer has replied
1
Reply
Is the new plate file available to download? The files currently posted look identical to the original. Thanks!
0
Reply
this new plate looks the same as the old? what changed?
0
Reply
Replying to @aaadnani :
Can confirm that I printed the second plate and it is significantly better. Switch fit is pretty much perfect, and everything is now vertically aligned correctly.
0
Reply
So, I’m a mechanical keyboards fan and I have whole YouTube channel with hundreds videos related to custom mechanical keyboards. But also I’m 3D printing fan so this project was win-win for me! Today I finally assemble this keyboard and what can I say - it’s absolutely doesn’t make any sense. For the budget of this hardware and printing you can buy really good mechanical keyboard with no problems at all. This one that I have build it’s not good. I mean if you want to try a 3D printing project and create a keyboard for the sake of doing it - fine, but if you really need a keyboard - go buy a normal one. what is wrong: - no stabilizers under space keys, ok maybe you can buy them separately - keycaps are not aligned so looks awful - switches the most cheap 3 pin mechanical switches - switch plate is flimsy I have projects of creating cases for existing 65% size keyboards from years ago and it’s all very well know issues, so nothing new. But case idea with magnets is great!
The designer has replied
0
Reply
I'd like to answer your questions one by one 1:Thanks to the split spacebar design, our tests show no additional stabilizers are required. Still, we reserved stabilizer mounting spots on the PCB for easy aftermarket adjustment by keyboard enthusiasts. Stabilizers were used on V1 yet brought little practical improvement. 2:3D-printed keycaps are a fun alternative. Standard keycaps are also available. Minor dimensional deviations are inherent to 3D printing production. 3:Yes, the included switches are basic budget models. No switches were bundled with V1. We decided to add free switches before launch to save customers extra purchasing costs. Regarding pricing: around $70 is admittedly not low. Here is the cost breakdown: 16% platform commission payable to Bambu Lab and Strinkly, plus international shipping fees ranging from $25 to $30 including prepaid customs duties. The price stands reasonable given these expenses, and we barely gain profit from this project.
0
Reply
Thank you very much for your objective feedback. We designed the Maker 40 as an innovative crossover product, focusing on bringing fun and an enjoyable hands-on experience. The 40% layout is not suited for most daily scenarios. It was originally sized to match the P1 series. We devoted plenty of effort to optimizing PCB craftsmanship and structural design. If we develop similar products in the future, we will fully leverage the strengths of 3D printing, lower hardware requirements, cut shipping and component costs, and let users focus more on the printing experience itself. Have a nice day sir
0
Reply
Hmm... not sure this is the right channel I have brought this board in 2024, was thinking to reprint the case for better magnet insertion. then I cant find the old model any where. The owner not responding too.. here is my keyboard for prove.
The designer has replied
0
Reply
https://makerworld.com/en/crowdfunding/158-xtia-maker-40-v2-make-your-own-mechanical-keyboard As already stated in the details: The Maker40 is not a completely new project. We finalized the initial V1 version at the end of 2024. However, due to various reasons, sales were very poor back then, putting the project close to being canceled by our company. The V2 has been fully redesigned across all aspects, so we will no longer provide the V2 model files for the V1 version. If you wish to adopt the magnetic structure of the V2, we can provide you with the main body model files, though the magnet type and quantity are different from the previous version. We will reply to online messages within 2–3 working days,
0
Reply
Replying to @XTIA :
Thanks, been trying to local the files for days in my computer and web. I can modified the files. will appreciate if you can provide me the model files with v1 or 2.
0
Reply
There is a problem with the printed keycaps. Letters Z,X,C,V,B,N, and M all have embossed letters whereas the rest of the keycaps are flush with the surface. this leads to a less than ideal multicolor print. See the WASD photo that has the letters on the first layer that actually print reasonably well
The designer has replied
0
Reply
We have logged the issue and will fix it as soon as possible. You can try printing with our pre-sliced 3MF version.
0
Reply
Issue fixed. This issue occurs because some text blocks in our original model accidentally fractured.We have updated the STP and STL source files for the keycaps. You may also directly use our 3MF files for printing.
0
Reply
it Looks amazing!
The designer has replied
1
Reply
Thanks
0
Reply
Print Profile
Maker40 keycaps with/without ams including all options
Fantastic compact design. would absolutely back another XTIA project.
The profile uploader has replied
0
Reply
Thanks
0
Reply

License

This user content is licensed under a Standard Digital File License.

You shall not share, sub-license, sell, rent, host, transfer, or distribute in any way the digital or 3D printed versions of this object, nor any other derivative work of this object in its digital or physical format (including - but not limited to - remixes of this object, and hosting on other digital platforms). The objects may not be used without permission in any way whatsoever in which you charge money, or collect fees.