Search models, users, collections, and posts

X2D Nozzle Switching Lever Dust Cover

GIF
GIF

Print Profile(2)

All
X2D
P1P
A1
H2C
H2D
P2S
A1 mini
X1
X1 Carbon
H2D Pro
P1S
H2S
X1E
A2L

For X2D
For X2D
Designer
9 min
1 plate
4.1(17)

PETG w/ fixed tab spacing / layer adhesion / brush strength
10 min
1 plate
4.9(8)

Open in Bambu Studio
Boost
73
371
40
1
181
156
Released 

Bill of Materials

Bambu Filaments
Select all
Matte Grass Green (11500) / Refill / 1kg

Description

Boost Me (for free)

𝗬𝗼𝘂𝗿 𝗳𝗿𝗲𝗲 𝗕𝗼𝗼𝘀𝘁 = My design supply pack 📦 Click "𝗙𝗼𝗹𝗹𝗼𝘄" to get more useful models! 👀

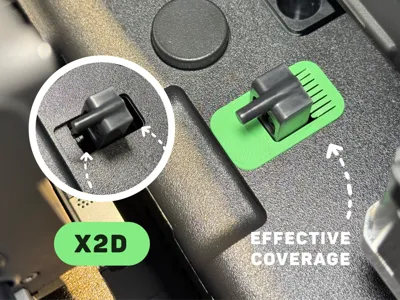
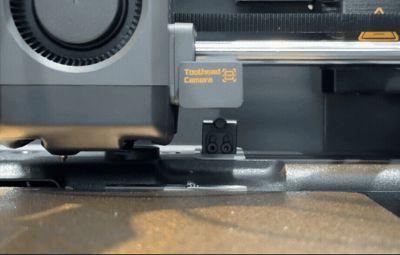
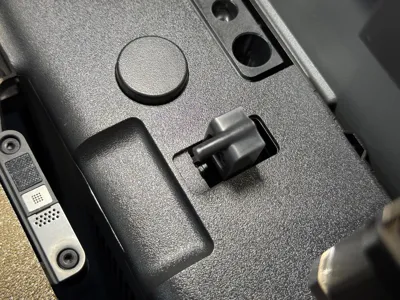
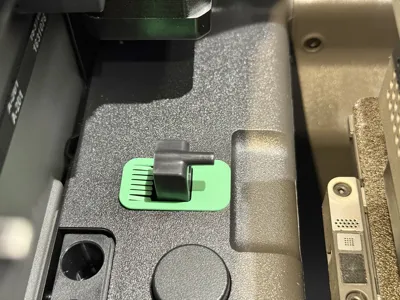
The X2D is a dual-head printer, with the main and secondary nozzles switched via a nozzle switching lever. However, there are large gaps at both ends of the lever, allowing printing debris to easily fall into them, making it impossible to remove and even jamming the movement mechanism.


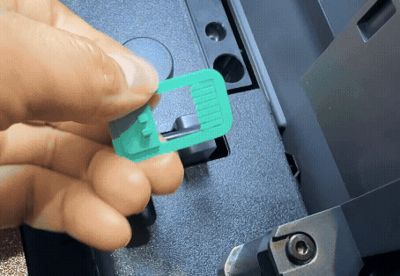
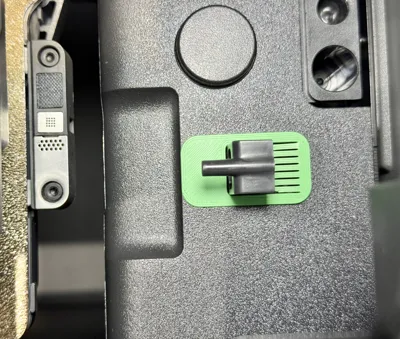
To effectively solve this problem, I designed this special accessory. Its innovative 0.12mm thick "thin brush" structure perfectly balances preventing debris from falling out while not affecting the lever's movement direction. I highly recommend equipping your X2D with one 👀


 - - - New models - - - 


Boost Me (for free)

𝗬𝗼𝘂𝗿 𝗳𝗿𝗲𝗲 𝗕𝗼𝗼𝘀𝘁 = My design supply pack 📦 Click "𝗙𝗼𝗹𝗹𝗼𝘄" to get more useful models! 👀

Comment & Rating (40)

(0/1000)

Pinned by Designer
Print Profile
For X2D
profile
1
Reply
There are several issues with this model, both in the design and the print preset. I'll list the design issues here, and the preset issues in a reply (due to comment length limits). Design issue 1: the retaining tabs are too tight at 2.0 mm spacing (identical to the actual dimensions of the pin on the printer). Adding 0.2 mm here (and to the latching hooks at the top) fixes that; for anyone wishing to print the current version: add a negative volume of type "rounded rectangle", scale it to X=2.20 x Y=2.60 x Z=2.30, and move it to object coordinates X=0 / Y=8.25 / Z=0.85. Then file off the latching hooks a tiny bit on the inside after printing. Design issue 2: the width of the brushes is not optimal for good adhesion between perimeters. More details in a reply, but as a quick fix, set wall generation to Arachne, and Elephant Foot Compensation to 0.07. Design issue 3 (minor): the tabs would be less likely to break off with a slightly larger fillet (and/or a fillet on the inside).
1
Reply
Preset issue 1: it really should be printed in PETG - less brittle than PLA, allowing the little brushes to flex without breaking. Preset issue 2: without a higher value for the infill, the "platform" for the two tabs is prone to shearing off the base. For such a small model, 100% Rectilinear infill has a negligible impact on print time and filament use. Preset issue 3: this model really needs Arachne wall generation. With that enabled, the slicer will create continuous loops from the cover "frame" to the brushes and back, making them significantly less likely to break off over time. A Concentric bottom surface pattern further improves the first layer. More details in the next reply. Preset issue 4: painted seams on the outside of the tabs improves the dimensional accuracy of their spacing (otherwise the slicer will create the seams on the inside), even with scarf seams. In addition, a seam on one of the brushes can be prevented by painting one on the opposite side of the "hole".
0
Reply
Regarding Arachne wall generation and the sizing of the brushes: there is an optimal wall thickness for FDM printers, calculated using the following formula: OptimalWallThickness(NumPerimeters, OuterWallExtrusionWidth, InnerWallExtrusionWidth, LayerHeight) = # the two outer walls 2 * OuterWallExtrusionWidth # subtract one count of overlap between the two outer walls - LayerHeight * ( 1 - PI / 4 ) # for any remaining inner walls, add the extrusion width minus overlap to adjacent perimeter + ( NumPerimeters - 2 ) * ( InnerWallExtrusionWidth - LayerHeight * ( 1 - PI / 4 ) ) In this case, for OuterWallExtrusionWidth=0.42, InnerWallExtrusionWidth=0.45, LayerHeight=0.12, NumPerimeters=4, it needs a modeled brush width of 1.66 mm, HOWEVER, Elephant Foot Compensation needs to be factored in, so we need to add 2*0.15 for a total of 1.96 mm. Or keep the 1.8 mm width and set Elephant Foot Compensation to 0.07 in the profile. With all that applied, it prints and fits perfectly!
(Edited)
0
Reply
Uploaded a (PETG) print profile with fixed tab spacing, solid infill, optimized walls, and clean seams. Still needs the latching hooks at the top of the tabs to be filed down ever so slightly before installation as noted in the description.
2
Reply
Print Profile
For X2D
Perfect fit. Thanks for.
0
Reply
Print Profile
For X2D
had to trim slightly to fit in with other crack protectors in place, but got it in so it does is job!
(Edited)
0
Reply
X2D, it doesn't lock and remains wobbly
Show original
designer
3
Reply
same issue here
0
Reply
Print Profile
For X2D
It just won't hold, I can't push it onto the front nose and it always springs off by itself, I even printed it in TPU. even here it springs off by itself again
Show original
0
Reply
Try my fixed print profile!
0
Reply
Replying to @Wmbrt :
tried it. fits perfectly
Show original
0
Reply
Replying to @DaveGold :
Great to hear! Don't forget to rate that print profile so others know which one to pick :)
0
Reply
Print Profile
PETG w/ fixed tab spacing / layer adhesion / brush strength
Thanks for all the corrections. This fits well - not around the dust cover I already had in place, but that's no fault of this model. It's held in place firmly and provides a lot of protection. The brush configuration is ideal, not too stiff. It doesn't impede the ability to change nozzles at all. Printed in Bambu Lab PETG Basic black. Thank you!
The profile uploader has replied
0
Reply
Great to hear, thanks for the feedback!
(Edited)
1
Reply
Print Profile
PETG w/ fixed tab spacing / layer adhesion / brush strength
I only gave this 4 stars, not because the design is not good, but because I was unable to get it to fit and stay on . I printed both the PLA and PETG versions, both in PETG since the X2D chamber gets hot, and neither would stay on. Excellent idea and very nice design though. And before anyone comments, yes my printer is calibrated, both the full calibration and the vision encoder calibration, and my filament profile is also calibrated. Print accuracy is not an issue as I have printed high precision functional designs that are perfect fit, part into part :-)
The profile uploader has replied
0
Reply
Can you provide some details on what the fitment issue was with the "PETG w/ fixed tab spacing" profile? Are the tabs still too tight to fit around the pin? Can you use calipers to measure the printed model's tab spacing, and the actual width of the pin on your printer?
0
Reply
Print Profile
PETG w/ fixed tab spacing / layer adhesion / brush strength
Great print, thank you
0
Reply
Print Profile
For X2D
Thank you for this cover. Simple, but helps prevent debris from getting inside these spots.
0
Reply
Cool !!
0
Reply

License

This user content is licensed under a Standard Digital File License.

You shall not share, sub-license, sell, rent, host, transfer, or distribute in any way the digital or 3D printed versions of this object, nor any other derivative work of this object in its digital or physical format (including - but not limited to - remixes of this object, and hosting on other digital platforms). The objects may not be used without permission in any way whatsoever in which you charge money, or collect fees.