Search models, users, collections, and posts
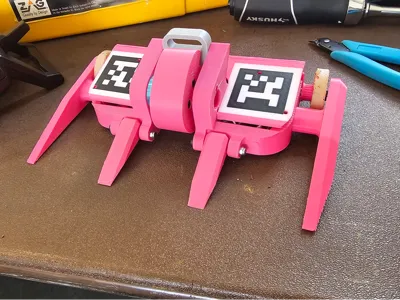
Polachrome (plastic antweight combat robot)
IP Report

Print Profile(0)
Add the first print profile to earn points
Boost
4
7
1
1
5
0
Released
Description
Description
Polachrome is a 2wd vertical spinner with heavy emphasis on armor and forks. It may be a good starting point for beginners who want to branch out from a kit. I hope this guide outlines everything you need to know to build one of your own.
SAFETY SPIEL:
- Even at 1lb the spinner moves fast enough to cause injury. Always use a weapon lock and keep the robot disabled when not in a safe testing/combat environment.
- You are responsible for your own safety when building or driving any combat robot
Electronics:
- Drive motors: (2x)
- Spinner motor: It was designed with this in mind but the v3 might be a drop in replacement (you'll want at least 1800 KV)
- Drive ESC: (1x)
- Spinner ESC: (1x)
- Receiver: (1x)
- Power switch (1x)
- Battery: Comes in a 2 pack
Hardware:
- All bolts are m3 and range in length from 6mm to 35mm (I will put in a full breakdown soon)
- This robot uses custom cast urethane wheels: I use this
- You'll probably need some misc wires to connect the spinner ESC to the motor
- All nuts should be m3 nyloc nuts
- Bearing: (1x)
Other required parts:
- I use a flysky fs-ia6 transmitter for the remote you don't need to get one that comes with a transmitter
- You will also need a lipo charger
- I use wago connectors to distribute power from the switch. It would save a ton of space on the inside if you simply soldered them but wagos make repair much easier
Printing tips:
- All robot parts are printed out of overture Super PLA+
- The molds should be printed in tpu
- There should be enough weight headroom for the side forks to be printed solid (99+ walls)
- Weapon should be printed Solid
- Walls should be at least 6
- Brick layers are strongly recommended
- Printing the middle forks on a smooth build plate improves ground game though the same result can probably be gotten through sanding
- The middle forks should be printed with the smallest layer height possible
- The spinner support has a print in place bearing. you will need to put a pause in the print in the slicer, insert the bearing, and continue.
- Supports are recommended
Assembly:
- Mold release is strongly recommended but not required
- Be careful using the right screw lengths when screwing into the spinner motor, if it does not spin freely the bolts are too long
- The electronics are a bit of a squeeze so be patient
Trouble Shooting:
- Depending on how your motors are set up you may need to reverse certain channels on the transmitter for it to drive properly
- Make sure to solder the positive wire to the positive terminal on the motors
- Due to being somewhat wide the robot turns very quickly. this can be turned down by adjusting the sensitivity on the remote if needed.
- You will need to bind the remote to the receiver. It's best to just look up a guide. There is a bind button on the receiver and remote
- If the spinner is spinning the wrong way just swap two of the wires going to the esc as that changes the direction
License
This user content is licensed under a
Creative Commons Attribution
Comment & Rating (1)