Ryobi P2107 18V Hybrid Blower Vertical Wall Mount


Print Profile(1)


Description
Hang your Ryobi Hybrid blower nozzle-down on the wall with a clean, minimalist collar mount. Prints in ~2.5 hours, uses ~65g filament, and holds the tool by its body with a built-in weight-bearing lip — no clips, no clamps, no moving parts.
Why this mount?
Tired of your Ryobi P2107 Hybrid blower rolling around the garage floor, getting tangled in its own cord, or sharing shelf space with the leaf rake? Same. This is a no-nonsense vertical wall mount that gets the blower up, out of the way, and ready to grab with one hand.
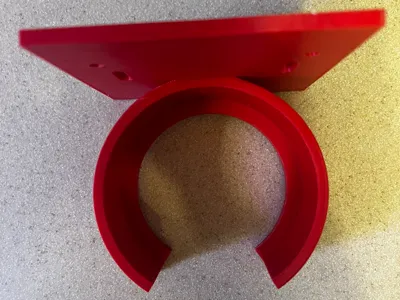
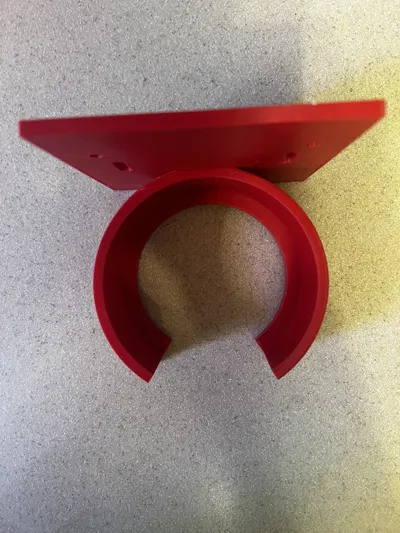
Unlike bulky "whole-tool" holders that waste filament and print time, this design uses a single smart cradle — a collar that wraps ~72% around the blower's main body with an integrated handle-rest lip that bears the weight. The blower literally drops into place and stays put by gravity. Lifting it out takes about half a second.
How it holds the blower
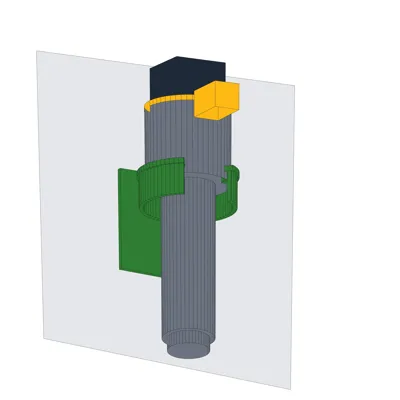
The tool hangs nozzle pointing straight down. Here's what happens:
- 🎯 Top shoulder of the body rests on the collar's handle-rest lip — this is what supports the ~5 lb load
- 🔒 Fan housing sits inside the 98 mm inner-diameter collar — prevents sway and tipping
- 🆓 Nozzle, handle, and battery all hang free — nothing in the way, nothing pinched
- ⬆️ To insert: nozzle-first, push toward the wall through the front opening
- ⬇️ To remove: lift straight up, pull forward — done
No latches, no clips, no spring mechanisms. Gravity does the work.
Design highlights
- ✅ Compact footprint — 110 × 62 × 121 mm, fits on any FDM bed (even Mini/A1 Mini)
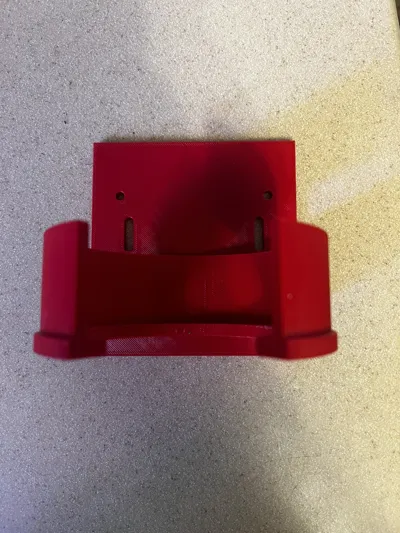
- ✅ 2 keyholes + 2 lock-down holes for solid wall attachment
- ✅ Minimal filament — ~65 g, no over-engineered gussets or ribs
- ✅ Smooth analytical geometry — true parametric curves (no voxel stair-stepping), clean slicer import
- ✅ Watertight mesh — verified manifold, no repair needed on import
🖨️ Print Settings
| Setting | Recommended |
|---|---|
| Material | ABS or PETG (preferred) or PLA+ |
| Orientation | Back plate flat on build plate (wall-side down) |
| Layer height | 0.2–0.24 mm |
| Walls / perimeters | 3 |
| Infill | 25% gyroid or grid |
| Supports | Optional — tree supports under collar overhangs and the underside of the handle-rest lip |
| Brim | Optional (5 mm) — helps with large flat plate adhesion |
| Estimated print time | ~2-3 hours |
| Estimated filament | ~65 g |
💡 Pro tip: ABS orPETG is recommended because the lip bears a continuous load. PLA will work fine in a climate-controlled garage but may creep over time in summer heat.
🔩 Suggested Fasteners
Pick based on your wall type:
- Into wood studs (preferred): #8 × 1-1/4" wood screw — or — M4 × 30 countersunk wood screw
- Into drywall (no stud): Heavy-duty drywall anchors rated ≥ 15 lb each (e.g., Toggler SnapSkru, E-Z Ancor Twist-N-Lock)
- Into plywood/pegboard backing: #8 × 3/4" wood screw
You'll need 4 screws total (2 keyholes at the top, 2 lock-down holes).
⚠️ Don't over-torque! Hand-tight plus a quarter turn is plenty — PETG will crack if you muscle it with an impact driver. Ask me how I know. 😅
📐 Dimensions & Compatibility
- Mount footprint: 110 × 62 × 121 mm (W × D × H)
- Collar inner Ø: 98 mm (fits ~95 mm blower body with clearance)
- Designed for: Ryobi P2107 18V Hybrid Blower (the round-nozzle sweeper-style unit)
- Works with or without a battery attached — battery hangs free below
Similar Ryobi ONE+ blowers (P2108, P2109 variants) may or may not fit depending on the body taper.
🪚 Installation
- Print the mount (no supports needed except under the collar and lip overhangs)
- Mark 2 keyhole locations on the wall — hit a stud if you can
- Drive two #8 screws leaving ~4 mm protruding
- Hang the mount — slide down onto the screws (big hole → small slot)
- Drive 2 more screws through the lower lock-down holes
- Drop the blower in — nozzle-first through the front opening
That's it. Total install time: ~5 minutes.
🙏 Support & Boost
If this design saved you from buying a $50 plastic mount at the hardware store, a Boost costs you nothing and helps me make more of these. 🚀
Questions, fit issues, or requests for other Ryobi tool mounts? Drop a comment — I reply to everything.
📝 Changelog
- v3 (current): Rebuilt with smooth analytical geometry — cleaner surfaces, 97% smaller file size, no slicer warnings
- v2: Voxel-based (deprecated — had thin-layer slicer errors)
- v1: Prototype
⚖️ License
Free for personal use. Please don't resell prints or the file without asking first. Attribution appreciated if you remix!
License
You may create derivative works based on this object, provided that all such derivative works are published exclusively on the MakerWorld platform and include proper attribution to the original creator. You may not share, upload, host, distribute, or publish this object—or any derivative work of this object—on any other digital platform, marketplace, or distribution channel. Commercial use of this object and any derivative works is strictly prohibited. This includes, but is not limited to, selling, renting, sublicensing, or using the object in any context in which you receive monetary compensation or other financial benefits.
Comment & Rating (0)