Parametric Breast Forms


Print Profile(1)
Description
This OpenSCAD file enables you to create breast forms in various sizes to suit your needs. Simply load the file up in OpenSCAD. (I recommend the nightly builds, which render super quickly)
Features include:
- Fully customizable with a few basic parameters, you can get going, but with some tinkering, you can fine-tune the shape to your liking as well
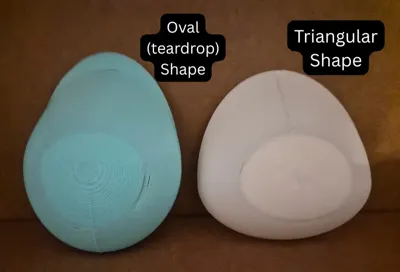
- Oval and triangular base forms are possible, based on what suits you
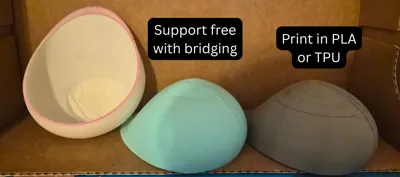
- Hollow design keeps forms lightweight and makes printing faster
- No support required when printing, even with TPU, for most sizes
Boost Me (for free)
If you like what I'm doing here, a boost would mean a lot!
Key variables:
Basic parameters:
These are mostly self-explanatory. See the figure to see what aspects of the form they influence. This will determine the core size of your form.
|  |
Design-based parameters:
These adjust the “shape” of the form itself. They’re a bit hard to describe, so I’d suggest you play around with these values to see how it looks to get a sense of how they work.
z_offset: This parameter controls the “convexity” of the top portion of the form. 0.5 is a good value on the low end if you want a sloped shape that’s like a teardrop. Bump this up to 10 or even higher to get a shape that’s more “straight” (and easier to print).
Bottom Overhang Scaler (-1 to 0.5): p_h_y: This variable controls how much the form “droops”, for lack of a better term. Real breasts tend to sag slightly as they increase in size, and this parameter aims to replicate that effect. Set this to a negative value, such as -0.3, if it doesn’t matter to you and you just want an easier print.
Side Overhang Scaler (-1 to 0.5): p_h_x: Similar to the bottom overhang scalar, except for the side. Usually, you want to keep both these values the same, unless you really care about the look of the form.
Form base shape, Oval-ish (Unticked), or Triangle-ish (Ticked): triangularFormShape: See my notes below where I talk about getting triangular forms as an example of where this applies.
Printing-based parameters:
Some parameters can be adjusted to improve print quality. These include:
layerHeight - mm (z-step): See my notes below for a much more detailed understanding.
overhangAngle - degrees: The angle of the form at which the form “bridges” across, giving a base for the top of the form to print on, giving it a better shot at printing. A well-tuned printer can manage 25 degrees, which is a 65-degree overhang. This works for 0.1 mm layer heights. I think newer printers can do even better, but I haven’t gotten one, so don’t take my word for it.
It also attempts to provide support near the base for specific teardrop-shaped configurations, where the initial overhang is quite steep.
widenWidthRange - degrees: Before trying to “bridge” at the top of the print, we want to slowly increase the thickness of the shell, so that there’s more material for the “bridge” to grab onto. This helps a lot with larger forms in specific configurations.
widenThicknessFactor - multiple of shell thickness (t): This adjusts how thick the shells get before the “bridging” first starts. The thickness factor can be somewhat confusing. When set to a value of 1, it means that the final thickness will t+t=2t. When set to 2, the thickness will be t+2t=3t.
Notes and more details:
All of my testing and printing were done using a scrappy Ender 3v2 with a dual fan mod. I like to believe that if that printer can print these forms without support, any newer printer should be able to do so as well.
Update (4/20): I've been able to upgrade to a Bambu Lab X2D, and am currently testing the forms on it. Using the the basic 0.2mm profile, I do not expect to have any issues whatsoever, but this might open up the option for some more complex options with better supports. But I still wish to keep the form to be easy and cheap to print for this version.
These are my notes and suggestions for how to go about printing a form (Most setting details use Cura. I will make updates for Maker Studio as I test further). I aim to cover as much detail as possible, recognizing that each form can vary. It’s possible to obtain a good form through testing and fine-tuning.
Layer heights:
When creating your form, set the layer height to match the layer height you plan to print with your printer.
While the model can be made using any layer height, I recommend going 0.2mm or lower; 0.1mm works very well. This is because the smaller the layer height, the easier it is for your printer to handle overhangs and allow for a cleaner finish.
In your slicer settings, ensure you don’t use adaptive layers and that the starting layer height matches your step/layer height for the entire print.
Thickness:
The thicker the shell, the stronger the form, and the better it can deal with overhang. The trade-off is that it becomes heavier.
Depending on your nozzle width, you’d want something around 3 walls thick. From my testing, 1.6mm thickness for a 0.4mm nozzle, and 2mm thickness for a 0.6mm nozzle worked well.
Shape (Teardrop vs Triangular):
You’ll see that the default settings make for a more teardrop-shaped form. This might not work for all folks, so the way to get a triangular shape would involve these changes:
- First, set the width (w) and length (l) to approximately equal sizes.
- Tick the triangularFormShape parameter to be True.
- You’ll get a roughly triangular form, which is probably what you want, but not entirely there yet.
The following adjustments are to your taste, and can go a long way in making a form that is just “right” for you:
- Change the z_offset parameter from 0.5 to somewhere between 30 and 50.
- Change the p_h_y and p_h_x overhang parameters from 0.3 to around -0.3.
That will make a form that looks more in line with what you’d want, hopefully!
Other notes:
- Set the overhangAngle to 0 if you want just the shape with no printing modifications made to the form to make a mould, use supports, or anything of the sort.
- Cura has an experimental setting to make overhangs printable that makes the form a solid shape, which is helpful if you want to get a solid form shape for any other application.
Bugs still needing to be squashed:
The “widening” of the shell before “bridging” is still a little buggy. I’ll work on trying to fix this.
Another issue can happen with the overhangAngle being high with a high overhang form. Increasing the z_offset and reducing the overhang scaler values should help fix this.
Why I made this:
Designing forms for different sizes, even for one person, is hard. I'm not a designer professionally, so one of the most significant troubles I had was that I would need to print with supports, and that I couldn't print with constant thickness along the z-axis. There may be ways to design in Fusion or Blender that could let me solve those problems, but it also prevents me from having a solution that could be easier for anyone to use, to fit them best. So, this is what I came up with: an OpenSCAD project that allows for a lot of flexibility in the ways you want to make a form. Is it computationally inefficient, with large STL file sizes? Yes. Does it get the job done? Also yes. So that’s why I’m publishing it as it is currently, because I’ve been able to use this, and I want there to be some tool like this available to others.
Comment & Rating (126)