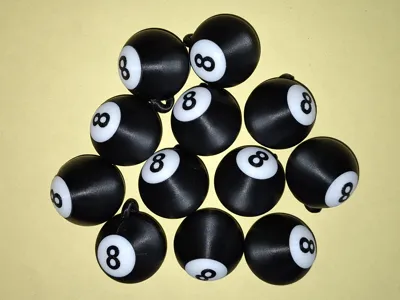
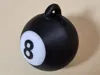
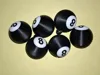
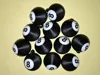
Billiard ball keychain (no AMS)


Print Profile(4)

Description
German | English |
|
|
German
- Today I was asked to fulfill a special request using the 3D printer.
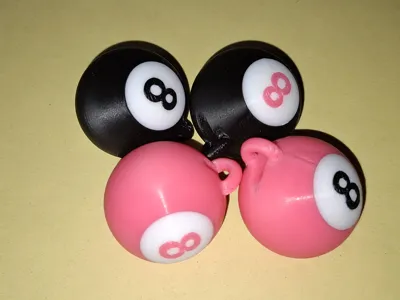
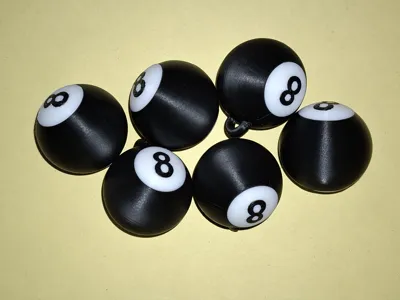
- The request was for a keychain featuring an 8-ball.
- Nothing special in itself, but the ball was supposed to be pink, not black.
- Of course, I immediately looked around on MakerWorld. I found a few billiard ball keychains, but none that I liked.
- My requirements:
- The ball must be perfectly round, even after printing.
- The print must be fast and use minimal material.
- Printed without AMS, designed to snap together without glue.
- The keychain must be very sturdy.
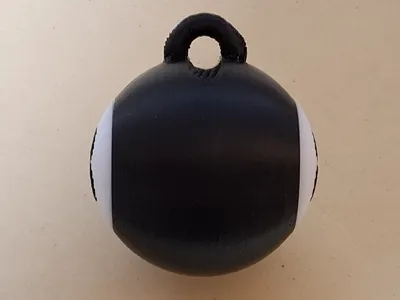
- To make this work, I cut a slice off the top and bottom of the ball. This creates a flat surface that can rest on the print bed.
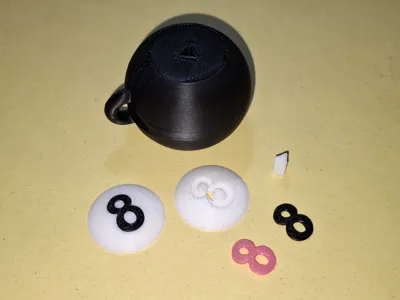
- The cut slices are printed individually.
- A triangular pin is used to connect them.
The number is printed individually, flat on the bottom and domed on top.
- Assembly
- Caution: You will need a hammer!
- Gently press the numbers with their flat side into the designated recess. Just a little, to set the orientation. Make sure that the two circles of the 8 are different sizes.
- Now give the number a light tap with the hammer. This will sink it into the center of the recess.
- Now give each end of the number a small tap.
- The number should now blend seamlessly into the white surface and be barely noticeable.
- Now press a triangular pin into the disc with the number. This should be possible by hand, but it is somewhat challenging.
- Now comes the more difficult part: press the triangular pin just a little bit into the corresponding opening of the ball.
- Then give it a gentle tap with a hammer to set the direction, followed by a few firmer taps, and the whole thing will be as solid as if it were welded in place.
- Of course, a drop of glue can also be used, but it shouldn’t be necessary.
- Now repeat the process on the other side.
Done!
3D printing
- Although the slicer indicated that support wasn't necessary, based on experience, I added minimal support to the eyelet.
- Material
PLA should work fine. With other materials, you might run into issues with the pin.
English
- Today I was asked to fulfill a special request using the 3D printer.
- The request was for a keychain featuring an 8-ball.
- Nothing special in itself, but the ball was supposed to be pink, not black.
- Of course, I immediately looked around on Makerworld. I found a few billiard balls made into keychains, but none that I liked.
- My requirements:
- The ball must be perfectly round, even after printing.
- The print must be fast and use minimal material.
- Print without AMS, but designed to snap together without glue.
- The keychain must be very sturdy.
- To make this work, I cut a slice off the top and bottom of the ball. This creates a flat surface that can rest on the print bed.
- The cut slices are printed individually.
- A triangular pin is used to connect them.
The number is printed individually, flat on the bottom and domed on top.
- Assembly
- Caution: You will need a hammer!
- Gently press the numbers into the designated recesses with their flat sides. Just a little, to set the orientation. Make sure that the two circles of the 8 are different sizes.
- Now give the number a light tap with the hammer. This will sink it into the center of the recess.
- Now give each end of the number a small tap.
- The number should now blend seamlessly into the white surface and be barely noticeable.
- Now press a triangular pin into the disc with the number. You should be able to do this by hand, but it is somewhat challenging.
- Now comes the more difficult part: press the triangular pin just a little bit into the corresponding opening of the ball.
- Then give it a gentle tap with a hammer to set the direction, followed by a few firmer taps, and the whole thing will be as solid as if it were welded in place.
- Of course, you can also use a drop of glue, but it shouldn’t be necessary.
- And that now still repeat with the other side.
Done!
- 3D printing
Although the slicer indicated that support wasn't necessary, based on my experience, I added minimal support to the eyelet.
- Material
- PLA should work fine. With other materials, you might run into issues with the pin.
License
You shall not share, sub-license, sell, rent, host, transfer, or distribute in any way the digital or 3D printed versions of this object, nor any other derivative work of this object in its digital or physical format (including - but not limited to - remixes of this object, and hosting on other digital platforms). The objects may not be used without permission in any way whatsoever in which you charge money, or collect fees.
Comment & Rating (0)