X2D/P2S Poop Bucket - UPDATED


Print Profile(1)
Bill of Materials

Description
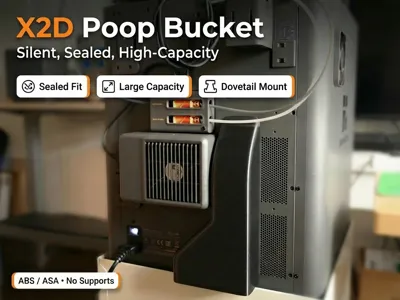
X2D/P2S Poop Bucket: The Ultimate Silent & Sealed Solution
Maximize your print experience with a clean chute and zero odour.
I am a big fan of the elegant mounting system of the "H-Series Poop Bucket (dovetail mounts)" and wanted to adapt its best features for the new Bambu Lab X2D printer. The result is the X2D/P2S Poop Bucket, a clean-print, high-capacity solution designed for efficiency and odorless operation.
Key Benefits:
- ✅ Odour-Controlled: This design doesn't just collect filament poop; it forms a close seal over the chute opening, significantly reducing printing odours and fumes.
- ✅ High Capacity: This tall design can handle large prints and long runs without a spill.
- ✅ Secure Dovetail Mounting: NO SCREWS or MAGNETS required! Use the existing back panel screws to secure the dovetail mounts, then just hang the bucket. It is incredibly sturdy and will not spill.
Features of the Update:
- ✅Lowered height to be printable on a P2S
- ✅Increased width to make better use of the space beneath the exhaust.
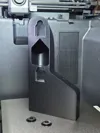
- ✅Bevels on the round dovel holders to eliminate possibility of clogged poops
Printing Specifications:
For optimal performance and heat resistance, ABS/ASA is recommended.
- Printer: Bambu Lab X2D
- Print Time: ~6 Hours
- Material: ~110g ABS/ASA (e.g., Bambu ABS)
- Supports: NO SUPPORTS REQUIRED. Designed to print clean.
- Layer Height: 0.20mm (Strength/High Quality)
- Walls: 2 Walls
- Infill: 15% Infill
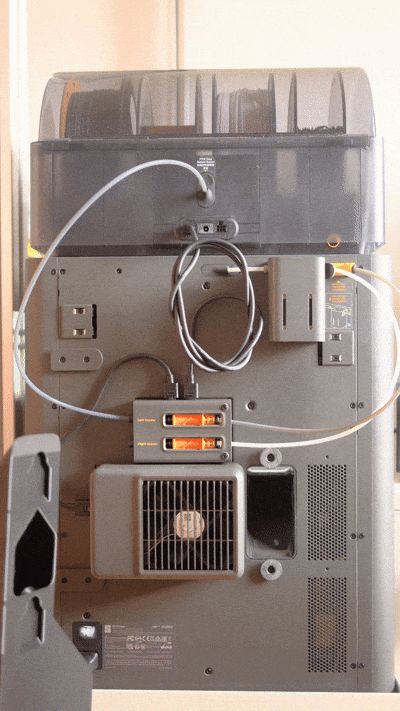
Assembly Instructions:
- Print the X2D Poop Bucket and the two dovetail holders.
- Unscrew the two existing screws holding the X2D back panel in place near the poop chute.
Place the dovetail holders over the screw holes and gently tighten the existing screws into them.
Make sure the bevel is facing upwards!
- Slide the poop bucket onto the dovetail mounts. Done!
License
You shall not share, sub-license, sell, rent, host, transfer, or distribute in any way the digital or 3D printed versions of this object, nor any other derivative work of this object in its digital or physical format (including - but not limited to - remixes of this object, and hosting on other digital platforms). The objects may not be used without permission in any way whatsoever in which you charge money, or collect fees.
Comment & Rating (38)