No-Drill Pole & Railing Mount for Blink Outdoor 4


Print Profile(1)
Description
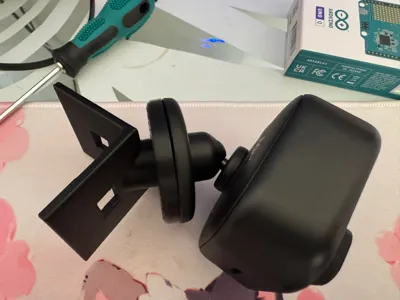
A simple, no-drill solution to mount a Blink Outdoor 4 camera on round poles, square posts, balcony railings, or downpipes — anywhere you don't want to (or can't) drill into the wall.
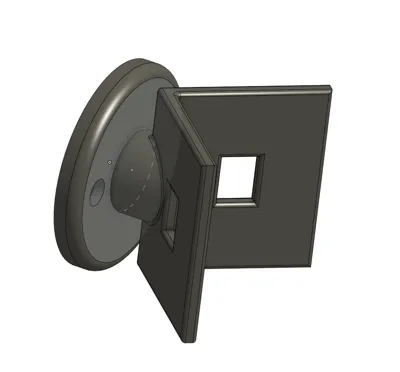
The bracket reuses the original Blink mount that ships with the camera, so you don't lose the magnetic ball-joint articulation. The rear plate carries two slots for a standard stainless steel band clamp (hose-style strap), which pulls the bracket tight against the support surface.
What you need
- 1× Blink Outdoor 4 with its original mount
- 1× stainless steel band clamp, recommended width 12 mm, length sized to your pole diameter + ~5 cm margin. A worm-drive hose clamp works too, though a band clamp gives a cleaner finish.
- 2× M3x8 nuts & bolts to attach the base with the clamp
- Optional: 1× M3x16 in the middle of the base in order to reinforce the middle stem
- Optional: a strip of rubber or EPDM between bracket and pole to improve grip and prevent slipping on painted surfaces.
Print settings
- Material: PETG or ASA recommended for outdoor use. PLA will warp in summer sun and become brittle over time — not recommended for permanent outdoor installation.
- Orientation: plate vertical, with the flat face against the build plate. This puts the layer lines perpendicular to the strap tension, which is where you want them.
- Walls: 4 perimeters
- Infill: 15 gyroid
- Supports: as little in the v-shape
- Estimated print time: 1 hours and 6 minutes
Assembly
- Print the bracket.
- if you want to reinforce the middle part of the base use the M3x16 with a nut in the center hole for the base
- use M3 nuts&bolts to attach the original mount with the base
- Snap the original Blink mount into the circular seat on the front.
- Pass the band clamp through both slots on the back plate.
- Wrap around your pole/railing, tighten the clamp.
- Attach the camera to the mount and aim.
Compatibility note Designed specifically for the Blink Outdoor 4 original mount footprint. Not tested with Outdoor 3 or earlier generations.
Disclaimer Not affiliated with, endorsed by, or sponsored by Amazon or Blink. "Blink Outdoor" is a trademark of its respective owner; this bracket is an independent design intended as a compatible accessory.
Comment & Rating (0)