Search models, users, collections, and posts
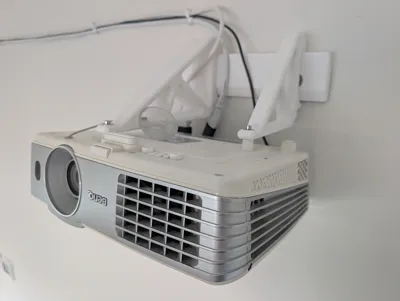
Heavy-Duty Projector Wall Mount (BenQ W1070+)
IP Report


Print Profile(1)
0.2mm layer, 6 walls, 25% infill
Designer
14.2 h
2 plates
Open in Bambu Studio
Boost
4
11
0
0
4
0
Released
Description
Tired of cheap ball-joint projector mounts that sag, wobble, and lose alignment over time or every time you dust? This is designed for maximum rigidity and permanent "set-and-forget" alignment.
Why this design?
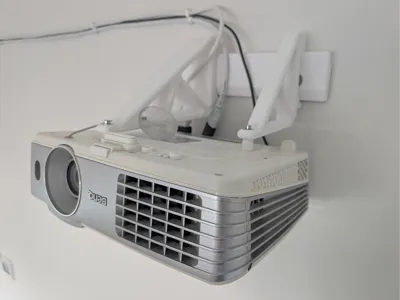
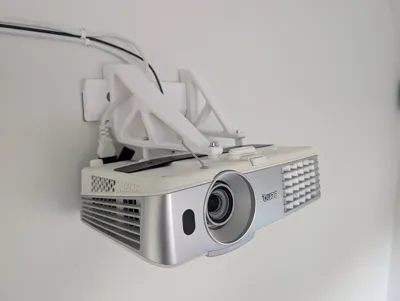
Most universal brackets rely on friction-based ball joints that struggle with the leverage of a projector. This system uses a Dual-Arm French Cleat architecture. It was specifically developed for the BenQ W1070+ (a 2.75 kg unit) but I'd be surprised if it complained with a projector weighing 5 kg.
Key Features:
- Zero Creep: Fixed-geometry truss arms eliminate the droop found in most adjustable mounts.
- Dual-Arm Stability: Spreading the load across two separate arms on a rail prevents horizontal yaw and side-to-side wobble.
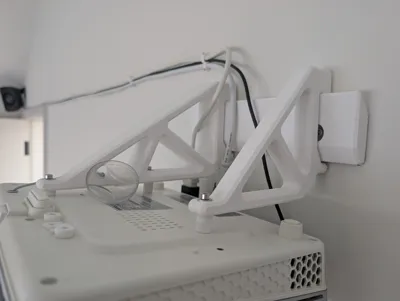
- Dovetail Rail: The 45-degree rail allows for easy horizontal centering while locking the arms vertically so they cannot be knocked off.
- Integrated Cable Management: The rail features a recessed "neck" to provide clearance for right-angle power and HDMI adapters against the wall.
- Bottom-Up Locking: M4 set screws on the bottom of the arms "pinch" the rail, locking the projector into position and removing all mechanical play.
- Thermal Protection: The truss design ensures maximum airflow around the projector’s vents, protecting both the hardware and the PETG.
Hardware Needed:
- Wall Mounting: 2x Heavy-duty masonry bolts. I used 6mm diameter bolts into concrete.
- Set Screws: 2x M4 bolts + 2x M4 Nuts (Hex nut traps integrated into arms).
- Projector Attachment: 3x M4 bolts (Length depends on your shim setup; W1070+ holes are ~10 mm deep, and the arms are 10mm thick).
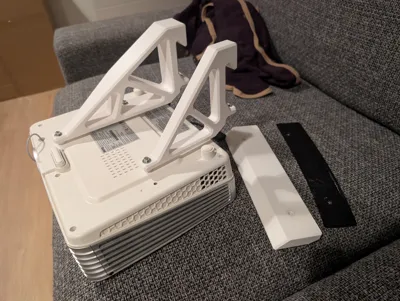
- Padding: 2 mm TPU gasket (included) to buffer the rail against the wall.
Printing Recommendations:
- Material: PETG or ASA is mandatory. Do NOT use PLA. PLA creeps and has a low melting point so projector exhaust heat will cause it to soften and sag over time.
- No Supports Needed: The truss geometry is designed to be printed entirely support-free.
- Orientation:
- Arms: Print on their side for maximum cantilever strength.
- Rail: Print on the back for the cleanest dovetail sliding surface.
- Walls/Perimeters: 6–8 walls (Essential for structural rigidity).
- Infill: 10–15% Gyroid.
- Layer Height: 0.2 mm.
Installation & Adjustment:
- Mounting: Secure the rail using the vertical stagger method (one bolt slightly higher than the other) to prevent the rail from "peeling" forward.
- Leveling: This design includes 5-degree tilt spacers and U-shaped shims. Use these between the arm and the projector to dial in your pitch and roll perfectly without using digital keystone.
- Locking: Once centered, tighten the M4 set screws in the bottom of the arms. This forces the arm hooks into the rail's top bevel for a rock-solid connection.
Open-Source & Parametric
The design is intended to be a universal mounting framework. You can modify the hole patterns, arm reach, or rail depth by accessing the Onshape file here.
License
This user content is licensed under a
Creative Commons Attribution-Noncommercial-Share Alike
Comment & Rating (0)