Fraction Manipulatives Lab (optional magnets)


Print Profile(3)


Description
🍎 The "Snap-Together" Fraction Lab: Making Math Snap into Place! 🍎
Tired of students struggling to "get" fractions?
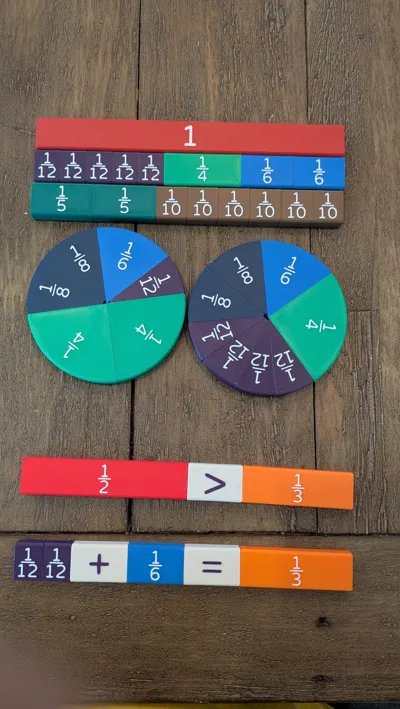
Forget boring worksheets. Say hello to the Snap-Together Fraction Lab, the ultimately customizable, tactile way to teach fractions from 1 (the whole!) all the way down to 1/12. This comprehensive set of fraction bars and fraction circles is designed to make abstract concepts instantly visual and incredibly engaging for students and teachers alike!
✨ A Fraction-Full of Features:
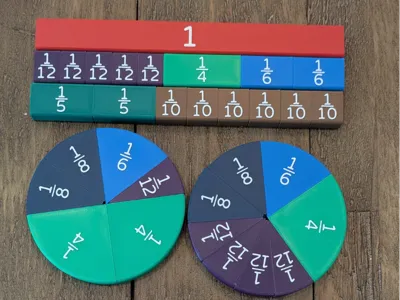
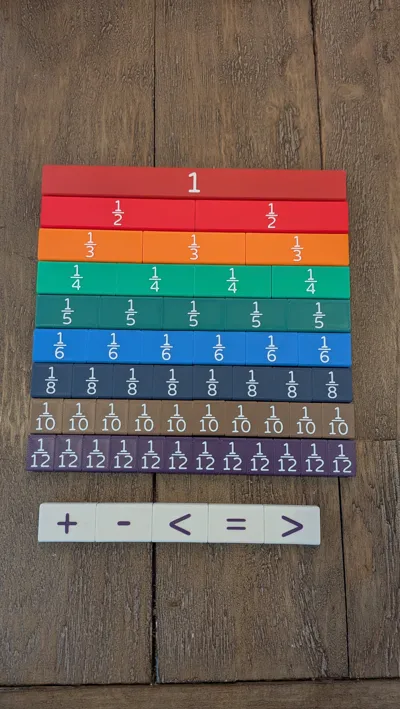
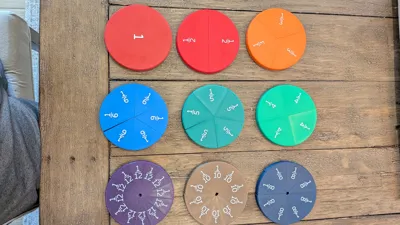
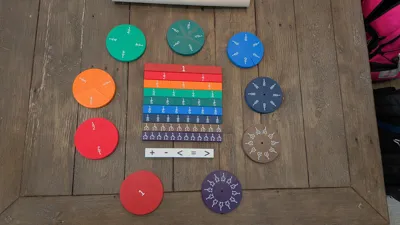
- Complete Set (1 to 1/12): This isn't just a basic set. You get full fraction bars and full fraction circles for every denomination: Whole, 1/2, 1/3, 1/4, 1/5, 1/6, even 1/7, 1/8, 1/9, 1/10, 1/11, and 1/12!
- Visually Easy Comparison: Students can physically overlay or line up different fractions to instantly see comparisons like 1/2 > 1/3 or that 1/4 + 1/4 = 1/2.
- Building a Whole: Use the "Whole Bar" or "Whole Circle" as the anchor, and then let students discover all the infinite combinations (like 1/3 + 1/3 + 1/3, or 1/2 + 1/4 + 1/4) that make a perfect whole.
- Included Operations Bar: The set comes with a dedicated operation bars featuring +, -, <, =, and > symbols, so students can construct and solve fraction equations right on the table.
💡 Maker-Friendly & Teacher-Approved Printing:
- Magnet Slots (Optional): This is the game-changer! The models are designed with integrated slots on the bottom and sides for 6x2mm (6x1.5mm actual) neodymium magnets. Profile has pauses at the right layer, insert the magnets, and now your fractions snap together securely*! Teachers, they will hold strong on your magnetic whiteboard for perfect classroom demonstrations!
- Easy Multicolor: Get that high-contrast, professional label look with just one simple filament swap. No AMS or complex multicolor setup is needed. Start with your fraction color, then switch for the labels! Different colors with the switch are already in the profile, change them as you desire.
- Support-Free: Engineered to print cleanly with zero supports.
What’s in the Profiles?
- All 12 fraction bars
- All 12 fraction circles
- Standard Operation Symbols Bar
- Print-in-Place Magnet Insert Profile, and a No-magnet Profile.
💡 Printing Tips:
- Walls and Infill: I have setup these profiles to use the minimum necessary walls and lightning infill to save on material. The result is a very sturdy manipulative, but you can increase walls and infill if you want a heaver or more solid manipulative at the cost of more filament.
- Bed Adhesion: A clean build plate is always important to avoid warping! This should be an easy print as the bed surface is rather large.
- Magnets: They are optional. There are base magnets (to attach to a whiteboard/fridge/etc), and side magnets (to attach to other fraction bars/circles), you can use both, just the base, just the sides, or none. The model will work with or without. Please note, if you do use them, YOU WILL NEED 325-490 magnets for the set, depending on which fractions you print. This is why I chose to use 6x2mm magnets, because they are the cheapest and most common to find. The set I printed above, bars, circles, operations (all but 1/7, 1/8, 1/9, 1/11) used 325 magnets for reference.
- Magnet Sizing: The profile that has magnets is setup for 6x1.5mm ACTUAL magnets. I purchased 6x2mm magnets off Amazon and used them for the pictures above. NOT ALL MAGENTS are the same ACTUAL size. In the magnet profile, I have a plate at the very end that you can use to test the magnet fit, so you don't have to waste too much filament to see if yours will work. The magnets should be able to slide without too much force through the side holes. If it does not, I'm willing to create more 6mm diameter magnet size profiles, but tell me in the comments what your magnet actual sizes are.
- *Magnet Placement: This is SO IMPORTANT. If you are using magnets, you must insert the SIDE magnets in the same direction, EVERY PLATE and for EVERY part. Here is an example of how the magnet polls should be on the ¼ plate:

Notice that the polls for the Fraction bars always have the S to the left, and the N to the right. EVERY fraction bar must be the same way. The Fraction Circles follow a clockwise pattern, S should always face “left" of the clockwise rotate, and N should always face “right”. If that doesn't make sense, please comment so I can help!
Making fractions fun is easy when math snaps!
Download your set today and help your students build a solid foundation!
Boost Me (for free)
Boosts are appreciated!!
If you enjoyed this design and want to show some support, I have a Ko-Fi page where tips are always welcome — but never expected. Every little bit goes right back into the hobby and helps me keep creating. Thanks for being part of the community! ☕🙏
License
You shall not share, sub-license, sell, rent, host, transfer, or distribute in any way the digital or 3D printed versions of this object, nor any other derivative work of this object in its digital or physical format (including - but not limited to - remixes of this object, and hosting on other digital platforms). The objects may not be used without permission in any way whatsoever in which you charge money, or collect fees.
Comment & Rating (10)