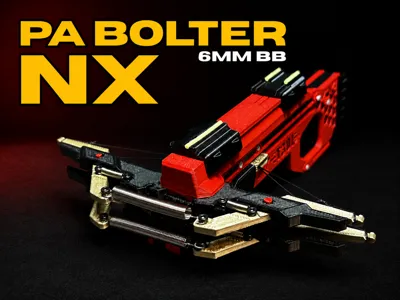
Search models, users, collections, and posts

PA Bolter NX

Print Profile(2)

All
P1S
A1
X1E
X1
P2S
H2D Pro
P1P
H2D
H2S
H2C
X2D
A1 mini
X1 Carbon
A2L

PA Bolter NX - 0.2mm layer, 2 walls, 15% infill
Designer
4.6 h
6 plates
5.0(4)

A1Mini - PA Bolter NX - 0.2mm layer, 2 walls, 15% infill
Designer
4.9 h
6 plates

Open in Bambu Studio
Boost
620
1515
35
23
411
85
Released 

Bill of Materials

Maker's Supply Kits and Parts
Select all
0.3x3x10 mm (20PCS) - BB003
0.4x3x10 mm (10PCS) - BA001
0.5x5x30 mm (5PCS) - BA007
BT2x5 SHCS Self Tapping Screw (20PCS) - AA191
0.6mmx5m(1PCS)- MF001
Bambu Filaments
Select all
Iridium Gold Metallic (13400) / Filament with spool / 1 kg
Yellow (33400) / Filament with spool / 1 kg
Black (33102) / Filament with spool / 1 kg
Red (33200) / Filament with spool / 1 kg

Description

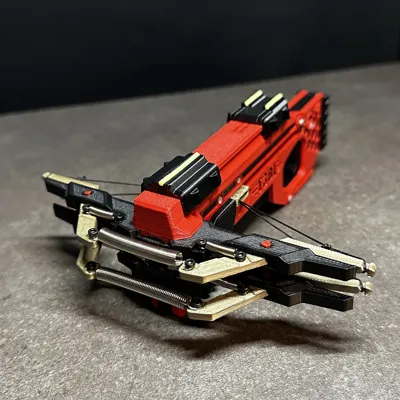
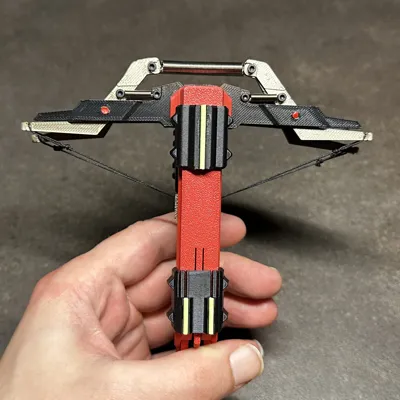
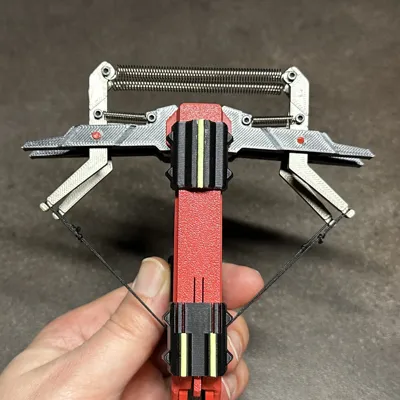
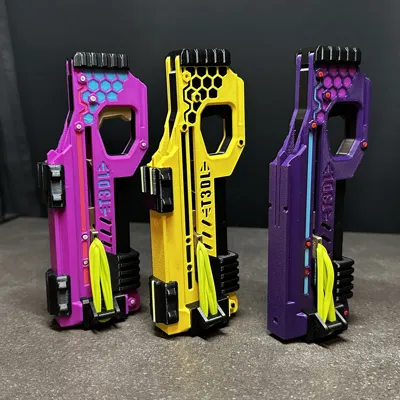
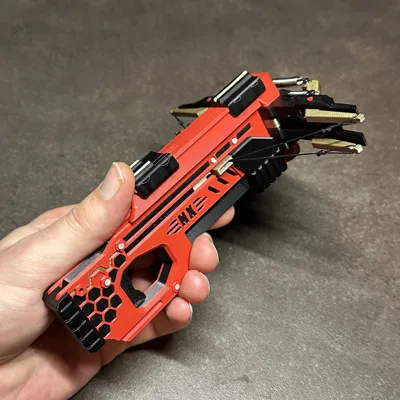
PA BOLTER NX – NEXT EVOLUTION


As you can see, I still stayed strongly inspired by the design and core principle of the previous models.
From the Mini Crossbow and the PA Bolter - BBX16, the PA Bolter NX was born.

The new model fires 6 mm BBs, is slightly larger than its predecessors, and offers better possibilities for future attachments that are still to come.


What is needed?


For the rubber band version, you will need:

  • 2x Helical 10 mm Springs (B-BB003)
  • suitable rubber bands

For the crossbow version, you will also need:

  • 2x Helical 10 mm Springs (B-BB003)

In addition, for the crossbow arms you will need:

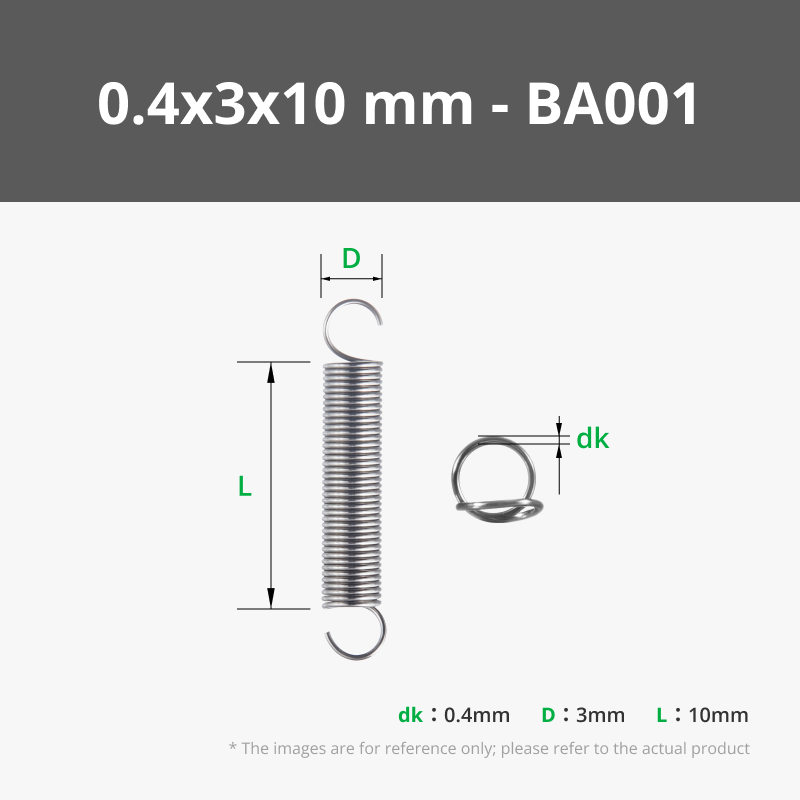
  • 4x Extension Springs 10 mm (BA001)
  • 2x Extension Springs 30 mm (BA007)
  • 12x Self Tapping Screws 2x5 mm (AA191)
  • some cord, for example Nylon Cord 0.6 mm (MF001)


🧩 Before you start printing


Before jumping into the full PA Bolter NX build, I highly recommend doing a quick tolerance test first, 

especially if you are using PETG or a new filament spool.

It is also important that the parts print with clean tolerances and smooth surfaces, since both can have a big impact on fit, 

function, and final assembly.


Assembly Guide

  • In the video, I assemble the crossbow version. There is one slightly tricky part, which is why I decided to make a video, since it is difficult to explain properly with just pictures and words.
  • I therefore recommend paying close attention at 0:36 min. In order to install the second side of the outer shell, it first has to be connected to the bolt in the slide, as shown in the video, and then carefully bent upward.


Safety warning

This model is a low-power mechanical toy launcher.

Do not aim or shoot at people, animals, faces, eyes, windows, vehicles, or fragile objects. Even if the impact may seem minor, a small projectile can still cause injury, especially if it hits the eye. Wearing eye protection is strongly recommended.


Safety Measures

This model includes constructive safety limitations. The mechanism, tolerances, and material strength are designed for the intended low-power toy function at the original scale.

Scaling, reinforcing, or modifying the model may cause malfunctions, breakage, or unsafe behavior and is not supported.

This model is not a firearm, not a firearm part, and is not compatible with real firearms or real ammunition.


Comment & Rating (35)

(0/1000)

Boosted
Pinned by Designer
Awesome design and super fun build. Everything fit together nicely, the mechanics work great, and the finished blaster looks amazing. Easily one of the coolest printable projects I’ve done. Great work!
The designer has replied
designer
1
Reply
@ImAgInE12 Buddy, this is exactly the kind of comment you hope to get! Thanks man, I really appreciate it! 😎🤙
0
Reply
Boosted
Replying to @Tommy3DLab :
All good 👍
0
Reply
Boosted
Are there any attachments for this?
0
Reply
Boosted
Do you know how to fix this?
The designer has replied
0
Reply
@ImAgInE12 There can be several reasons for that, but I would start with the standard procedure.... clean the print bed and nozzle, dry the filament, and run a flow calibration
1
Reply
Print Profile
PA Bolter NX - 0.2mm layer, 2 walls, 15% infill
great
The profile uploader has replied
profile
1
Reply
Thanks!👍
0
Reply
what cad did you use to design this print?
(Edited)
1
Reply
Replying to @jordsta221211 :
Autodesk Fusion 360
0
Reply
this is so sick!
The designer has replied
0
Reply
@MakerMania Thanks buddy, it’s been a while! ^^
0
Reply
Replying to @Tommy3DLab :
it really has! i havent been on makerword for a while...
0
Reply
molto bello
The designer has replied
designer
1
Reply
@Disagioinside Thanks! 👍
0
Reply
Boosted
Best 3d print I ever printed
The designer has replied
0
Reply
@ImAgInE12 Thanks buddy! 🤙😎
0
Reply
Boosted
Video to make the rubber band version?
The designer has replied
0
Reply
@ImAgInE12 Right now I don’t have time to make a full video for the rubber band version, but I made an image to show where the parts go. That should help you see the setup more clearly.If anything is still unclear, just let me know! 👍
1
Reply
I love your design very much. Thank you for your great models
The designer has replied
0
Reply
@husodyn Thanks, buddy! I really appreciate it! 😁👍
0
Reply
For the Emperor! The PA Bolter NX is an extraordinarily detailed Warhammer-inspired weapon replica. The brutalist bolter design — magazine, barrel shroud, targeting scope and grip — is rendered with obsessive grimdark accuracy. This prop-quality piece would look phenomenal on any Warhammer enthusiast's shelf or cosplay rig. Magnificent craftsmanship!
The designer has replied
0
Reply
@TinyOrbit3D For the Emperor! I’m not deeply into Warhammer myself, but I’ve always admired how rich the universe and lore are. I really appreciate your awesome feedback, buddy, hearing that comparison is a huge compliment! 🫡
0
Reply
Range?
The designer has replied
0
Reply
Marui is you!!! =///=
The designer has replied
0
Reply
@jimmu Haha no, I’m Tommy 😄
0
Reply

License

This user content is licensed under the MakerWorld Exclusive License.

You may create derivative works based on this object, provided that all such derivative works are published exclusively on the MakerWorld platform and include proper attribution to the original creator. You may not share, upload, host, distribute, or publish this object—or any derivative work of this object—on any other digital platform, marketplace, or distribution channel. Commercial use of this object and any derivative works is strictly prohibited. This includes, but is not limited to, selling, renting, sublicensing, or using the object in any context in which you receive monetary compensation or other financial benefits.