Search models, users, collections, and posts
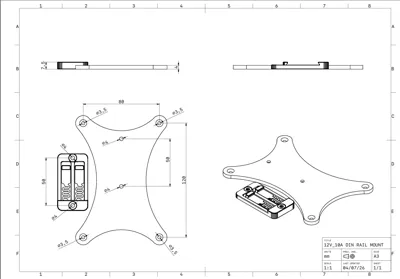
DIN Rail Mount SMPS Power Supply (120x80mm)
IP Report


Print Profile(1)

0.2mm layer, 3 walls, 25% infill
Designer
57 min
1 plate
Open in Bambu Studio
Boost
2
4
0
0
4
3
Released
Bill of Materials
Maker's Supply Kits and Parts
Select all


Bambu Filaments
Select all
.jpg)
Description
Description:
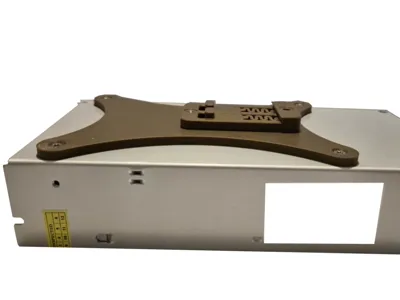
This is a reliable two-piece mounting system designed to easily attach an SMPS power supply to a standard DIN rail. The modular design allows for fast, support-free printing and a solid assembly, making it perfect for organizing electrical panels, 3D printers, or automation projects.
The base plate is compatible with SMPS units that have a 120 x 80 mm mounting hole spacing.
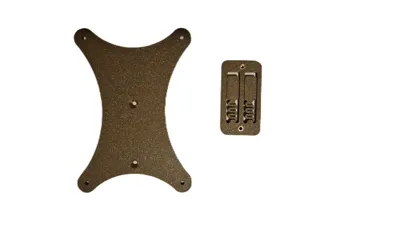
3D Printed Components:
- Base Plate: The main "X" shaped part that attaches directly to the back of the SMPS.
- DIN Clip: The mount that attaches to the base, featuring integrated flexible arms for a firm and secure grip on the DIN rail.
Bill of Materials (BOM):
To fully assemble this mount, you will need the following hardware in addition to the printed parts:
- 4 x M3x6 screws — to secure the printed base plate to the metal casing of the SMPS.
- 2 x M3x8 screws — to attach the DIN clip to the base plate.
- 2 x M3 nuts — to secure the two printed parts together (base plate and DIN clip).
Assembly Instructions:
- Insert the 2 M3 nuts into the dedicated hex slots on the base plate.
- Place the DIN clip over the base plate and align the center mounting holes.
- Secure the two parts together using the 2 M3x8 screws.
- Align the assembled mount with the threaded holes on the back of the SMPS (120x80 mm spacing).
- Screw the base assembly to the power supply using the 4 M3x6 screws.
- Snap the power supply onto your DIN rail!
Recommended Print Settings:
- Material: PETG, ABS, or ASA. These are highly recommended because power supplies generate heat, and these materials offer superior thermal resistance. PLA can work if the area is very well ventilated.
- Infill: 20% - 40% (to ensure the mechanical rigidity needed to hold the weight of the power supply over time).
- Supports: No (the parts are designed to be printed flat on the build plate).
License
This user content is licensed under a
Creative Commons Attribution-Noncommercial-Share Alike
Comment & Rating (0)