Hi Detailed Snowy Owl - Multipart Assembly Model


Print Profile(3)

Description
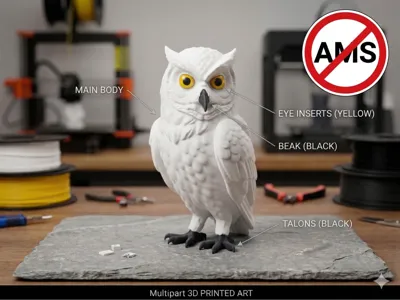
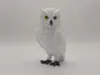
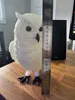
Highly Detailed Snowy Owl - Multipart Assembly Model (No AMS Needed!)
Bring a touch of wildlife elegance to your desk or shelf with this stunning, highly detailed Snowy Owl sculpture!
This model features intricate feather textures and a realistic pose, designed specifically as a multipart print. This means you can easily achieve a professional, multi-colored look without needing a Bambu Lab AMS or other multi-material switching system. Simply print the parts in their respective colors and assemble them!
This design is optimized for detail and clean color separation, but please note: It is NOT support-free. Due to the complex geometry of the feathers and overhangs, supports are required for several parts (the main body).
Features:
- Multipart Design: Print the Main Body, Eye Inserts, Beak, and Talons separately in different colored filaments (as shown in the reference image).
- High Detail: Captures realistic feather patterns and facial features.
- No AMS Required: Achieve a multi-color result through simple assembly.
- Perfect Display Piece: Makes an excellent decoration for home, office, or as a gift.
Print Settings & Instructions:
Required Materials:
- White Filament (Main Body)
- Yellow Filament (Eye Inserts)
- Black/Dark Grey Filament (Beak & Talons)
Recommended Settings:
- Layer Height: 0.16mm - 0.2mm (for fine detail on feathers).
- Infill: 10% - 15% (Grid or Gyroid recommended).
- Walls: 2-3 wall loops.
- Supports: REQUIRED. We highly recommend using Tree Supports (Auto) with a 0.2mm Z-distance for easier removal from the feather details, especially under the wings and chest of the main body.
- Brim: Recommended for the smaller parts (Beak and Talons) to ensure good bed adhesion.
Assembly Instructions:
Assembly is straightforward! Once all parts are printed and cleaned of supports:
- Take the Main Body (White).
- Carefully glue the Yellow Eye Inserts into the eye sockets. A tiny drop of superglue works best.
- Glue the Black Beak into the corresponding slot on the face.
- Glue the Black Talons into the slots on the base of the owl's feet.
Happy Printing!
License
You shall not share, sub-license, sell, rent, host, transfer, or distribute in any way the digital or 3D printed versions of this object, nor any other derivative work of this object in its digital or physical format (including - but not limited to - remixes of this object, and hosting on other digital platforms). The objects may not be used without permission in any way whatsoever in which you charge money, or collect fees.
Comment & Rating (30)