Bambu Spectrum - 2 color mixing test piece for BBL


Print Profile(2)

Description
"Want to jump on the color-mixing hype train with your 3D printer but... You do not own a Snapmaker U1? "
That was the idea behind this model - to give a sneak peek to the rest of the 3D printer community. Videos are nice but it is nothing like seeing it with your own eyes and feeling it with your own fingers.
Share pictures of your two color mixes so others can learn and be inspire.
If you like the design, don’t forget to share it so others can enjoy it too.
------------------------------------------------------------------------
History and details about the design:
When I saw the first videos of Full Spectrum color 3D prints (Orca-->Snapmaker Orca fork) I had one thought - "AT LAST!". I downloaded the slicer and did a couple of tests with my Snapmaker U1. Watching YT videos and looking at my prints I decided I wanted to do such design for Bambu Lab printers and show the people what a cool idea that Full Spectrum is.
The more hype, the faster some company would do something, eh?
After few days of overthinking the model I decided it should follow a few points and have the following advantages:
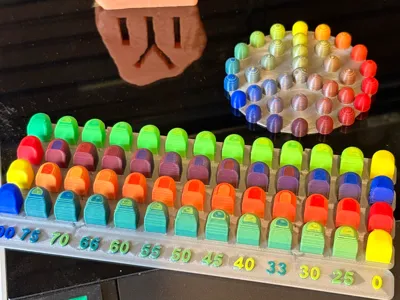
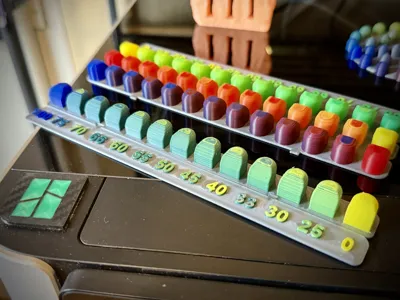
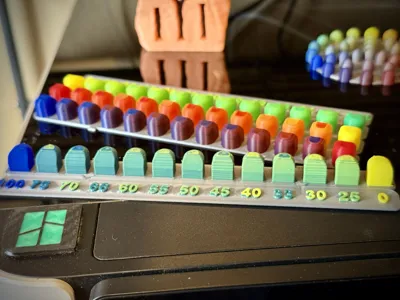
- After playing with "PeggyPalette Mini" the size is too small for me. It is super cute but it does not give you good idea of a real print, so mine had to have bigger test area.
- The second conclusion is that I want to see the colors in different shapes, not only a cylinder. Thus I made a shape that has flat walls, sloped walls, part of a cylinder, and the top is filleted in two stages. Although the Peggy Palette looks quite nicer this form gives you far beter prespective of what a real print would like.
- Learning from Peggy Palette I got two tings about color mixes:
= The step between the mixes in other models is like 25% or even more (50% in other Makerworld models for Bambu machines) which looses really cool mixes and ratios. That is why here we have the following ratios (one color %, the rest is the second color): 100%, 70%, 66%, 60%, 55%, 50%, 45%, 40%, 33%, 30%, 25%.
= Most of color mixes a ratio of more than 75% (e.g. 80:20, 90:10) does not look good, so I focused the design of this model to be between 75:25 and 25:75 at each end.
- Layer height: Watching a few hours of test videos and trying to understand how good mixes look in real life I didn't want to go for bigger than 0.16 layers as they are too course for this. 0.12 seemed like a good alternative but watching those videos made me think twice. 0.08 is too slow and imo there is no need for so fine layers. Thus I went back to the old style of printing with 0.1mm layer height which seems to me to be a good balance between all of those. If you have tried 0.12 please share.
- Because of the previous point the model is made with 0.1 mm layers in mind.
- The design is made with the idea of being printed fast(ish) on a machine like my H2D (or any other two+ nozzle machine), but to be a plausible print for anybody with an AMS and single nozzle. That is why the gradients are made only from two colors, as anything above that would take too much time and too much changes (although doable).
Please comment if you have any ideas or things that you would like to be fixed. If you are interested in me sharing only the the modifier layers (so you can add them to your own design) comment with "give us the secret"... Or something else.
Thank you for your time and do not forget to share this.
Special thanks to the people of Full Spectrum and Hue Forge for making such amazing projects!
Comment & Rating (6)