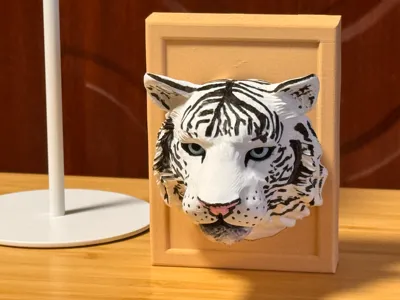
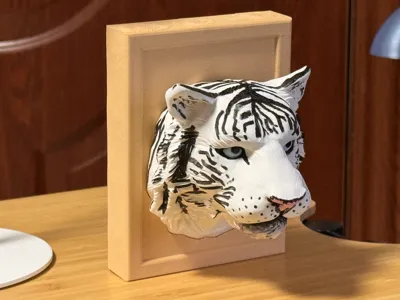
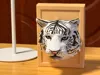
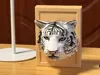
【Hunting White Tiger - Derivative Bust】Wall Hanging/Fridge Magnet/Standing Photo Frame (Original Derivative/Separate Eye Parts/Hand-Painted Fur/Rich Texture Details)


Print Profile(2)
Bill of Materials

Description
This is a derivative work from my other original piece, "【White Tiger - Snow Hunter】with Base (Original/Separate Eye Parts/Hand-painted Fur/High Surface Quality/Rich Texture Details/CrazyZoo!)". Please click my avatar to find the original model
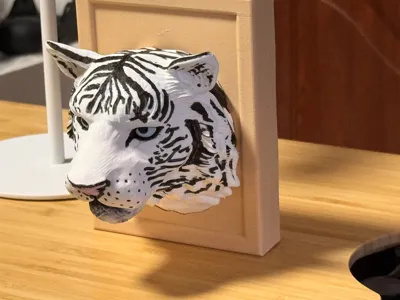
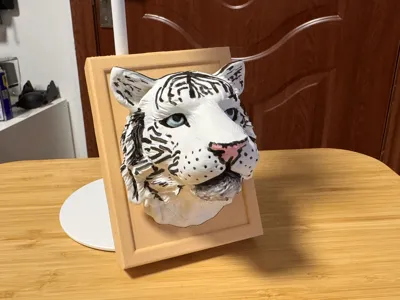
The white tiger's cold gaze is terrifying, even if it's just the head
This is a derivative work from the first piece in the original realistic animal model series 【CrazyZoo!】. Please leave a like, favorite, and comment so I can continue updating future works!
Notes:
- Key parts of this model series are separate (eyes), the main body is Print in Place, and fur details need to be hand-painted, making it moderately difficult.
- The two configurations are a head sculpt with a frame (head sculpt printed diagonally) and a head sculpt only (head sculpt printed flat)
- The back of the frame integrates a hook (for wall decoration with adhesive hooks), 8mm diameter 2mm thick (including 0.1mm tolerance for magnet embedding hole), and an adjustable angle stand hole. These are all negative parts, which can be selected and deleted as needed.
- The back of the head sculpt integrates a hook (for wall decoration with adhesive hooks) and an 8mm diameter 2mm thick (including 0.1mm tolerance for magnet embedding hole), which can be selected as needed.
- If you want to adjust the size of the frame or head sculpt yourself, please only scale up the non-negative parts synchronously.
Boost Me (for free)
Your likes, favorites, comments, and follows are the biggest motivation for me to continue creating free works!
If the final product surprises you, please don't hesitate to use your free boost coupons!
Printing & Filament Instructions (April 02, 2026)
- The head sculpt is specially designed for diagonal printing to minimize layer lines, with the support surface left on the chin (to mimic the messy texture of an animal's chin with a rougher support surface). Do not change unless necessary
- The main body uses lightning infill to save material and improve printing efficiency. Do not change unless necessary
- Filament recommendations: Main body (PLA Matte White), Eyes (PLA Ice Blue), Frame (PLA Wood)
Support Removal & Installation Instructions (April 02, 2026)
- The support surface is small, so support removal is not difficult. It is recommended to use needle-nose pliers to cut the middle section of the support, then pull the support directly out by applying vertical force along the support surface direction
- Make sure to install the eyes only after completing the coloring of the eye sockets and eyes. It is recommended to use Blu-Tack for semi-permanent adhesion (not super glue, to prevent incorrect adhesion)
- The frame and head sculpt fit perfectly, simply adhere them with Blu-Tack
Coloring Instructions & Suggestions (April 02, 2026)
- The most important part is coloring the eyes, which is why Print in Place eyes are not provided. Coloring Print in Place eyes is very difficult and not recommended; with separate parts, the difficulty is medium to low.
- The coloring of the fur texture can be done freely, as natural animal textures are inherently quite random.
- Coloring order:
- Eyeballs (Important!): Dot paint the pupils. It is recommended to hold both eyeballs simultaneously with your fingers and draw pupils of the same size along the circular layer lines
- Eye sockets: Insert a light gray pen tip into the eye socket and fill a circle, then use black to create the phoenix eye effect
- Nose: Apply an appropriate amount of pink, then gently outline with a black pen, including inserting the pen tip into the nostrils to color them black
- Lips: Simply insert a black pen and fill the entire seam
- Other fur: Feel free to use real white tiger images and my uploaded pictures as reference
License
You shall not share, sub-license, sell, rent, host, transfer, or distribute in any way the digital or 3D printed versions of this object, nor any other derivative work of this object in its digital or physical format (including - but not limited to - remixes of this object, and hosting on other digital platforms). The objects may not be used without permission in any way whatsoever in which you charge money, or collect fees.
Comment & Rating (0)