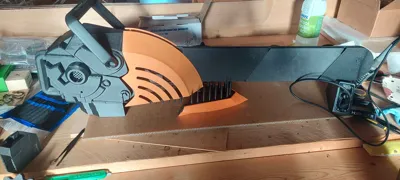
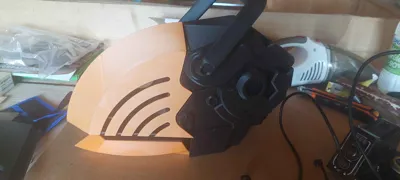
Chainsaw man cosplay of denji


Print Profile(1)

Description
Boost Me (for free)
If you like this project boost !!!!!!
Like this project if you appreciate that
Final version of printing setting of cosplay
This is the instruction manual
- Attach TOP HANDLE onto HEAD by snapping it into place.
- Clip NECK WIRES L and NECK WIRES R onto the inside studs of NECK. The longest wires should be at the center of this subassembly.
- Using one HINGE, connect NECK to HEAD.
- Screw BACK HANDLE into HEAD, but leave partially unscrewed so that NECK can still rotate along HINGE (for putting the head on). Set this head/neck subassembly aside for now.
- Screw 2x TEETH into UNDERFACE (16 teeth total, largest at front. See numbers on bottom of teeth for order).
- Screw 2x TEETH into UNDERJAW (16 teeth total, largest at front. See numbers on bottom of teeth for order).
- Slide JAW WIRES into UNDERJAW so the open side of the wires faces forward.
- Fit OVERJAW onto UNDERJAW. Bend/twist OVERJAW as needed, but try not to bend/break the thin slips on either side.
- Slide CHEEK WIRES L and CHEEK WIRES R into UNDERJAW, then slide both into UNDERFACE. This should combine the jaw and face subassemblies, which will be a little loose and bendy with the TPU parts. Set this new subassembly aside for now.
- Slide HEAD SAW components together in the following order: G, F, E, D, C, B.
- Chain 25x TOOTH A and 25x TOOTH B together (alternating) to create the head chain. Slide this chain into the assembled head saw components. Direction does not matter.
- Place HEAD SPROCKET A onto HEAD SAW B under the loose head chain ends. Connect the head chain ends around HEAD SPROCKET A so that the bumps sit between the sprocket teeth.
- Place HEAD SPROCKET B onto HEAD SPROCKET A. Make sure it sits fully in place. You may need to rotate B by one sprocket tooth relative to A.
- Slide HEAD SAW A over the assembled head sprockets. It will not lock in place, but it should cover the chain teeth at the back of the saw. Set the head saw subassembly aside.
- For each arm, use ARM SAW components label "R" and "L" (right and left) appropriately. Components that are the same between both arms do not have "R" or "L".
- Combine ARM SPROCKET A and ARM SPROCKET B, then seat into ARM HUB L. Slide ARM HUB L into ARM SAW A-L. Slide ARM SAW B, C-L, D-L, E, F, G-L, H-L, I, and J-L in order onto that subassembly. Chain 35x TOOTH A and 35x TOOTH B together (alternating) to create the arm chain. Slide it in one side of the open saw, around the sprocket, and out through the other (chain teeth point counter-clockwise if ARM HUB L points up). Slide ARM SAW K, M, and N onto the loose chain ends and the rest of the saw. Link the chain together at the far end of ARM SAW N.
- Do the precedent instruction another for the other arm
- Place the head subassembly onto the back of your head, attaching WISHBONE flat-side-up into NECK before closing NECK under your ears and rotating BACK HANDLE fully into place.
- Use a HINGE to connect the face and head subassemblies. As the face subassembly rotates down, ensure that the CHEEK WIRES L and CHEEK WIRES R slide between NECK and HEAD, WISHBONE slides into UNDERJAW, UNDERFACE locks into HEAD, and the pins at the sides of UNDERFACE lock underneath NECK.
- Slide the head saw into UNDERFACE. Slide OVERFACE L and OVERFACE R onto UNDERFACE, locking their pins in the holes above the cheeks.
- Put your arms through the arm saws. It may pinch a little. Your elbow should be able to fit through with your arm straight.
- Align your hands in the saws. Assembly complete!
If you want i can make an assembly video
If you have any question tell me
list of parts to print:
1x HEAD (black PLA)
1x NECK (black PLA)
1x UNDERFACE (black PLA)
1x UNDERJAW (black PLA)
1x TOP HANDLE (black PLA)
1x BACK HANDLE (black PLA)
1x WISHBONE (black PLA)
2x HINGE (any PLA)
1x HEAD SPROCKET A (any PLA)
1x HEAD PROCKET B (any PLA)
2x ARM SPROCKET A (any PLA)
2x ARM PROCKET B (any PLA)
1x POWERPACK (any PLA)
1x JAW WIRES (black TPU)
1x CHEEK WIRES R (black TPU)
1x CHEEK WIRES L (black TPU)
1x NECK WIRES R (black TPU)
1x NECK WIRES L (black TPU)
1x OVERJAW (orange PLA)
1x OVERFACE L (orange PLA)
1x OVERFACE R (orange PLA)
4x TEETH (32 total pieces, white PLA)
95x TOOTH A (gray PLA)
95x TOOTH B (gray PLA)
2x ARM SAW B (silver PLA)
2x ARM SAW E (silver PLA)
2x ARM SAW F (silver PLA)
2x ARM SAW I (silver PLA)
2x ARM SAW K (silver PLA)
2x ARM SAW M (silver PLA)
2x ARM SAW N (silver PLA)
1x HEAD SAW A (silver PLA)
1x HEAD SAW B (silver PLA)
1x HEAD SAW C (silver PLA)
1x HEAD SAW D (silver PLA)
1x HEAD SAW E (silver PLA)
1x HEAD SAW F (silver PLA)
1x HEAD SAW G (silver PLA)
1x ARM HUB L (silver PLA)
1x ARM SAW A-L (silver PLA)
1x ARM SAW C-L (silver PLA)
1x ARM SAW D-L (silver PLA)
1x ARM SAW G-L (silver PLA)
1x ARM SAW H-L (silver PLA)
1x ARM SAW J-L (silver PLA)
1x ARM HUB R (silver PLA)
1x ARM SAW A-R (silver PLA)
1x ARM SAW C-R (silver PLA)
1x ARM SAW D-R (silver PLA)
1x ARM SAW G-R (silver PLA)
1x ARM SAW H-R (silver PLA)
1x ARM SAW J-R (silver PLA)
1x CASING (silver PLA)
Remix for bambulab printer of project by giedzinski on printable.
Comment & Rating (85)