Engine Adapter for Manual Transmission


Print Profile(1)
Description
This remix contains parts to connect my manual transmission model to this great engine model by another designer: https://makerworld.com/en/models/1285057-print-in-place-v8-engine-fidget You will need to download and print both of those models separately, in addition to printing this model.
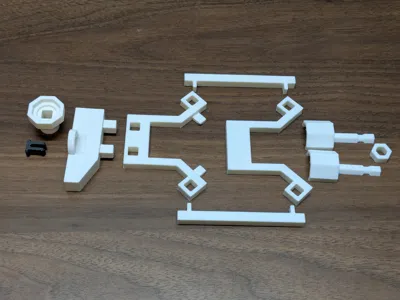
All the white parts pictured inside this red box are the remix parts included in this model; everything else pictured is part of the other two models:


(The black clip is part of the original transmission model but is also included in this model for convenience)
In addition to connecting the transmission to the engine, this also includes a printed hex-to-socket adapter that makes it easy to “run” the engine using an electric drill. See the gif in the model images above for an example of that.
Assembly
Disassemble the input arm on the transmission:

Slide the engine output coupler onto the input arm (so it goes where the crank used to be), and reassemble:

Drop the base attachment onto the dovetail under the coupler:


Use the clip to connect the transmission to the base. Insert it from the transmission side:


Attach the tabbed Y-arm to the engine. Align it as shown. Insert one tab and then the other, maintaining this alignment as much as possible to make it easier:


(Inserting the second tab will require some forceful flexing on the second arm)
(Optional) From this point forward, I recommend superglueing all the square connections together. The tolerances are a bit too loose for a solid friction-fit, and things will tend to fall apart during operation if you don't.
Align the two square holes and the coupler and press-fit the tabbed Y-arm into the base. Ensure that the coupler is rotated to align with the engine output when you do.

Connect the two extension arms to the square holes in the top of the tabbed Y-arm. Make sure the protruding tabs are pointed towards the engine to help support it.

Attached the tab-less Y-arm to the extension arms:

(Optional) Assemble the drill adapter by sliding the hex ring down over the ¼" shank until it rests inside the grove inside the socket head:


Enjoy!
Boost Me (for free)
Like it? Leave a like.
LOVE it? Boost it!
Comment & Rating (29)