Egg-O-Matic – Hand Crank & Motorized Egg Decorator


Print Profile(3)


Bill of Materials


Description
🐰 Egg-O-Matic – Hand Crank & Motorized Egg Decorator
🎉 Spin • Draw • Decorate your Easter Eggs!
Meet the Egg-O-Matic — a fun, kid-friendly machine that spins your eggs for smooth, consistent decorating. Create perfect lines, spirals, and patterns whether you use the hand crank or the USB-powered motor.
Designed to be easy to print, assemble, and use — with minimal hardware and no AMS required.
Boost Me (for free)
I always appreciate a boost!
✨ Features
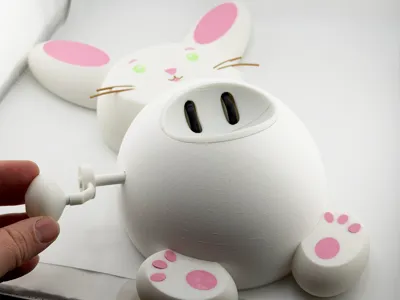
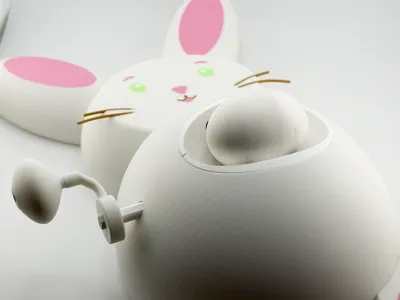
- 🖐️ Hand Crank Mode – interactive and fun for kids
- ⚡ Motorized Mode (USB powered) – smooth, consistent rotation
- 🥚 Works with real or fake eggs
- ⚙️ Smooth rotation using TPU tires + 608 bearings
- 🧩 Modular design with mostly press-fit assembly
- 🎨 Multi-color bunny details (no AMS required)
- 🛡️ TPU tires act as a built-in slip clutch to protect gears
🧩 Print Profiles
🔹 Common (Used for BOTH versions)
- Cage (includes motor mount)
- Gears, wheels, spacers
- Tires (TPU recommended)
- Optional printed 608 bearings
- Optional bearing caps
- Bunny parts:
- Ears, feet, head
- Face inserts (color parts)
- Eyes + reflections
- Whiskers and lips
- Top egg cradle (2 pieces – glue together)
- Bottom plate
🖐️ Hand Crank Profile
- Hand crank
- Crank shaft
- Retainer ring
- Knob (requires M3 x 30mm screw)
- Body (with crank hole, no USB opening)
⚡ Motorized Profile
- Direct drive crank shaft (motor coupling)
- Body (USB cable exit, no crank hole)
🔩 Hardware Required
- M3x6 2 screws (up to ~12mm for bottom plate)
- M3x6 2 screws for cage to bottom attachment
- M3 x 30mm screw (for crank knob)
Bearings (choose one)
- Print your own 608 bearings (see common print profile)
- Or use real ones:
→ Micro Steel Deep Groove Ball Bearings (608ZZ) - 5 bearings total
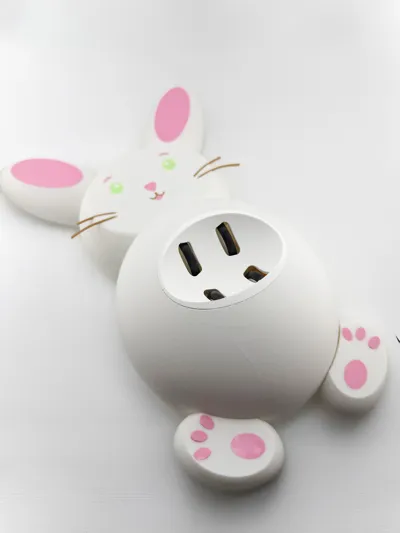
⚡ Motor (Motorized Version)
- TT Motor DC5V 59RPM CCW Single Axis (Part # LA001 order from maker supply, or from amazon)
- Powered via standard USB-A
Optional:
- USB extension cable
- USB battery pack for portable use
🧪 Materials & Print Notes
- PLA for most parts
- TPU for tires (recommended for grip + slip)
- No AMS required — color parts are separate inserts
🛠️ Assembly Notes
- Most parts are press-fit
- Glue required for:
- Top egg cradle (2 pieces → glue together)
- Optional: cradle to body
- Decorative inserts (ears, face, feet)
- Bottom plate attaches with M3 screws
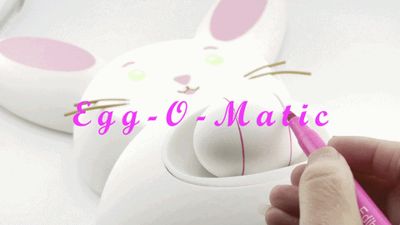
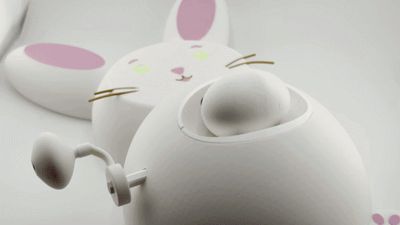
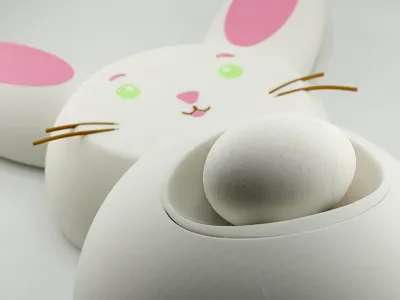
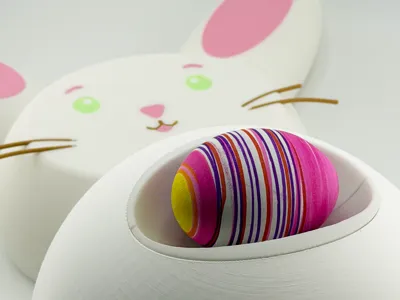
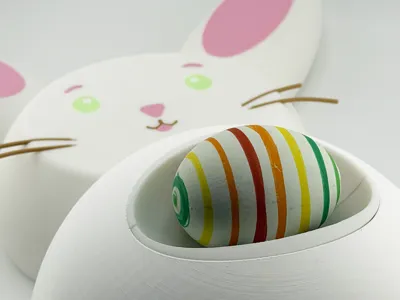
🥚 Using the Egg-O-Matic
- Works great with:
- Hard-boiled eggs
- Plastic eggs
- For edible decorating:
→ Edible Food Coloring Markers such as these
Just spin and draw — stripes, spirals, and patterns are super easy and fun 😄
💡 Tips
- TPU tires provide grip while protecting gears
- If needed, gently adjust egg position for centering
- Spring-loaded wheels help accommodate different egg sizes
- Motor mode gives the smoothest results, crank mode adds interaction
🛠️ Assembly Instructions
Assembly is straightforward and mostly press-fit. Follow the steps below based on your chosen build (hand crank or motorized).
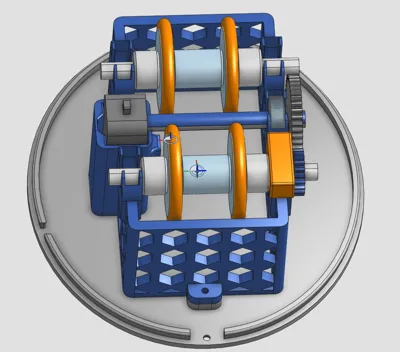
🔧 1. Install Bearings & Wheels

- Add TPU tires to the wheels
- As shown in the diagram, for each axle, Install wheels and spacers and bearings and egg gear
- Press the prepared axle down into the cage
Install bearing caps if needed for a tighter hold
2. (Motorized version)
- Connect the motor output shaft and the motorized crank shaft with the crank gear

- Slide the TT motor's USB cable through the mount and then through the cage hole. If you printed the Motorized Body you will have a hole for the USB wire


finally, press fit the assembly into place

2.5 Hand Crank Version
Starting with step 1 above, you should have an assembly that looks like the following:

- Pre-assemble the knob, crank arm and crank shaft. You can glue the arm to the shaft if you wish. The knob screws to the arm with a M3x30mm screw. Do not overtighten, you want it loose so the knob can freely rotate.

- Now pass the crank shaft through the hole in the body (from the hand crank profile) and finish assembling the shaft with the bearing and crank shaft collar

- Finally, gently press the shaft and bearing into the center bearing holder and line up the gear.

3. Cage and Body assembly
- Using the M3x6 screws, mount the cage to the bottom part
- Place the USB wire across the hole in the bottom
- Place the body (motorized version) onto the bottom plate
Using M3x6 screws attach the bottom to the body
4. Body decoration
- Place and glue each of the colored inserts into the ears, head, and feet
- Glue the feet, head and ears together at designated mount points
Enjoy!
License
You shall not share, sub-license, sell, rent, host, transfer, or distribute in any way the digital or 3D printed versions of this object, nor any other derivative work of this object in its digital or physical format (including - but not limited to - remixes of this object, and hosting on other digital platforms). The objects may not be used without permission in any way whatsoever in which you charge money, or collect fees.
Comment & Rating (1)