Search models, users, collections, and posts

Gothic Ornamental Chess Piece Holders

IP Report

Print Profile(2)

All
X1 Carbon
H2S
P2S
X1E
P1S
P1P
H2D
X1
A1
H2C
H2D Pro
X2D
A2L

X1C Print Profile (0.16mm layer, 2 walls, 15% infill)
Designer
72.2 h
4 plates
5.0(4)

0.16mm layer, 2 walls, 15% infill
Designer
71.9 h
4 plates
5.0(1)

Open in Bambu Studio
Boost
101
312
18
7
147
21
Released 

Description

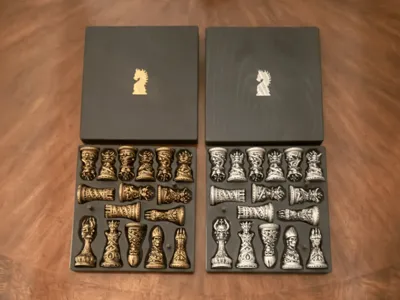
This is a chess piece holder designed to store the “Gothic Ornamental Chess Set” chess pieces designed by 29FLO. The wood grain modifier I used for the surface of the top lids was provided by mathdvc (Flat Surface Only Texture).  The Prints pictured in the photo were printed on the H2C using Creality Ender PLA (Black), and PLA Silk for the knight chess piece emblems on the lids. I printed the two holder lids on different build plates so the you can see the difference. The Gold chess piece holder lid was printed on a Bambu PEI Textured plate, and the silver holder was printed on the Bambu Engineering plate.  I personally prefer the textured plate, which is incorporated in the print profile.  As always, let the prints come down to room temperature before removing from the heat bed, to avoid any stress induced warping as the print cools.


After quite a few requests, I resized this model so that it can be printed on smaller plates.  I have an X1C, so the print profile that I added is for that printer. However, it should fit the P1's as well since they have the same usable print volume.


Since the model takes up the entire build plate, make sure to remove the purge lines printed along the front edge of your plate as soon as it gets laid down, and the printing starts.  Otherwise, it will get embedded into the surface of the chess piece holders.  Also, I noticed that if I changed project filaments, the prime tower would move on the plate and Bambu Studio would give me a warning that the model was over the printable boundaries of the plate.  So, if you run into the same problem it's usually an issue with the prime tower location.  Move the prime tower in 0.1mm increments, re-slice each time, until you get a successful slice.  If you do have to move the model itself (Which you shouldn't), make sure you select “Assembly” for the pertinant plate before moving.

Comment & Rating (18)

(0/1000)

Hello I printed the model on my A1 it came out excellent but the figure doesn't come out on the lid do you know why
The designer has replied
Show original
0
Reply
I'm not sure why it did not print the knight emblem on the lid for you, without being able to see your slice settings. Are you seeing the knight emblem in the preview tab after slicing? I just loaded the X1C profile I provided into Bambu Studio and sliced it for the A1 printer and the emblem shows up after slicing in the Preview tab. One thing to verify, especially if you've changed/added/removed any of the project filaments, is make sure that the color for the knight emblem is not the same color as the main body in the Objects tab. I know that Budweiser08 commented below about having the same issue, but never got back to me whether or not he was able to resolve the issue. Let me know what you discover, so if others are having the same problem, they will be able to follow the same guidance.
1
Reply
Replying to @HobbyShack :
It's no use, it doesn't come out, so I made one and printed it separately and glued it on
Show original
0
Reply
Print Profile
X1C Print Profile (0.16mm layer, 2 walls, 15% infill)
Nice fit pretty tight. I couldn't get the knight to print in second color. It's fussy about plate being too close etc. 256x256. Long time to print, but again to is really nice.
1
Reply
Tell me how to print is on a P!P with 256x256x256 plate. One color would be fine and can rub and buff the knight. Thanks
The designer has replied
0
Reply
Go to the Process tab (Global), select Others and uncheck Rib Wall in the Prime Tower section. Then set the prime tower width to 5mm, Brim Width to 2mm, and the Infill Gap to 100%. Check the Purge into objects' infill (if it isn't already). Then slice the model. After slicing, the prime tower moved and I got the error message "A G-code path goes beyond plate boundaries" and the prime tower extended off the back of the plate. I went back into the Prepare tab and moved the prime tower in 0.2mm increments until I got it to slice. The coordinates that I ended up with for the successful slice was x=16.00, y=150. I don't know if that will be the same for you or not, but you just need to move the prime tower so that it's not too close to the print boundary, or too close to the model. For whatever reason, the prime tower moves every time you change the filament type. Bottom line is you have to move the prime tower in small increments in order to get everything to fit.
0
Reply
Replying to @HobbyShack :
Here's an image of a successful slice with the setting I just mentioned.
0
Reply
Replying to @HobbyShack :
I'm not that good at settings. It was set like you wrote. I get the tower on the way, move it then get the g code error. Bambu
0
Reply
It's a great case. I printed it perfectly on A1. I don't have an emblem on my seal either. but not critical. I would also like to draw a grid on one lid to use as a chess board.
The designer has replied
1
Reply
I'd like to figure out why some are having this issue. Can you send me a screen shot of your sliced settings that captures the info like in this pic? You're settings in the Objects tab should look exactly like this for plate 1 (Chess Piece Holder Top (Gold)).
0
Reply
can you create this for a P1S?
The designer has replied
0
Reply
I'm assuming you are asking if I can create the print profile for the P1S, correct? The X/Y dimensions are 235mm/250mm, so the model will fit the P1S build plate, albeit it will be tight. I don't have a P1S, but I do have an X1C, which has the same usable build plate volume. I created a print profile for the P1S and X1C (and the A1) just to make sure that it will fit. I had to change the prime tower width to 5mm to get it out of the way of the model, but it sliced successfully. A person would also have to remove the purge line at the front of the plate as soon as it gets laid down, so it doesn't get embedded in the print. I'll have to print it out on the my X1C to validate the profile before I can post.
2
Reply
what if it was done as just one color, the tower may not be needed?
0
Reply
Beautiful and wonderful
Show original
0
Reply
Print Profile
0.16mm layer, 2 walls, 15% infill
0
Reply
Print Profile
X1C Print Profile (0.16mm layer, 2 walls, 15% infill)
0
Reply
Print Profile
X1C Print Profile (0.16mm layer, 2 walls, 15% infill)
0
Reply
Print Profile
X1C Print Profile (0.16mm layer, 2 walls, 15% infill)
0
Reply

License

This user content is licensed under a Standard Digital File License.

You shall not share, sub-license, sell, rent, host, transfer, or distribute in any way the digital or 3D printed versions of this object, nor any other derivative work of this object in its digital or physical format (including - but not limited to - remixes of this object, and hosting on other digital platforms). The objects may not be used without permission in any way whatsoever in which you charge money, or collect fees.