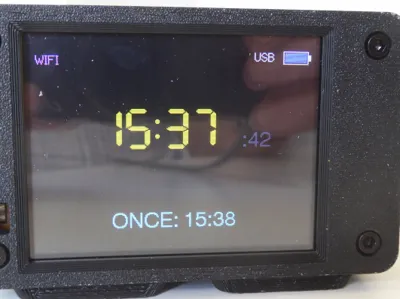
Travel Alarm Clock


Print Profile(1)

Description
CYD Buttonless Travel Alarm Clock. I recently bought a small batch of Cheap Yellow Displays (CYD) from Ali Express and have run out of interesting projects, all copied from Github and elsewhere on the internet. The CYD is a highly versatile piece of kit, ESP32 based, USB powered, 2.8-inch touchscreen LCD, Wi-Fi and Bluetooth connectivity, all at a ridiculously low cost. I/O connectivity is limited. There is also a JST connector for an external speaker. In my opinion the choice of build options is limited, especially for a relative newbie like me, unless you are into Home Assistant, IoT stuff, which seems to be where most of the applications are.
Why a buttonless travel alarm? Well, (a) because I couldn’t find one for the CYD; (b) because I needed a new travel alarm, and (c) buttonless because the CYD doesn’t have a lot of options when it comes to I/O connectors. Also, Wifi scanners and weather stations I already have – they were my learning curve. There are quite a few clock calendars as well but I couldn’t find a decent alarm clock anywhere. Having already built one with a 16 x 4 LCD display I now felt that the CYD might make a good starting point for a travel alarm clock. So here goes….
The first thing to note is that not all CYDs are the same. Mine all have the ST7789 driver. Others will work with minor mods to the setup files. First off with an admission and an apology. I’m OK with C++ programming but the vagaries of the microchip, and the differences between certain functions in different versions of Arduino. Some of this left me fumbling in the dark with code that won’t compile. Google AI has been really useful at saving me hours, maybe days of frustration. If that upsets the purists among you I apologize, read no further.
This project progressed in stages, each one adding further functionality. This may have led to a much larger .ino file than might be efficient, but it compiles well. I have a bunch of libraries installed.
- TFT_eSPI (by Bodmer) – You need to configure the User_Setup.h for the CYD but I found useful information here which saved me lot of time.
- RTClib (by Adafruit)
- Wire.h
- LVGL (Light and Versatile Graphics Library): for creating buttons, sliders, etc. on the CYD.
I started with just a simple clock, with the time being set via the code. This kept surprisingly good time but was not what I needed. Then I, in order and over several days:
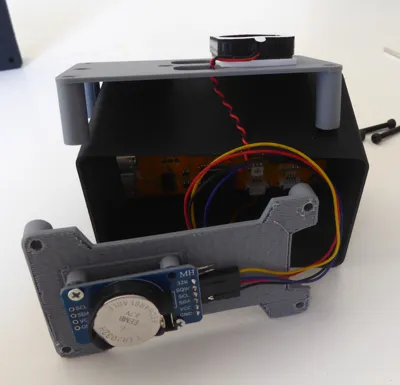
- added a RTC module (DS3231) to retain the time when not connected to a power supply. This is connected to the I2C pins on the CYD (22 & 27 in my case)
- added an alarm, still hard coded
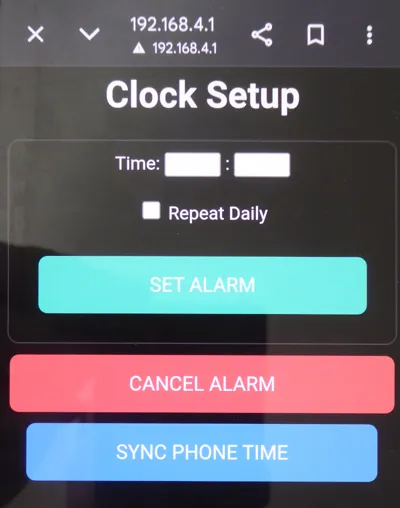
- having problems using the screen to set time and alarm, instead built a simple web interface that uses the CYD wifi and my mobile phone
- added XPT2046_Touchscreen library and an ALARM stop via the touchscreen
- Added a DNS Server which triggers the "Sign-in to network" popup automatically. Requires additional libraries <DNSServer.h> <WebServer.h>. Also added a “Sync Time” button to the web page. Alarm clock now syncs to the phone time, and the RTC is updated.
Connection
The CYD has an internal I2C pin header (usually labeled CN1 or P3). You will connect your RTC module there.
SDA - GPIO21 or 22
SCL - GPIO22 or 27
GND - GND
VCC - 3.3 or 5V depending on module.
The JST connector and cables (provided with my CYD) were a perfect fit for this.
There is another internal header for the speaker and (hopefully, but not in my case) for battery input. The battery input should also charge the battery.
I had a lot of issues with the XPT2046_Touchscreen and the TFT-eSPI libraries. Google AI was a life saver here. AI also recommended I include File System libraries <FS.h> and <SPIFFS.h> because of a library conflict between WebServer and TFT.eSPI. Not quite sure what I did here but it worked.
- Redesigned screen layout and font size. Added icons and text for the USB and RTC battery.
- Added a 3.7V LiPo 1000mAh battery. This will keep the clock going if there is a power cut. Not really necessary but a good idea where I live. The whole system is quite a demand on the available power and the battery is only good enough for a few hours. I managed to extend it by having the software turn off the CYD WiFi after ten minutes. The whole battery thing was an extra level of complication. I realised quickly that I needed a hard switch to isolate the battery if the USB power was disconnected for any period longer than the few hours that would flatten the battery completely (the battery has a protection circuit that is intended to avoid damage).
- Modified the web app so the alarm could be set to repeat daily (avoids having to set the alarm every day)
- Modified the web app with a “Cancel Alarm” button.
I guess you could call this a success, an alarm clock with no buttons. I still haven’t “calibrated” the battery icons. The CYD can be very bright at night. I need to control the backlight brightness via GPIO 21 (using analogWrite(21, value) or something). In hindsight, a battery pack is not really necessary. I have a few power packs into which I could have plugged the alarm while the power pack is charging. It works fine on USB power alone and keeps its time OK via the RTC even when disconnected.
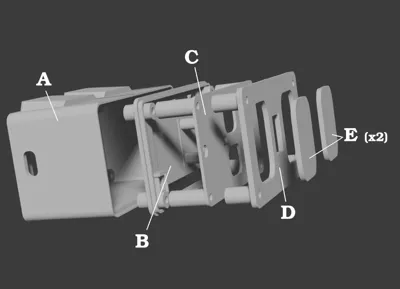
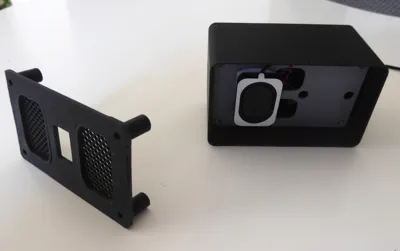
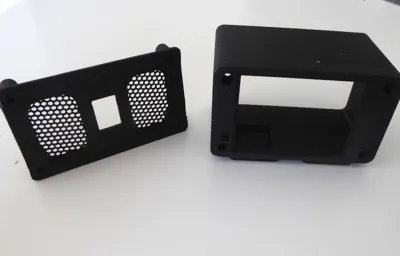
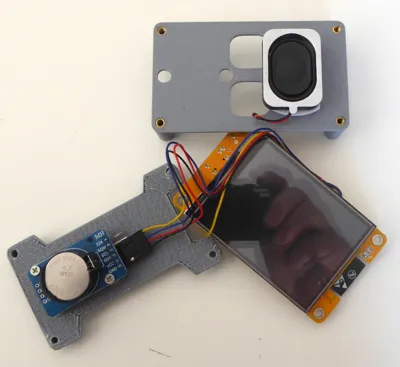
I designed a full enclosure, using the front end of “Simple housing for Cheap Yellow Display (CYD) with USB-C by DE_Markus on Thingiverse: https://www.thingiverse.com/thing:6440252”
Shopping list:
- Cheap Yellow Display (CYD) – AliExpress
- DS3231 RTC with battery. “Safety Check” whether battery needs to be a rechargeable one. Some RTCs need a rechargeable battery. Fitting a standard battery can lead to serious damage unless the board is modified (usually desoldering or cutting across a resistor).
- 8 Ohm 1W 1.25mm JST Speaker
- (Optional) 3.7V 1000mAh LiPo Battery or small pass-through power pack. If a battery is fitted there is a hole for a switch on the back cover. The battery is only back-up power. If the USB power supply is removed, the switch should be turned off to save the battery.
- 3mm hex-socket head cap screws (20/22mm) and threaded inserts to fit. If you din’t want to use threaded inserts, the holes can be made smaller for the screws to cut their own thread. Don’t use a larger screw, the CYD will not accept it.
Arduino
I have enclosed the Arduino .ino file. There is a lot of useful information at this site including preconfigured CYD setup files. The TFT_eSPI folder will contain a User_Setup.h file which you will need to preconfigure. I have included my own here, which works fine with my CYD (ST7789 driver).
Setup
When the alarm is powered up, the wifi will activate (and close down after ten minutes). SSID is “CYD_countdown”. Connect to this wifi with your mobile phone and open page at http://192.168.4.1. This will give you access to the setup for the travel alarm.
Comment & Rating (1)