Functional Parts for 1.2m RC Harbour Tugboat


Print Profile(1)

Description
Overview
This is a complete set of functional parts for the 1.2 M Harbour Tugboat that can be found on Makerworld here:
https://makerworld.com/en/models/1843800-1-2m-rc-harbour-tugboat-harbour?from=search#profileId-1995660
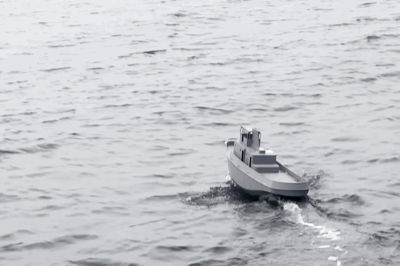
As far as I can estimate, this is a 1:20 scale model of a 1960s-era tug boat. The prototypes were 78 feet long.
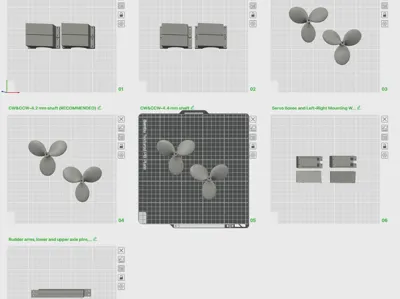
I cut the oversized pieces in the print profile to fit A1, P1, and X1 series printers, and consolidated some pieces to reduce the number of plates, and applied adaptive layer height to some pieces with rounded tops.
I've also included a parts list for the radios, motors, servos, electronic speed controllers, and drive shafts. This is the exact parts list I used, and it works fine.
Hull Assembly
I glued the hull together with superglue. I ran a bead of glue on the edges before mating them, and then ran a bead both inside and outside along the seams after mating to make sure there were no leaks. PLA is waterproof, so you do not need to cover it with resin or other waterproofing material. Most people will paint the hull which is also waterproof. I strongly recommend testing for leaks before painting.
Ballast
The boat rides way too high without ballast (weight) in the bottom of the boat. You need about 7 kg (15 pounds) of ballast in the bottom of the boat to get it to sit at the right height in the water. The propellers must be fully submerged (so that the stern of the boat is touching the top of the water) and the helm/cockpit should be level with the water.
Motor Mounts, Servo Mounts, Rudder Mounts, and Propellers
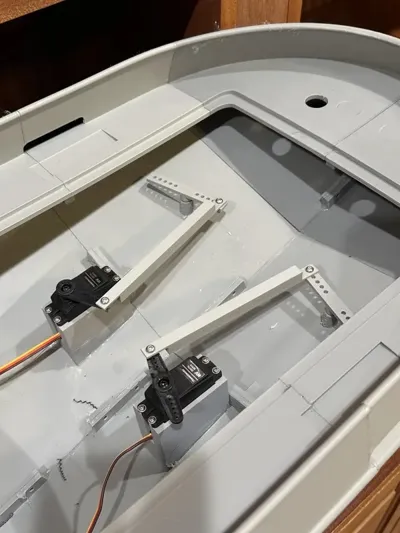
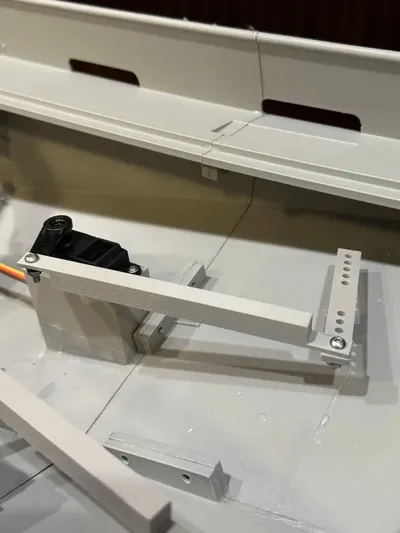
This file now includes a complete set of motor mounts, servo mounts, rudder mounts, and scale-appropriate propellers, which were all missing from the original model. I have included photos of how they are attached. Superglue is used to attach all of them to the hull and/or to each other where appropriate.
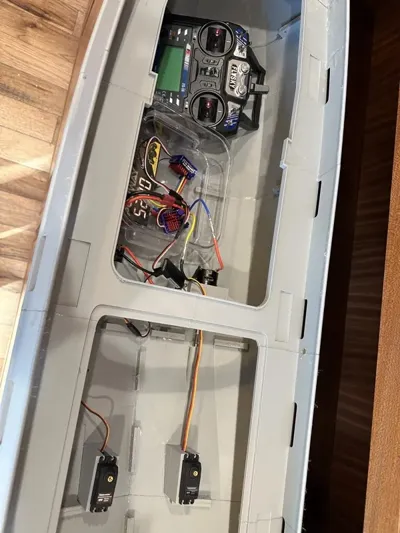
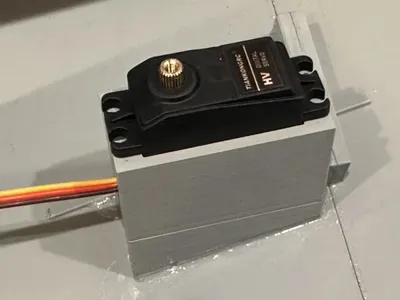
Motor and Servo Mounts
The servo mounts fit precisely in place against a small ridge on the inside of the hull. See the photos in the print profile.
The motor mounts fit along a small ridge on the inside of the hull, but the placement in the bow/stern direction is flexible. You need to adjust them to fit the universal drive shaft which allows for some misalignment between the motor shaft and the propeller shaft.
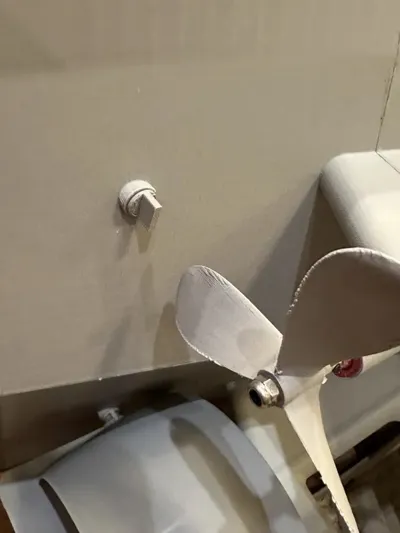
Bore Collars with Set Screws
You need to install 4mm bore collars with set screws on the inside end of the drive shaft to prevent the shaft from pulling on the motor when in reverse (I didn't do this initially and one of my motors pulled right out of its mount).
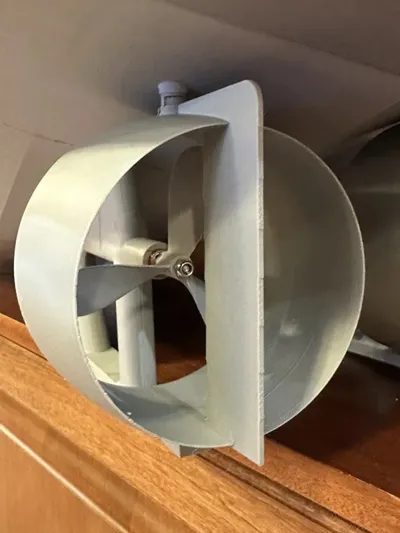
Propellers
The propellers included are 100 mm diameter with a 65 mm pitch. They are suitable for the tugboat of this era and provide good thrust both forward and backward.
Note 1: The top of the rudder needs to have a 2.6 mm wide x 2.5mm deep slot cut in the mounting bracket for engage with the rudder/shroud without slipping.
Note 2: The front of each propeller needs to have a 2.6 mm wide x 2.5mm deep slot cut across the axis of the drive shaft for it engage with the drive shaft without slipping.
Electronics & Hardware Parts List
Here is a parts list for the radios, motors, servos, electronic speed controllers, and drive shafts. I used these exact parts and have a fully-functional boat.
Motors
You can use either brushed or brushless motors. Brushed motors are much cheaper ($15 to $25), but run much hotter and don’t perform as well. Brushed motors are defined in terms of the number of turns on the windings. The lower the turn number, the faster and more powerful the motor, but the hotter the motor runs. A motor in the range of 21T to 35T will give you good power with the propeller included in these files. Brushed motors can get very hot, especially with lower turns, so you must print the motor mount in ABS or use a silicone liner between the motor and the mount. I used a 27T motor and cut a silicone baking sheet to use as a liner. This works well with a 2s (7.4V) battery. For better low-speed control, you can use a motor with a higher number of turns (e.g., 45T to 65T motor. However, it will be under-powered with the included propeller unless you also use a 3s (11.1V) or even 4s (14.8V) battery.
Brushless motors are more expensive ($80 to $150), but way more efficient. They are quieter, more powerful, provide better control at low speeds, and don’t run hot. With brushless motors, you do not need to print the motor mount in ABS or use a silicone liner. The Hobbywing Quicrun Fusion SE 1200KV is a 540 motor that is the same physical size as a 550, but has an integrated ESC. This brushless motor will outperform a 550 brushed motor. The cost of this motor right now is $80.
Electronic Speed Controllers (ESCs)
Most motors require a separate electronic speed controller (ESC). ESCs come in brushed and brushless versions. Your ESC type must match your motor type!
Some brushless motors come with an integrated ESC (like the Hobbywing Quicrun Fusion SE mentioned above).
Battery & Charger
You can use any NiMh or LiPo rechargeable battery. I used a 2s (7.4V) 5700ma LiPo battery. This will run the boat for 30-45 minutes. You can use a 3s (11.1V) or even 4s (14.8V) battery if you need more power and speed.
You will also need a battery charger compatible with your battery.
Drive Shafts
Note: The drive shaft specified below is just long enough to work. The stuffing tube, though, is about 10mm shorter than the printed tube inside the boat. So, I cut off 10mm of the 3D printed tube inside the boat to match the length of the 250mm stuffing tube.
Parts List
Some links to parts are included below just as examples. You can use any part that matched the description.
2x 550 Brushed Motors (Hobbypark 27T) OR 2x 550 Brushless Motors (HOBBYWING Quicrun Fusion SE 1200KV) | $40 (brushed) $160 (brushless) |
| 2x ESCs (60A) (must match motor type!) | $30-40 ($0 for Fusion SE) |
| 2x Servos (JX PDI-1501MG) (20kg-cm) | $24-30 |
| Radio System (FlySky FS-i6X) | $50-60 |
| 1x Battery (2S 5000mAh) | $30-40 |
| LiPo Charger | $25-35 |
| 2x Drive Shafts (OD of stuffing tube: 9mm; Shaft length 300mm; Tube length 250mm; shaft diameter: 4mm; Fielet Drive Shaft, 300 mm tube/250 mm shaft/4mm shaft) | ~$40 |
| 2x Drive shaft collars with set screws (4mm bore) | ~$5 |
| 2x Universal drive shafts from RC truck (3.17mm on one end, 4mm on the other end) | ~$10 |
Installation of Stuffing Tube & Drive Shaft
I installed the stuffing tube by continuously squeezing silicone adhesive onto the outside of it and rotating it as I slowly pushed it in. Let dry for 24 hours. That seemed to work well. It doesn't leak.
You then have to remove the drive shaft and squeeze grease into the interior of the stuffing tube This is harder than it sounds. I tried to do it straight from the grease tube and it was very difficult and didn't work well. I used a 5ml syringe and squeezed the grease in using that which worked great. Then, you just insert the drive shaft back through the stuffing tube, and you have a sealed drive shaft.
Documentation (1)
License
You shall not share, sub-license, sell, rent, host, transfer, or distribute in any way the digital or 3D printed versions of this object, nor any other derivative work of this object in its digital or physical format (including - but not limited to - remixes of this object, and hosting on other digital platforms). The objects may not be used without permission in any way whatsoever in which you charge money, or collect fees.
Comment & Rating (12)