Search models, users, collections, and posts
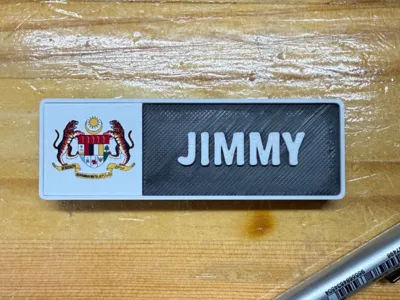
Malaysian Gov Nametag
IP Report


Print Profile(1)

0.2mm layer, 2 walls, 15% infill
Designer
1 h
1 plate
Open in Bambu Studio
Boost
2
4
0
0
13
5
Released
Description
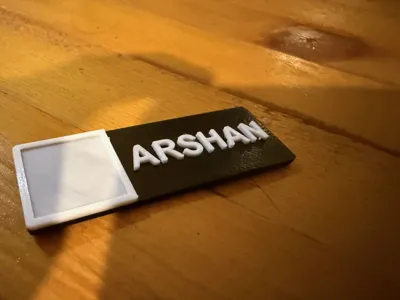
Professional Magnetic Name Tag (Customizable)
Ditch the boring plastic clips! This 3D-printed name tag features a sleek, multi-layered design with high-contrast text and a dedicated space for a full-color logo. Whether for professional events, school staff, or business branding, this tag is built for durability and style.
✨ Key Features
- Magnetic Backing: Designed specifically to house a standard magnetic name tag fastener, so you don't ruin your clothes with pins.
- Dual-Texture Finish: The contrast between the smooth logo area and the textured "Jimmy" nameplate gives it a premium look.
- UV DTF Ready: The left panel is perfectly sized for a 1:1 square or circular logo application.
- Raised Lettering: The name is embossed for a tactile, high-end 3D effect.
🖨️ Print Settings
- Material: PLA or PETG (Black/White/Grey).
- Layer Height: 0.16mm (Optimal for crisp text and logo details).
- Top Surface Pattern: Monotonic Line (For that clean, streak-free look on the name background).
🛠️ Assembly
- Logo: Apply your logo using a UV DTF transfer or a high-quality sticker on the recessed left panel.
- Magnet: Simply glue a standard magnetic name tag attachment (commonly found at office supply stores) to the backplate.
- Customization: Easily change the name in your slicer by adding a text modifier or using the provided OpenSCAD/CAD file.
✏️ How to Customize Your Name Tag
Follow these quick steps in Bambu Studio:
- Open the Project: Load the .3mf file into Bambu Studio.
- Locate the Text Object: In the Process panel (left side), switch from "Global" to "Objects." Look for the object labeled "NAME" (or the text layer).
- Edit Text: Right-click the text object and select "Edit Text" (or use the 'T' icon in the top toolbar).
- Type Your Name: Change "NAME" to your desired name. You can also adjust the Font, Size, and Thickness here.
- Center It: Use the move tool to ensure your new name is perfectly centered in the black recessed area.
- Slice & Print: Hit "Slice Plate" and you’re ready to go!
💡 Pro Tip: If your name is long, reduce the font size rather than stretching the tag, so it keeps its professional proportions.
License
This user content is licensed under a
Creative Commons Attribution
Comment & Rating (0)