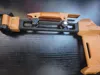
Folding Pistol Brace to Picatinny with Cheek Riser


Print Profile(1)
Description
Boost Me (for free)
Uncle J got this for ya!
The creator assumes no responsibility for how this file, the printed object, or any modifications are used. Users are solely responsible for ensuring their actions comply with all applicable laws, safety standards, and regulations in their location. By downloading or using this file, you agree that you do so at your own risk.
Boost Me (for free)
Now that legal talk out the way, here are the instructions
Tools:
Screwdriver
Drill (Optional)
Soldering Iron (Optional)
Superglue/Adhesive
Hardware:
2:3mmx30mm Screw
2:3mmx22mmHexScrew
4:3mmNut
2:5mmx30mmScrew
1:1.2mmx200mm Round Rod
2:M2.5x10mm Roll Pin
2:3mmx0.3mmx30mm Spring
1:Lighter Spring
2:m5 Threaded Heat Insert (Optional)
Instructions:
1. Trim the spring by cutting off eight loops. Repeat this step twice. Heat one end of each spring and quickly insert the heated end into the designated hole to secure it in place.

2. Cut two 18 mm sections from the 1.2 mm × 200 mm round rod.

3. From the remaining rod, cut a 7.5 mm section (a 1/16" Allen key can also be used).

4. Place the buttons into their slots, aligning the springs with the holes above. Insert the 18 mm rods to hold the buttons in position.

5. Glue the spacers into the corresponding cutouts.

6. Insert the spring‑loaded button into the hinge, align the opening, and insert a 3 mm × 0.3 mm × 30 mm roll pin in the correct orientation.

7. Insert the springs into the spring‑loaded buttons.

8. Carefully compress each spring with the detent and secure it using the 7.5 mm rod or 1/16" Allen key. Repeat for both sides.

9. Install the hinge onto the bar and fasten it using a 5 mm × 30 mm screw.

10. Assemble the remaining components as required.
11. Glue the knobs together using the 3 mm × 22 mm hex screw and install the riser.

Always free..
Always to help.
Your membership contribution is greatly appreciated
License
You shall not share, sub-license, sell, rent, host, transfer, or distribute in any way the digital or 3D printed versions of this object, nor any other derivative work of this object in its digital or physical format (including - but not limited to - remixes of this object, and hosting on other digital platforms). The objects may not be used without permission in any way whatsoever in which you charge money, or collect fees.
Comment & Rating (5)