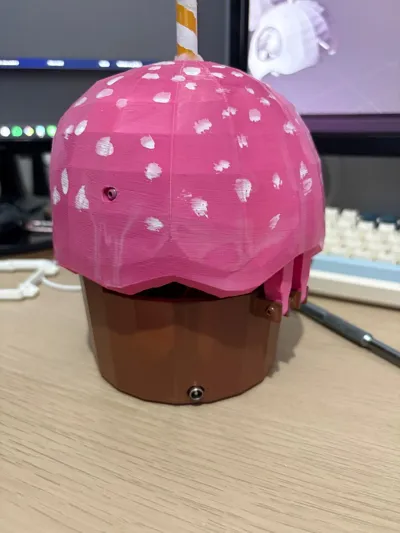
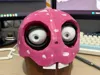
Carl the Cupcake, Animatronic FNAF Robot


Print Profile(2)

Bill of Materials
- Arduino nano x 1:
- pca9685 x 1:
- MG90s servo x 2: for eyes
- Mg995 servo x 1: for mouth
- yellow LED x 1:
- 220 resistor x 1: for led
- 5v power supply x 1: 3A minimum, 5A recommended
- M3 screw kit x 1:
Description
🧁 Carl the Cupcake – Animatronic FNAF robot
📖 Description
Bring Carl the Cupcake to life
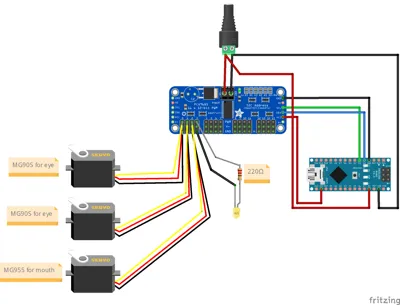
It uses an Arduino Nano ESP32 with a PCA9685 16-channel servo driver, giving smooth control of multiple servos over I2C. Movements are randomized to make Carl feel alive — perfect for FNAF displays, Halloween props, or robotics fun.
⚠️ Note: If you are using a normal Arduino Nano, the VBUS pin on the ESP32 Nano is equivalent to the 5V pin on the normal Nano. All other wiring remains
the same.
💬 Disclaimer: This is my first robot, so it’s not perfect. You may need to tweak servo positions, angles or models to get Carl moving just right, but everything should work just fine
✨ Features
- Random eye movement (left / right / center)
- Natural mouth opening/closing timing
- Flickering LED candle effect
- Smooth servo control via PCA9685
- Expandable — you can add more servos easily
🧰 Bill of Materials
🔌 Electronics
- Arduino Nano ESP32 (or normal Nano)
- PCA9685 16-Channel PWM Servo Driver
- 5V external power supply (minimum 3A, recommended 5A)
- 1× MG995 Servo (mouth / piston)
- 2× MG90S Servos (eyes)
- 1× Yellow LED
- 220Ω resistor
🔧 Other
- Jumper wires
- Breadboard or soldered setup
- External power connector
- Paperclips (to connect servo horns to the eyes)
- Screws: All M3 variants — recommended to get an M3 screw kit
🔌 Wiring

PCA9685 Channels
- CH0 → Left Eye
- CH1 → Right Eye
- CH2 → Mouth / piston
- CH3 → LED Candle
I2C Connections
- SDA → D2 (Arduino Nano ESP32)
- SCL → D3 (Arduino Nano ESP32)
Power
- VCC (PCA9685) → 3.3V (logic power)
- V+ (PCA9685) → 5V external supply (servo power)
- GND → shared ground for all components
- Arduino 5V (VBUS on ESP32 Nano, 5V pin on normal Nano) → external 5V supply
⚠️ External Power Notes (IMPORTANT):
- Do NOT power the Arduino with USB and external 5V at the same time
- Use USB only for uploading code
- Servos and LED must be powered through the external supply
- All grounds must be connected together
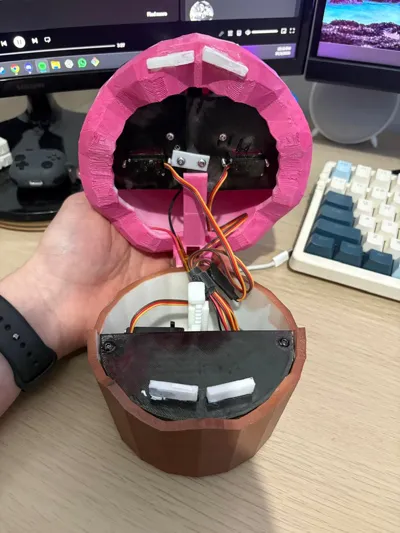
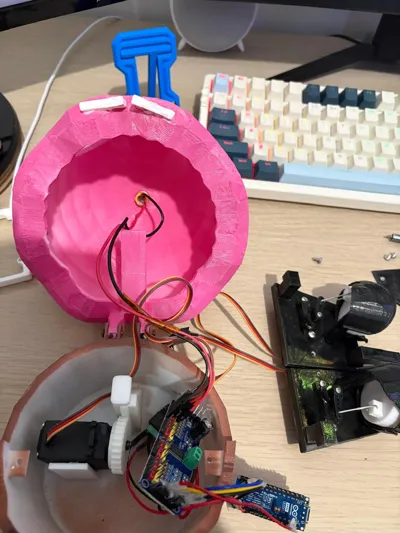
🧰 Assembly
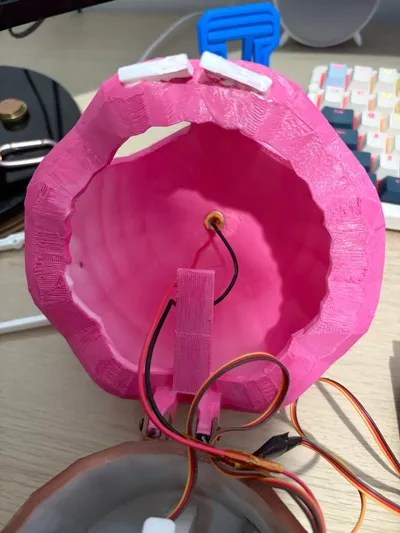
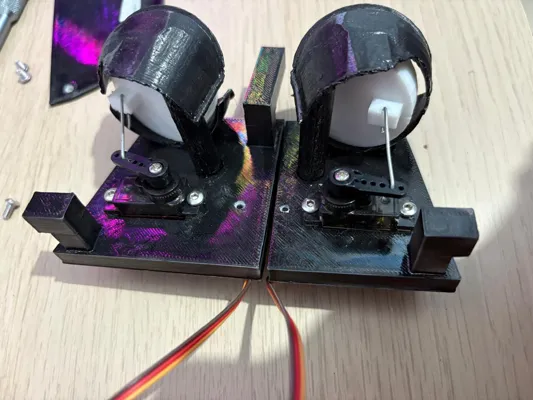
Eyes
- Carl’s eyes are mounted on two separate bases (the two eye bases were split because one piece wouldn’t fit inside the head). Assemble these bases first.
- cut and bend a paperclip just enough so that it hooks on the servo horn holes and on the eye hole on the back
- Connect each eye to its servo using a paperclip for simple linkage.
- Before mounting the servo horn:
- Set the servo to 90°
- Ensure the eyes are pointing forward
- Mount servos exactly as shown in the pictures for proper alignment and movement
- inset one eye base then the other base and screw them together, then screw them to the head on the left right and front
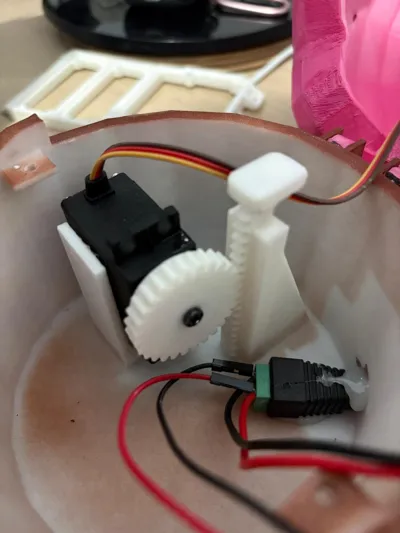
Mouth / “Piston”
- Before mounting the gear on the mouth servo:
- Set the servo to 0°
- Check that the piston fits and moves easily (tolerances may vary)
- Place the piston all the way down
- Mount the gear and make sure the teeth of the gear and piston align properly
💬 Questions / Comments: If you have any questions or need help, feel free to ask in the comments — happy to help fellow makers!
Boost Me (for free)
if you liked this model please interact with my page and boost me so i can keep posting more
thank you so much
Boost Me (for free)
if you liked this model please interact with my page and boost me so i can keep posting more thank you so much
Documentation (1)
License
You may create derivative works based on this object, provided that all such derivative works are published exclusively on the MakerWorld platform and include proper attribution to the original creator. You may not share, upload, host, distribute, or publish this object—or any derivative work of this object—on any other digital platform, marketplace, or distribution channel. Commercial use of this object and any derivative works is strictly prohibited. This includes, but is not limited to, selling, renting, sublicensing, or using the object in any context in which you receive monetary compensation or other financial benefits.
Comment & Rating (32)