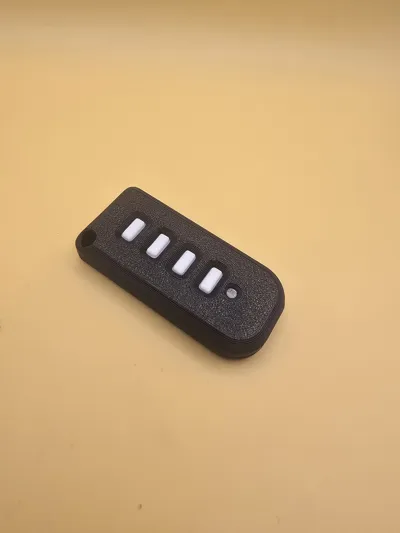
JCM Tech GoEvo-4 Replacement Remote Case


Print Profile(1)
Description
Boost Me (for free)
Like the model? Rate it and boost it! It's free and gives valuable feedback! :)
Boost Me (for free)
Well, if you use it, boost it please... let's be honest, what I can say - "a lot of work for such a stupid thing" and would be 10 times cheaper to buy a new remote instead of creating this... :D
Is your original JCM Tech GoEvo-4 (https://jcm.cz/go-evo-4/)case cracked, held together by tape, or are the buttons starting to fail? This is a precision-designed, 3D-printable replacement housing that restores your remote to better-than-new condition.
Designed specifically for the JCM Tech GoEvo-4 (4-channel) transmitter, this case maintains the slim profile while offering a much more robust feel in the hand.
💡 Key Improvements
- Enhanced Durability: Unlike the original brittle plastic, this design uses 3D printing perimeters to create a case that can survive drops and pocket pressure.
- Textured Grip: Optimized for "Fuzzy Skin" settings (optional) to give the remote a premium, non-slip feel.
- Perfect Fit: The internal geometry is modeled directly from the original PCB to ensure zero rattling and tactile button feedback.
- Integrated Keyring Loop: Reinforced hole for your keychain to ensure the remote stays attached to your keys.
- Material: PLA works fine but may become brittle over time if left in a hot car. Use PETG if this might affect your use case. Translucent filament (tested with PETG, but PLA should work fine as well) is required for the small LED opening (or you can just leave it empty)
- Print profile: print by object, so you can fully customize the colors - bottom and top part and the buttons.
- Fusion 360 file is included, in case you want to modify it / create a version for 2 button remote / etc… I'm done with this :D :D
🔧 Assembly
Insert buttons into top part

Snap them in place using tool like tweezers:

(Optional) Insert translucent LED “button”:

Insert PCB. Use some pressure to snap in place to the locks:

Insert the metal connector spring into the protrusion in the back and place into its place:


Align the battery properly:

Put the top part against protrusions in the bottom and push together:

8. Push back, to align the parts together. You are done. To replace battery, just reverse :)

Eveyrthing should hold together really well and tight. Keyring acts as additional security so it does not fall apart :)
License
You shall not share, sub-license, sell, rent, host, transfer, or distribute in any way the digital or 3D printed versions of this object, nor any other derivative work of this object in its digital or physical format (including - but not limited to - remixes of this object, and hosting on other digital platforms). The objects may not be used without permission in any way whatsoever in which you charge money, or collect fees.
Comment & Rating (1)