College Basketball March Madness Bracket Trophy


Print Profile(4)


Description
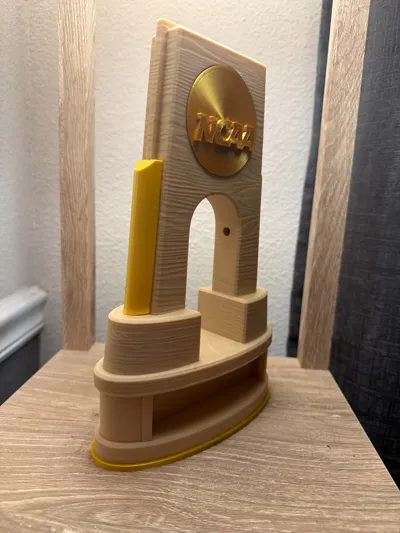
The Idea Behind the Trophy
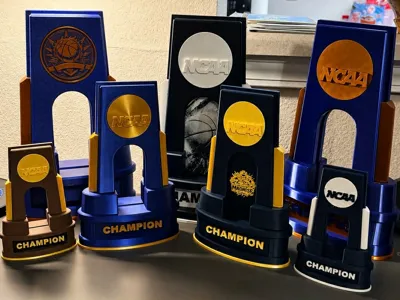
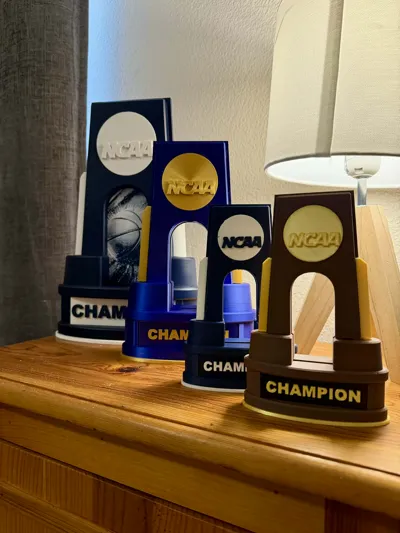
My goal with this project was to create a trophy that feels premium, brings that goosebump feeling when March Madness comes around, and gives people the flexibility to make it their own. I wanted to build a blueprint that anyone could use to start printing something unique, different, and meaningful for their group or pool. Whether it is for friends, coworkers, a family bracket challenge, or any competitive group, this trophy represents more than just competition. It captures the excitement, tradition, and bragging rights that make March Madness special.
Filament Recommendations
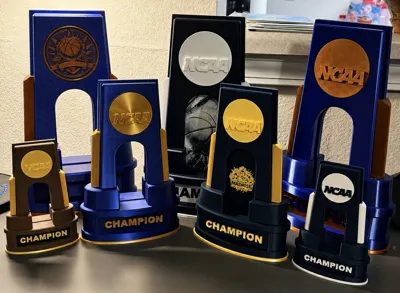
Many color combinations could work for this and I'm excited to see what you guys come up with but I'll provide my experience with different types of PLA.
- PLA Matte for a clean, easy-to-print finish.
- PLA Wood if you want a more trophy-like look.
- PLA Silk if you know what you're doing.
Sizes
The trophy is made up of several pieces, each scaled individually. The total filament estimate may be misleading because it includes alternate pieces for flexibility. I may adjust this in the future by separating the files, but I don’t want to overwhelm you with too many profiles. The list below is the standard profiles.
| Trophy | Sizes | Size (Scale) | Hardware Required | Status |
 | Tiny | 25% | No hardware or Glue. Just print. | Published |
 | Small | 50% | No hardware just glue. | Published |
 | Medium | 75% | Yes. Hardware below. | Published |
 | Large | 100% | Yes. Hardware below. | Published |
 | Wood | Medium | Yes. Hardware below. | Published. I do have plans to apply it for every size. |
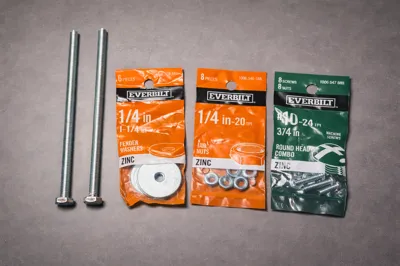
Hardware
All required hardware should be easy to find at a local hardware store for roughly $4 total, depending on your location. I've attached an image of all the supplies you will from Home depot. I went with metal machine screws because every printer has slightly different tolerances, and metal hardware makes the assembly more consistent and reliable. I wanted to provide a dependable solution instead of giving people a headache trying to account for tolerance differences across many printers.
Medium Trophy
| Part Name | Required | Product Link | Part Location |
| 2 x 1/4-20 Jam Nuts | Yes | Home Depot Link | Arch |
| 2 x 1/4-20 x 5" in Hex bolts | Yes | Home Depot Link | Base |
| 2 × #4-40 ×3/8" Machine Screw | Yes | Home Depot Link | Arch |
2 x #4-40 Hex Nuts
| Yes | Home Depot Link | Arch Beams |
| Super Glue | Yes | Any super glue will work. | Arch |
Large Trophy
| Part Name | Required | Product Link | Part Location |
| 2 x 1/4-20 Jam Nuts | Yes | Home Depot Link | Arch |
| 2 x 1/4-20 x 6 in Hex bolts | Yes | Home Depot Link | Base |
| 1/4 in. x 1-1/4 in. Zinc-Plated Steel Fender Washer | Yes | Home Depot Link | Base |
| 2 × #10-24 × 3/4" Machine Screw | Yes | Home Depot Link | Arch |
2 #10-24 Hex Nuts
| Yes | Home Depot Link | Arch Beams |
| 2 x Neodymium Disc Magnets | No. Optional. | Amazon Link | Magnet Holder Plugs |
| Super Glue | Yes | Any super glue will work. | Arch |
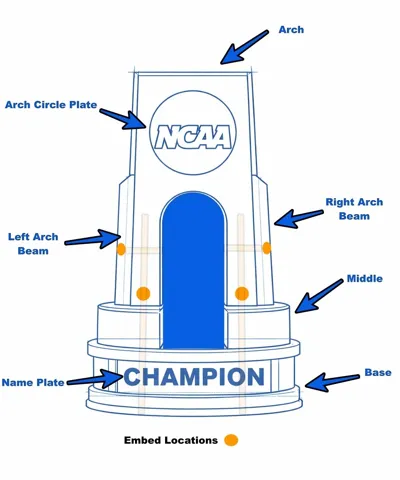
3D Printed Parts
| Name | Description |
| Plugs + Washers | Small finishing parts used during final assembly. |
| Magnet Holders (optional) | Only needed if you plan to use magnets instead of glue for the arch plate. |
| Base | The base where all champions need a solid foundation. |
| Middle | Center section with the middle lip and the left/right side supports for the arch |
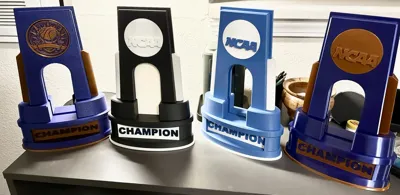
| Arch | Top section of the trophy. |
| Arch Square Plate | Vertical plate for the arch section. I’ve left it blank, but it could be used to display the names of previous winners. |
| Arch Round Plate | Circle plate in arch. As of now I've included the "NCAA". |
| Arch Left + Right Beams | The left and right beam that lays on the side of the Arch. |

Calibration Instructions
Before starting the full trophy, make sure your printer is reasonably dialed in. Watch for these common issues
- Warping - Make sure you take your build plate off and clean it with soap and water. Since this print has a larger surface area, warping can be a common issue, so a clean plate will help a lot with bed adhesion. Also make sure your bed is properly leveled before starting.
- Top Layers - For top surface imperfections, check your slicer settings and make sure you have enough top layers to fully cover the infill. If there aren’t enough top layers, the infill pattern can show through or leave the surface looking rough.
- Ringing - If you’re having issues with ringing, I’d suggest slowing the print down a bit. Check your print speeds, especially on the outer walls, and adjust as needed.
- Overhangs - For the overhangs, keep an eye on them and make sure you’re using supports for the arch. That area will need extra help to print cleanly.
Printing Instructions
1) Print the plugs🖨️ Print Difficulty: Easy 🛑 Pause required: No. 🏗️ Supports Needed: No. 🥌 Ironing Needed: No.
Print the required plugs first and set them aside for assembly.
|
 |
2) Print the magnet holders (optional)🖨️ Print Difficulty: Easy 🛑 Pause required: Yes. 🔩 Hardware Required: Yes. 2 × Neodymium Disc Magnets. 🏗️ Supports Needed: No. 🥌 Ironing Needed: No.
Only print these if you want to mount the arch plate with magnets. |
 |
3) Print the base🖨️ Print Difficulty: Easy 🛑 Pause required: Yes 🔩 Embed Hardware Required: No 🏗️ Supports Needed: Yes 🥌 Ironing Needed: No. Recommended but not required.
Before leaving the printer to finish on its own, be sure to monitor the first few layers for proper adhesion. A pause is built in for a filament color change. Make sure the top surface of the bottom bar up to your standard. |
 |
4) Print the middle section🖨️ Print Difficulty: Easy 🛑 Pause required: No 🔩 Embed Hardware Required: No 🏗️ Supports Needed: No 🥌 Ironing Needed: No. Recommended but not required.
This part of the trophy is straightforward to print and should not require any adjustments. If surface finish is important to you, consider keeping an eye on overhang speed. |
 |
5) Print the arch🖨️ Print Difficulty: Hard 🛑 Pause required: Yes 🔩 Embed Hardware Required: Yes. 2 × 1/4-20 jam nuts 🏗️ Supports Needed: Yes 🥌 Ironing Needed: No
This part includes a pause for jam nut insertion. The nut insert cavity is slightly larger and shaped differently to better support angled printing. If your printer supports it, printing the part flat or upside down may help minimize overhang issues. Feedback and suggestions are appreciated on this.
Note (Important) I included the Arch Nut Cover to provide better support, since holes can make bridging less consistent. It is available on the Plugs and Washers Plate, and I also added it to the Arch Plate in case you want to start directly with the Arch. This should result in cleaner bridging. Please place it on top of the jam nut. |
 |
5) Print the arch (Note Important)
I included the Arch Nut Cover to provide better support, since holes can make bridging less consistent. It is available on the Plugs and Washers Plate, and I also added it to the Arch Plate in case you want to start directly with the Arch. This should result in cleaner bridging. Please place it on top of the jam nut. | 
|
6) Print the Arch Circle Plate🖨️Print Difficulty: Easy 🛑Pause required: No. However you can change the logo color. 🔩 Embed Hardware Required: No 🏗️ Supports Needed: Yes 🥌 Ironing Needed: No. Highly Recommended.
As of now I've included the "NCAA". I've also included a blank just in case. I'd love to see what you guys come up with for your group. SVG are you friend and would work perfectly for this.
|  |
7) Print the Arch Left + Right Beams.A pause is need to add the nut. It's a tight fit but it'll work.
🖨️ Print Difficulty: Easy 🛑 Pause required: Yes 🔩 Embed Hardware Required: Yes. 2 #10-24 hex nuts. 🏗️ Supports Needed: Yes 🥌 Ironing Needed: No | 
|
8) Name PlateI've included two name plates. Either one will work.
🖨️ Print Difficulty: Easy 🛑 Pause required: Yes 🔩 Embed Hardware Required: No 🏗️ Supports Needed: No 🥌 Ironing Needed: No. Highly Recommended. | 
|

Future Updates
I do have plans to make updates and upgrades.
- 3D printed threads instead of inserts. I’m exploring this more, but my main concern is the long-term durability of printed threads and how well they hold up over repeated use.
- Texture options. Including brick, sci-fi, stripes, and noise textures (Not Fuzzy Skin).
- Bevel options for different looks and cleaner edges.
- Smaller cut options that can be added to your plate, giving you more flexibility for post-processing and finishing.
If anyone has suggestions or tricks that would improve this project. Please let me know. I will respond quickly. Also, if anyone needs something particular, please ask. I might be able to help you with it.
Disclaimer
This project is unofficial and is not affiliated with, endorsed by, or sponsored by the NCAA or any of its trademarks, events, or organizations.
The term “March Madness” is used only in a descriptive sense to refer to the time of year and common bracket competitions, and solely for personal, non-commercial use.
Boost Me (for free)
I’m limited by the technology of my time, but your boost helps this solo maker keep improving projects like this March Madness trophy. Every bit of support helps.
Documentation (2)
Comment & Rating (8)