


Print Profile(1)


Description
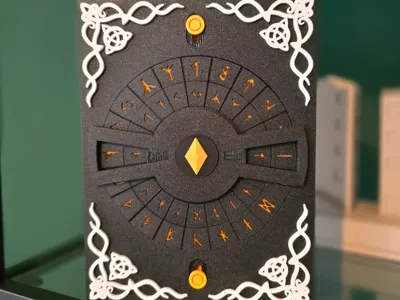
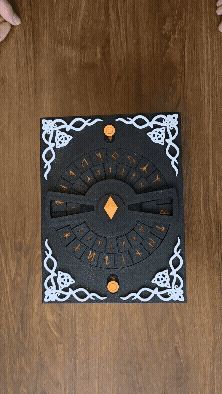
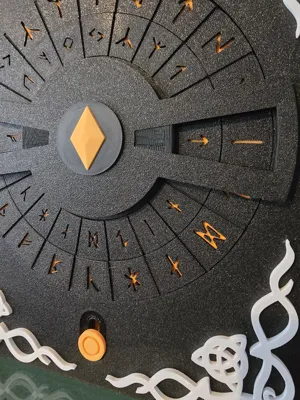
Nordic Rune Lock Diary Box – 400 Combination Book Safe 🔐ᚱ
This project is a mystical Nordic-style lock box designed to hide and protect a diary, journal, or other personal items. Inspired by Norse runes and Viking aesthetics, the box features two rotating rune dials that form a mechanical combination lock with 400 possible combinations.
The lid opens with a spring-assisted mechanism: once the correct rune combination is set, the lock releases and the lid automatically pops open. ✨
This makes it a fun secret diary safe, puzzle box, or fantasy-themed storage box for your desk or shelf.
🎨 Printing
The model was designed without using an AMS, since I do not own one.
Only two colors are required, so it can easily be printed with manual filament swaps.
For my example print I used three colors, but feel free to experiment with your own color combinations to create unique versions of the box. Different colors can give it a completely different look! 🎨
Manual Color Changes
The gemstone in the center and the two rune dials require manual color changes.
To make this easier, I already added print pauses at the correct layers, so you can simply swap the filament during printing to achieve a clean two-color result without an AMS.
Just resume the print after changing the filament and the printer will continue normally.
🔧 Required Parts
To enable the automatic opening mechanism you will need:
- 2 small rubber bands
These provide the tension that makes the lid pop open automatically.
Without rubber bands the box will still work, but you will need to slide the buttons aside manually to open the lock.
🔐 How the Lock Works
- Rotate the rune dials to the correct combination.
- The locking mechanism releases.
- The lid automatically pops open thanks to the rubber bands.
To close the box again:
- Slide both buttons to the side.
- Rotate one of the rune dials to reset the lock.
The combination can be set by the user, so you can choose your own secret rune code.
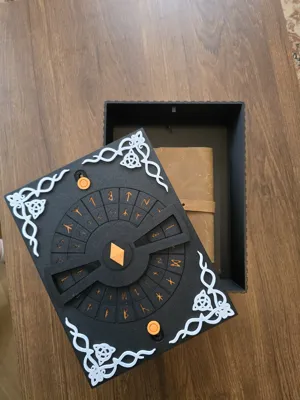
📚 Book Size
Maximum book size that fits inside the box:
21.5 × 17.5 × 4.5 cm
🖨 Printer Compatibility
Due to its size, this model cannot be printed on the A1 Mini.
If there is interest, I can create:
- a smaller version for the A1 Mini
- a version for thicker books
🛠 Assembly & Cleaning
Step 1:
Some support structures are required for printing.
To remove them cleanly I recommend using:
- a small precision screwdriver
- a hobby knife / cutter
Take your time when removing supports to avoid damaging the moving parts.
Step 2:
First, firmly insert the 8 decorative pieces into the front plate.
Then, place the gemstone into the center of the middle part shown on the right in the picture.

Step 3:
Place the large dial into the hole in the middle of the front plate.

Step 4:
Attach the middle piece to the front plate so that the large dial cannot fall out.

Step 5:
Flip the front plate over and place the small dial inside the larger dial.

Step 6:
Then, screw the black round threaded plate on top to secure the small dial.
Do not tighten too much, or the small dial may become harder to rotate.

Step 7:
Flip the front plate back and set your combination by turning the dials to your desired code.

Step 8:
Flip the plate to the back again and slide the two latches into their slots.

Step 9:
Insert the first round disk into the large dial so that the slots in the disk align with the latches.

Step 10:
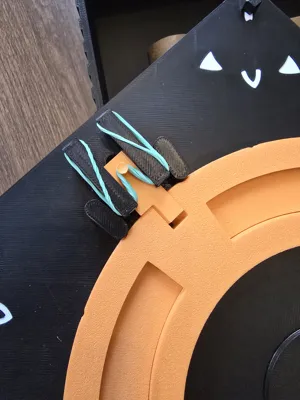
Do the same with the second disk for the small dial, aligning the slots with the latches.

Step 11:
Stretch the rubber bands as shown in the picture to enable the automatic opening mechanism.

Step 12:
From the front, insert the two buttons into their holes.
Make sure the buttons are precisely aligned with the holes on the latches, so the lock functions correctly.

⚠️ Important Notes
This is a mechanical puzzle-style lock, not a real security device.
Please do not try to force the box open, as the mechanism is not designed to withstand strong force.
Due to printer tolerances or small leftover support pieces, it can sometimes happen that:
- parts move a bit stiffly
- the mechanism needs slight cleaning
Usually removing small support remnants solves this easily.
🧙 Final Notes
Feel free to experiment with different color combinations and make the box your own Nordic artifact. I would love to see your prints and remixes!
Happy printing! 🖨️✨
License
You may create derivative works based on this object, provided that all such derivative works are published exclusively on the MakerWorld platform and include proper attribution to the original creator. You may not share, upload, host, distribute, or publish this object—or any derivative work of this object—on any other digital platform, marketplace, or distribution channel. Commercial use of this object and any derivative works is strictly prohibited. This includes, but is not limited to, selling, renting, sublicensing, or using the object in any context in which you receive monetary compensation or other financial benefits.
Comment & Rating (6)