
QSFP Dust Cover / Port Plug
Print Profile(0)
Description
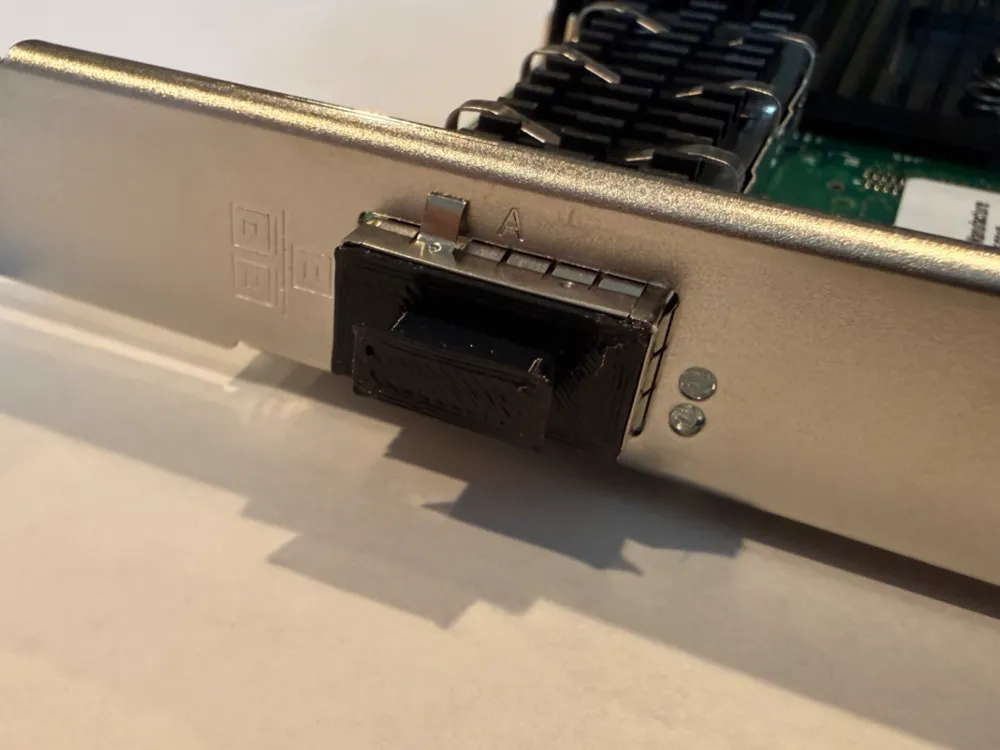
A printable dust cover for QSFP-type port cages, designed as a practical alternative to commercial rubber plugs. Commercial units can run $0.25–$1.50+ each; this print comes in at roughly $0.10–$0.11 USD per unit in PEBA at current filament prices.
The 3MF file includes a 12-up print bed layout for efficient batch production.
Overview
A functional QSFP port dust cover designed for homelabs, server builds, and data center equipment. Fits standard QSFP, QSFP+, and QSFP28 interfaces. The 3MF file includes a 12-up print bed layout for efficient batch production.
Design Features
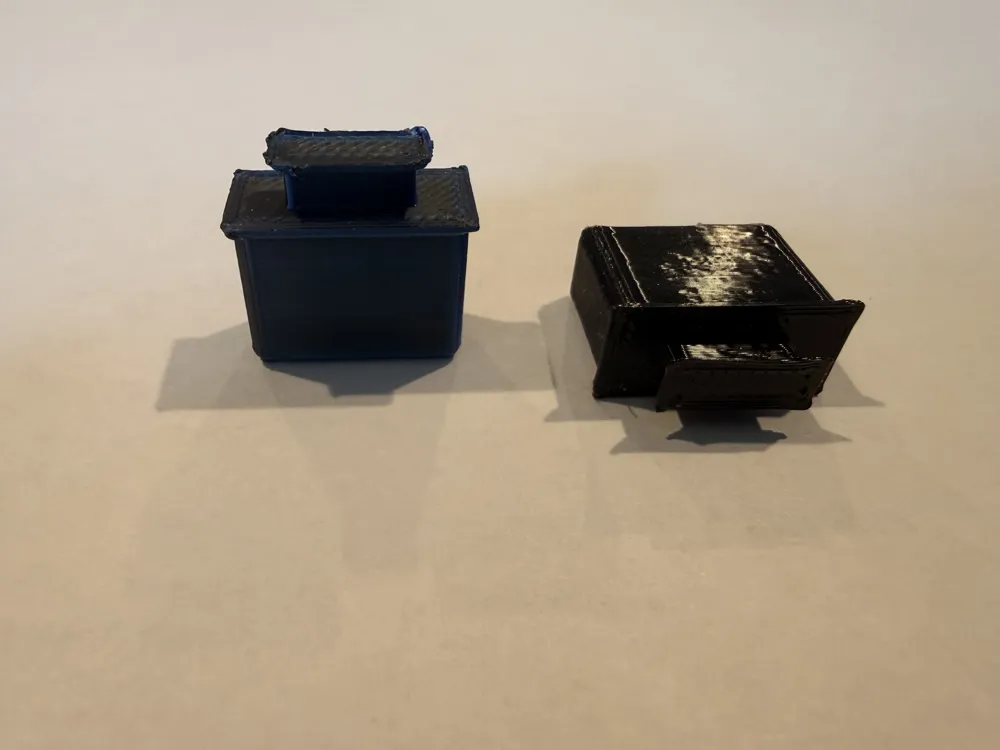
- Chamfered corners on the insertion tab promote smooth pressure release during insertion and reduce port contact stress
- Top lip / overhang acts as a positive stop to prevent over-insertion — note: the lip can be overridden with enough force, so seat the plug deliberately but don't force it
- Handle on top for easy one-handed insertion and removal
- Solid body (25% gyroid infill) — unlike hollow designs that warp and deform when printed in flexible filaments, this model maintains dimensional stability throughout
- Snug fit — sized to seat firmly in the QSFP cage with no wobble
Recommended Filament: Siraya Tech PEBA 95A
PEBA is the strongly recommended material for this print. It is:
- Non-conductive / no conductive additives — safe for use inside and around active networking equipment
- Flexible enough to seat and release cleanly without stressing the port cage
- Surprisingly excellent at handling small overhangs — in testing, PEBA outperformed Sunlu Multi-Colore SILK PLA on the overhang geometry without any supports
- Durable and resistant to deformation in warm environments (server rooms, rackmounts)
PEBA Print Settings (Siraya Tech PEBA 95A)
(Settings provided for PrusaSlicer to print on Prusa Core One L)
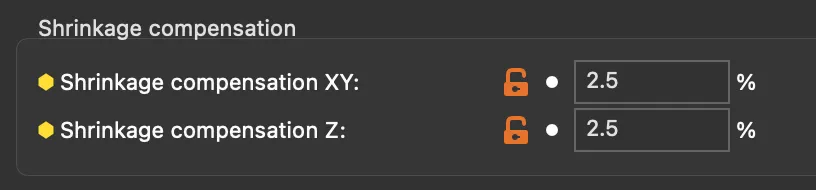
- Shrinkage Compensation (XY): 2.5% — this is aggressive compared to typical PEBA settings (0.2–0.5%) but validated for dimensional accuracy on this part
Shrinkage Compensation (Z): Up to 2.5% — less critical to fit but tested and validated
- Layer Height: 0.2mm is the most workable layer height I have found to work consistently among all PEBA prints.
- Brim: Recommended brim of 5mm - 6mm to compensate for the relatively low surface area contact with the bed vs the forces imposed on the model during printing.
- While I usually try to avoid brimming FLEX models, the brim on this is easily removed with straight-edge snips.
- Shared Brim!: For batch printing jobs, I'd strongly recommend each object be grouped close enough together so that they all share a common brim layer. This single brim layer helps to reenforce the entire matrix of objects on the print bed.
- All other settings per your dialed-in PEBA profile
- While I have called out a few of the more critical print settings, if you would like me to share the PEBA settings I have tuned (Print, Filament, and Printer Profiles), please message me directly.
Batches / Mass Production (Siraya Tech PEBA 95A)
This is one of the key areas where results will vary, and it is worth understanding the underlying factors before scaling up your batch size.
Overall, PEBA is more forgiving than traditional TPU - the nylon content provides meaningful dimensional stability - but it remains susceptible to cooling and shrinkage during the print process. As inter-layer cooling time increases, this can manifest as uneven layers, poor layer adhesion, inconsistent geometry, and more prominent stringing between individual objects.
In testing, keeping inter-layer print time at or under ~90 seconds produces the most consistent results. Several variables influence this in practice: bed radiant heat, ambient temperature, and - critically - the number of objects grouped on the bed and how tightly they are arranged. Closely grouped objects retain heat from their neighbors throughout the print, which meaningfully offsets the cooling risk at higher object counts.
Several 3MF layouts are provided (1, 6, 8, and 12 objects) to accommodate different batch sizes. As illustrated in the slicer preview below, the 12-up layout shows layer times ranging from under one minute in the lower body to over 15 minutes in the upper lip and handle layers - well beyond the 90-second guideline. Despite this, batch runs of 12 have printed successfully, which is largely attributable to the tight object grouping maintaining radiant heat across the bed throughout the print. I would not recommend printing batches of more than 12 at a time... but, you do you!
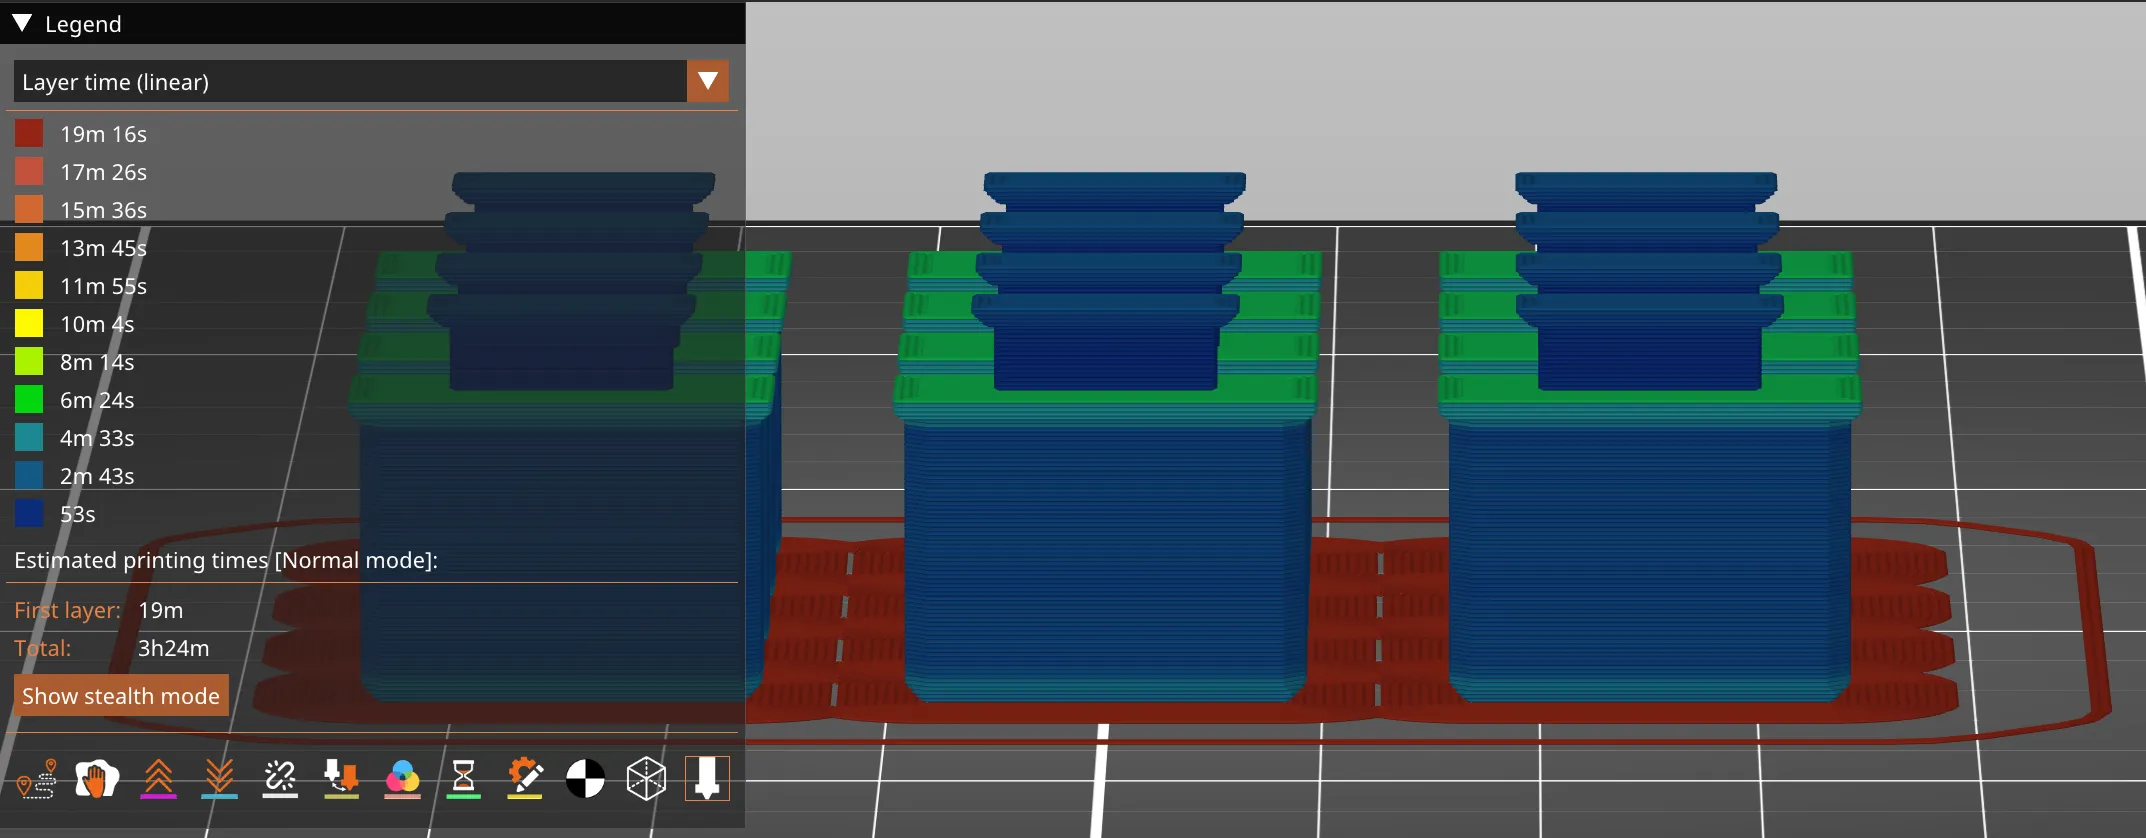
The layer time heatmap (PrusaSlicer, layer time linear view) shows the transition from fast lower-body layers (dark blue) through progressively longer upper layers (green → red at the first layer), reflecting the reduced cross-sectional mass as the print transitions through the lip and handle geometry.
If you are still dialing in your PEBA profile, it is advisable to start with the smaller layouts and scale up once you have confidence in your settings.
Pressure Advance (Siraya Tech PEBA 95A)
One important setting for achieving clean PEBA prints - particularly in batch layouts - is Pressure Advance. PEBA's flexible, somewhat elastic nature means the filament can continue to ooze slightly at the end of a move even after the extruder has stopped, leading to nozzle blob buildup over time. This is especially problematic in multi-object prints where the nozzle makes frequent travel moves between parts.
To compensate, the following line is added to the custom Start G-code in the filament profile:
M572 S0.04 ; Pressure advance for PEBA
M572 is the Klipper/PrusaSlicer pressure advance command. The S0.04 value applies a modest correction - enough to account for PEBA's elasticity without over-compensating in ways that could introduce under-extrusion or pressure artifacts. This value has been validated for this print on the Prusa Core One L; if you are using a different printer or a significantly different PEBA formulation, some tuning may be required.
Filament Preparation - Drying (Siraya Tech PEBA 95A)
PEBA is highly hygroscopic - it absorbs moisture from the ambient air readily and will degrade print quality noticeably (or even fail to extrude) if printed wet. For anyone already experienced with PEBA or similar nylon-based flexibles, this is well-understood territory. For those coming to this print as a first foray into PEBA, it is worth treating filament preparation as a non-negotiable step rather than an optional one.
Before starting a print, dry your PEBA at the manufacturer's recommended temperature for a minimum of 4–6 hours. Siraya Tech recommends drying PEBA 95A at 65°C; consult your filament documentation and do not skip this step even if the spool appears to have been stored well (even if fresh from the manufacturer).
Importantly, drying does not end when the print starts. PEBA will re-absorb ambient moisture during the print run — even if fed from a dry box with active desiccant. For short prints this is generally not a concern, but for longer batch runs (such as the 12-up layout included here), it is advisable to run the filament directly from a heated dry box throughout the duration of the print. A passive dry box with fresh desiccant is better than nothing, but a box with active heating is the more reliable approach.
Signs of under-dried PEBA include popping or crackling sounds during extrusion, increased stringing, and surface bubbling or roughness on the finished part. If any of these appear mid-print, moisture is the most likely culprit.
PLA — Works, But Not Recommended
Test prints were made in Sunlu Multi-Color SILK PLA. PLA will produce a functional plug, but the fit is less forgiving and the overhang quality is noticeably inferior to PEBA. If you use PLA, follow your filament vendor's specifications and expect to dial in fit tolerances for your specific material.
TPU / Other Flex Filaments
Not tested in TPU, but the solid-body design should print well. Critical warning: if using any flexible filament (TPU, TPE, or similar), verify that it contains no conductive additives. Carbon-fiber-filled, metal-flake, or "anti-static" flex filaments must be strictly avoided. While the plug does not directly contact the electrical contacts inside the QSFP cage, conductive materials near active optical or electrical interfaces pose a real risk. This caution extends to PLA and any other material — know your filament's additive composition before use.
Cost Breakdown
| Material | Cost / Unit |
|---|---|
| SirayaTech PEBA 95A | $0.10 - $0.11 USD |
| CookieCAD TPU (Glitter)* | $0.06 - $0.07 USD |
| Prusament TPU 95A | $0.15 - $0.17 USD |
| Prusament PLA | $0.05 - $0.06 USD |
(*) CookieCAD TPU not recommended due to metallic additives! Only listed for cost comparison purposes.
Compatibility
Designed to fit standard QSFP-type port cages, including QSFP, QSFP+, and QSFP28 form factors on NICs and switches.
Practical / Real-World Use Notes
Being made from PEBA, these QSFP Port Plugs are very elastic and, if dropped (say on the raised hard-panel floor of a server room), they will bounce. Maybe consider printing a few extra to avoid waisted time fishing the dropped plug out from under a server rack - or maybe just don't drop them... I can neither confirm nor deny this coming from first-hand experience.
Printed on a Prusa Core One L. If you find this useful, a like or make goes a long way!
Original Model Posting: On Printables
License



Comment & Rating (0)