Dremel Spool Holder for Easy Spooler


Print Profile(1)

Bill of Materials


Description
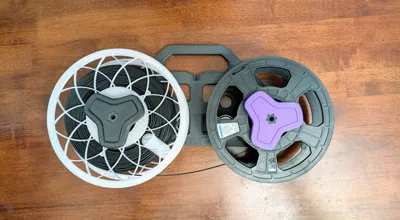
Spool holder for EasySpooler by Willi 3D to hold the plastic Dremel filament spools.
There are two different colors of Dremel filament spools with different dimensions. There is a separate base for each of the two colors, and a common screw to hold either one in place.
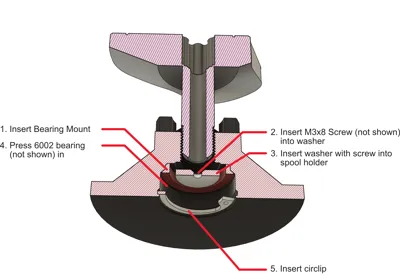
In order to assemble this the instructions are slightly different than the easyspooler. This is because the dremel spools have a much smaller diameter hole, which does not allow some of the parts to be inserted from above in the spool holder assembly. Basically the disc with the screw that is used to hold the bearing down must be inserted into the spool holder from below before the bearing is pressed into place. Since the washer and bearing support ring are captive and more difficult to remove in this model than the original they are included on the plate for each spool holder.
The modified instructions are as follows:
- Assemble the Easyspooler through Step 1 following the assembly guide
- Step 2 is slightly modified as follows
- Ensure that the easyspooler main body can accept an M3x8 countersunk screw into the hole
- Ensure that the bearing fits onto the easyspooler main body in all four locations
- Thread a M3x8mm countersunk screw into the 3d printed washer that holds the bearing down. This washer is shown as part of Step3 in the easyspooler assembly guide
- Insert the bearing support ring into the lower dremel holder assembly (either for the blue or black spools) such that it snaps into place
- Insert the washer and screw that was assembled in Step 2c a into the dremel spoolholder assembly
- Press the bearing into place
- Insert the circlip into the bottom of the dremel spool holder
- Screw the disc and screw into the easyspooler main body
- Complete the assembly Step 3 in the assembly guide
Documentation (1)

Comment & Rating (0)