Recliner Actuator Block Replacement Power Recliner


Print Profile(1)

Description
What is this?
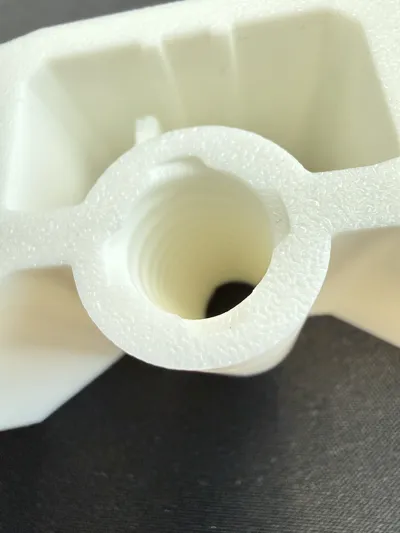
A 3D-printable replacement for the arched actuator moving block (also called "slide block" or "traveling nut") found inside the linear actuator of power reclining sofas. This is the plastic block that rides on the worm/lead screw inside the actuator tube and connects to the legrest linkage. When it breaks, your legrest stops working.
This part is nearly impossible to buy in the US. The only known source for the generic block is SofaRehab in Australia, but even that version has the wrong thread pitch for many actuators.
Sofa / Actuator Identification
Sofa manufacturer: MotoMotion Vietnam (HHC/MOTO brand)
Internal sofa code: E01001188A 3 XS8046DG02-6-RX1 0019
Mechanism family: XS8046DG02
Actuator:
- Brand: MOTO / HHC
- Model: LMD12517W1-4-H
- Specs: 24 VDC, 5A, 311mm stroke, 1000N max load, 38mm/s
- Connector: 5-pin MOTO/HHC control plug
If your sofa has a similar feature set and a MOTO/HHC actuator (any LMD12517W variant), this block should work for you.
Actuator Block Dimension
| Dimension | Value |
|---|---|
| Width (wing tip to wing tip) | 96 mm |
| Height (arch peak) | 42 mm |
| Depth (front to back) | 40 mm |
Lead Screw Thread Specification (CRITICAL)
This is the part most people get wrong. The lead screw inside MOTO LMD12517W actuators is NOT a standard single-start thread.
| Spec | Value |
|---|---|
| Thread type | Metric Trapezoidal (TR) |
| Major diameter | 14 mm |
| Pitch | 3 mm |
| Starts | 4 (four-start) |
| Lead (travel per revolution) | 12 mm |
| Thread angle | 30° |
How to verify your screw matches:
- Measure peak-to-peak diameter with calipers → should be ~14mm
- Measure distance across 10 adjacent thread crests → should be ~30mm (pitch = 3mm)
- Look at the end of the screw; count how many separate grooves spiral off → should be 4
- Or: print the included test nut and try threading it on
The steep thread angle that makes it look "wrong" compared to normal screws is because it's 4-start — four independent helixes wrapped around the rod. This is common on fast-travel actuators (mine is 38mm/s).
Included Files
Ready-to-print (STL)
- actuator_block_TR14x3_4start.stl - Complete block with TR14x3 4-start internal threads.
- test_nut_TR14x3_4start.stl - Small hex nut for verifying thread fit before committing to a full print.
- thread_cutter_TR14x3_4start.stl - Male threaded rod for boolean subtraction in CAD software (for making your own custom block).
Editable CAD files
- actuator_block_TR14x3_4start.step - Full block with threads, editable in Fusion 360, SolidWorks, FreeCAD, or any CAD that reads STEP.
- actuator_block_NO_THREADS.step - Block body only, no threaded bore. Use this if your screw has a different thread spec; import the thread cutter STL (with modified parameters) and boolean-cut your own threads.
OpenSCAD source code (for thread customization)
- TR14x3_4start_test_nut.scad - Parametric test nut. Change major_d, pitch, starts, and clear to match your screw. Requires BOSL2 library.
- TR14x3_4start_thread_cutter.scad - Parametric threaded rod for boolean cuts in CAD. Same adjustable parameters. Requires BOSL2 library.
⚠ OpenSCAD files require the BOSL2 library: Download from https://github.com/BelfrySCAD/BOSL2 and place in your OpenSCAD libraries folder. Without BOSL2, the files will not render.
How to Identify Your Thread Spec
If your actuator is different from mine, you need to figure out your own thread before printing.
Step 1: Measure major diameter
Use calipers across the screw, peak-to-peak. Rotate the screw to find the maximum reading (both jaws on peaks, not valleys).
Step 2: Measure pitch
Mark a thread crest. Count 10 crests forward. Measure the distance between mark #0 and mark #10 with calipers along the screw axis (not angled). Divide by 10 = pitch.
Step 3: Count starts
Look at the cut end of the screw straight-on and count how many separate grooves spiral off. Or: mark one groove with a Sharpie, trace it for one full revolution, measure how far it traveled axially. Divide that distance by the pitch = number of starts.
Step 4: Print a test nut
Open the .scad test nut file, enter your measured values, render, export STL, print, and try it on the screw.
Print Settings
| Setting | Recommended Value |
|---|---|
| Material | PETG, PC Blend, Nylon, or CF-Nylon. No PLA. It will creep and crack under load. |
| Layer height | 0.15 - 0.20 mm or less |
| Nozzle | 0.4 mm |
| Perimeters / walls | 5-6 minimum |
| Top/bottom layers | 5-6 |
| Infill | 50-85%, Gyroid pattern |
| Print speed | 30-40 mm/s (slower = better threads) |
| Orientation | Bore axis vertical (flat bottom on bed, arch facing up) |
| Supports | Yes for the arch overhang, but use a support blocker over the threaded bore to keep supports out of the threads |
| Z-seam | Paint away from the threaded bore area |
| Cooling fan | Lower than normal (30-40%) for better thread surface quality |
How to Use the Thread Cutter STL in Fusion 360
If you need to modify the block shape but keep the threads:
- Open your custom block design in Fusion 360
- Insert → Insert Mesh → select thread_cutter_TR14x3_4start.stl
- Position it centered on the bore, aligned with the bore axis
- Mesh tab → Modify → Convert Mesh (select Parametric)
- Modify → Combine → Target: your block body, Tool: the converted thread body, Operation: Cut
- Export as STL for printing
If Convert Mesh fails due to high polygon count, open the .scad file, reduce $fn from 72 to 48, and re-export.
If Your Threads Are Different
Many recliner actuators use similar but not identical lead screws. Common variations:
| Screw | Pitch | Starts | Lead | Notes |
|---|---|---|---|---|
| TR14×3, 4-start | 3mm | 4 | 12mm | This model — MOTO LMD12517W |
| TR14×3, 1-start | 3mm | 1 | 3mm | Common on slower actuators |
| TR14×4, 1-start | 4mm | 1 | 4mm | Common on Kaidi/RMT actuators |
| TR10×3, 1-start | 3mm | 1 | 3mm | Smaller actuators |
| ~9/16" ACME | ~3.2mm | 1 | ~3.2mm | Imperial actuators (rare) |
Use the OpenSCAD files to generate test nuts and thread cutters for any of these specs. Just change major_d, pitch, and starts.
Background / Why This Exists
I accidentally broke the actuator block on a MotoMotion multimedia recliner. The part is not sold individually by the manufacturer or any US retailer. The only known source (SofaRehab, Australia) sells a generic block with the wrong thread pitch for this actuator. Amazon sells complete actuators with similar-looking blocks, but those also have wrong thread specs for MOTO LMD12517W actuators.
After extensive research, caliper measurements, and multiple failed test prints, I identified the thread as TR14×3 4-start metric trapezoidal; not a standard single-start thread. The steep helix angle is what makes it look "wrong" compared to typical lead screws and is the reason off-the-shelf replacement blocks don't thread on.
The block was modeled in Fusion 360 using reference photos as canvases, with caliper measurements for all critical dimensions. The internal threads were generated in OpenSCAD using the BOSL2 library and boolean-subtracted in Fusion 360.
Tags / Keywords
recliner, power recliner, actuator, linear actuator, MOTO, HHC, MotoMotion, LMD12517W, LMD12517W1-4-H, actuator block, slide block, moving block, arched actuator block, traveling nut, lead screw nut, TR14x3, trapezoidal thread, 4-start, four start, worm gear, legrest, footrest, XS8046DG02, recliner repair, sofa repair
Comment & Rating (0)