Marker pen airbrush modified with universal chuck and needle nozzle spray bottle


Print Profile(1)
Description
2026/03/20 Updated needle-tip bottle fixture size, simply insert the needle-tip bottle directly for easier replacement
The fixed clamp's marker airbrush can only use markers of about 12mm. To meet expansion needs, two extensions were created: a universal marker pen clip and a needle-tip spray bottle
Step 1: Prepare materials:
- Electric drill, 3.2mm drill bit
- Each of the two extensions requires M3x12 hex screw set x2 (knurled nuts are included in the model), or knurled screw set x2
Needle-tip spray bottle extension additionally requires:
- Needle-tip bottle, 20mm cap diameter, 30-50ml capacity. Can be purchased on various platforms, a few yuan can buy many
- 0.2-0.5mm needle tip (must cut off the tip). Obtained by purchasing disposable syringes from various platforms or pharmacies
- 4mm silicone cap (actual 3.8mm), used for sealing after storing pigment in the needle-tip bottle. Source same as 1
Step 2: Modify the airbrush, cut off the original airbrush clamp, leave a section, trim it into a semi-circular shape, and drill a hole of about 3.2mm (must drill accurately, otherwise the marker tip will not align with the nozzle), as shown below:

Step 3: Install accessories
Plate 1 is the marker clamp, the large clamp can hold pens with a diameter of 14-18mm, inserting into the small ring allows it to hold pens of 10-13mm
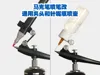
Plate 2 is the needle-tip bottle clamp, you can freely choose needle-tip bottles of various sizes and capacities, the style is shown in figure 2 below
After the needle-tip bottle is installed and positioned, then cut off the excess needle tip
Note: install the nut on the side with the nut slot to prevent slipping when tightening. The marker or needle tip needs to be adjusted multiple times to the correct distance, then the nut can be tightened to prevent changes


print profile: Supports are set by default, the most likely place for problems is the support in the middle of the marker clamp. Everyone can fine-tune the support parameters based on the actual printing results
That's all for now, this is my first model upload, I hope everyone likes it. If there are areas for improvement, I will adjust them promptly. If you have other questions, please leave a comment
License
You shall not share, sub-license, sell, rent, host, transfer, or distribute in any way the digital or 3D printed versions of this object, nor any other derivative work of this object in its digital or physical format (including - but not limited to - remixes of this object, and hosting on other digital platforms). The objects may not be used without permission in any way whatsoever in which you charge money, or collect fees.
Comment & Rating (0)