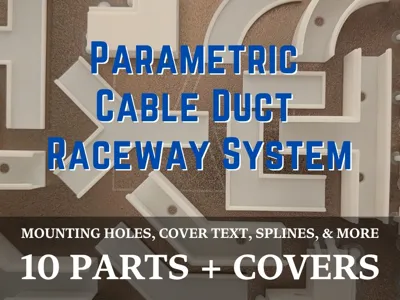
Ultimate Parametric Cable Duct Raceway System


Print Profile(12)

Description
This is the Ultimate Parametric Cable Raceway System—a fully customizable, modular cable management ecosystem. Using the MakerWorld Customizer, you can adjust the dimensions to perfectly match your cables and generate an entire ecosystem of routing joints that seamlessly link together.
💡 Pro-Tips & Slicing (Must Read!)
- ✂️ Splitting the Grid to Objects: If you render the entire ecosystem at once, the generated layout will likely be larger than your build plate. Don't worry! Simply open the model in Bambu Studio, click the Split to Objects icon on the top toolbar (it looks like a piece of paper with an 'O' on it), or right-click the model and choose Split > To Objects. You can then Auto-Arrange (A) or move parts to different build plates.
- 🧱 Stagger Your Seams: When printing long straight runs, generate your covers at a different length than your base tracks (e.g., 250mm bases with 150mm covers). Staggering the seams so they don't meet up hides the joints and adds massive structural rigidity to your cable runs!
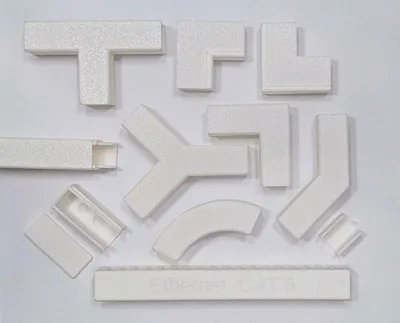
🧩 The Complete Connector Ecosystem:
Generate any combination of the following pieces:
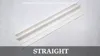
- ➖ Straight Duct: Custom length tracks for long runs.
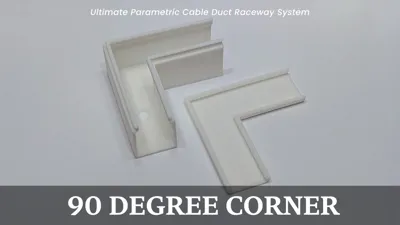
- 📐 Flat 90° Corner: A sharp right angle for flat surfaces.
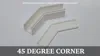
- 📐 Flat 45° Corner: A half-turn for angled routing.
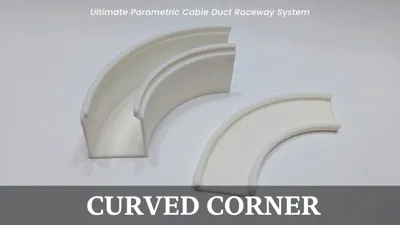
- ↪️ Curved 90° Corner: A smooth, sweeping bend to respect thick cable bend-radii.
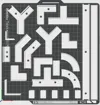
- ┳ T-Junction: A sharp 3-way split.
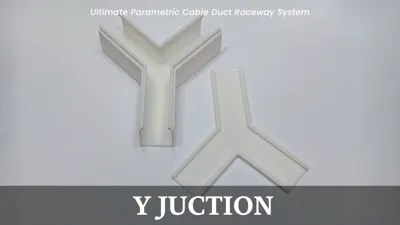
- ⑂ Y-Junction: A symmetrical 45-degree splitter.
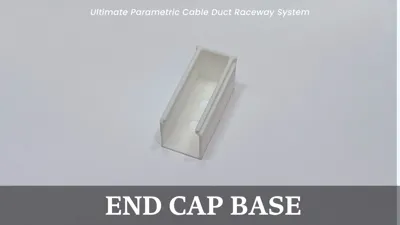
- 🛑 End-Cap (Base or Cover): A terminal block to cleanly close off the end of a run.
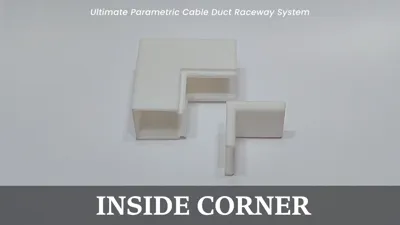
- ↘️ Vertical Inside Corner: For routing cables from a floor UP a wall (or into an inside room corner).
- ↗️ Vertical Outside Corner: For routing cables outward around a pillar or over the edge of a desk.
🌟 Key Features:
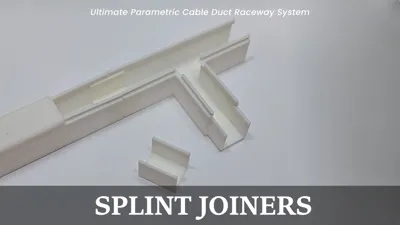
- 🦴 Internal Splint Sleeves: A robust internal U-channel joiner system. Slide the splint into the ends of two adjoining tracks to perfectly align the walls and eliminate twisting, resulting in a flawless outer seam.
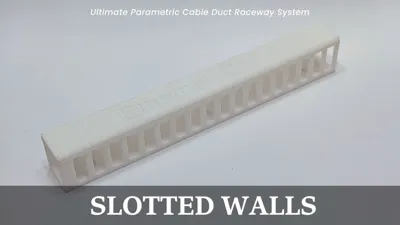
- 🎛️ Advanced Cable Management: Need cables to exit midway? Enable the "Slotted Walls" feature to turn your straight track into a server-rack-style wire manager with customizable routing fingers.
- 🛡️ Custom Covers: Choose between flush or overlapping covers, round the edges for a sleek look, and even engrave custom text (like "Power" or "HDMI") directly into the top of the covers!
- 🎯 Auto-Centered Mounting Holes: Add customizable screw countersinks to your straight tracks, and automatically center mounting holes on all your connector pieces for maximum wall-mounting strength.
📐 Basic Customization Settings:
To get started quickly, open the customizer and adjust these core values:
- 📏 Duct Length: How long your main straight tracks are.
- ↔️ Outer Width & Height: The external dimensions of your raceway.
- 📐 Corner Leg Length: Defines how long the "arms" of your connector pieces are.
- 🧱 Wall Thickness: Crucial for strong prints! Set this to a multiple of your nozzle diameter (e.g., 1.2mm for a standard 0.4mm nozzle).
🖨️ Printing Recommendations:
- 🧵 Material: PLA, PETG, or ABS all work wonderfully. PETG is highly recommended for the covers if you plan on snapping them on and off frequently, due to its slight flexibility.
- 🏗️ Supports: SUPPORTS ARE REQUIRED for the Internal Splints and the Vertical Inside / Vertical Outside corners. The straight tracks, flat corners (90, 45, Curve, T, Y), and all covers print entirely support-free!
- 🍳 Brim: A brim is generally not needed unless you are printing very long, thin straight covers that are prone to warping on your build plate.
- 🔧 Assembly: Fasten the base tracks to your wall or under your desk using screws (via the generated countersink holes) or double-sided tape. Insert the Splint Sleeves between gaps to align the tracks, route your cables, and snap the covers on!
⚙️ Detailed Customizer Settings Guide:
Here is a breakdown of the advanced settings available in the Customizer so you can tune your raceway perfectly:
1️⃣ Render Options Check the boxes for which parts you want to generate. You can generate one part at a time, or check them all to generate a neatly organized, space-saving grid of your entire ecosystem at once. You can also pick a render color to visualize your setup!
2️⃣ Cover & End Cap Settings
- Cover Style: Choose "Flush" to have the cover sit inside the duct walls, or "Overlapping" to have it wrap around the outside.
- End Caps: Choose to seal off one or both ends of your straight cover (connectors always stay open to allow cable passthrough).
- Corner Radius: Enable rounded corners to give your covers and bases a softer, more premium look.
3️⃣ Cover Engraving Enable text, type your label, and adjust the font, scale, and depth to engrave it directly into the straight cover. You can also rotate the text for vertically mounted tracks!
4️⃣ Slotted Walls (Fingers) Turns your straight track into a slotted wire manager. Adjust the thickness of the fingers and the gap between them to easily route cables out the sides at any point.
5️⃣ Mounting Holes Enable screw holes. You can set the number of holes for your straight track, define the screw and countersink diameters, and toggle automatic centered holes for all your connector pieces. The generator automatically moves holes away from the edges to ensure they never collide with the internal splints.
6️⃣ Advanced Cover Latch Geometry
- Gap Clearance: The tolerance between the cover and the base. 0.0mm is default. Increase this (e.g., 0.15mm) if your cover is too hard to snap on. Use negative values (e.g., -0.1mm) to force a tighter interference fit!
- (The height, depth, and angle of the snap wedges can also be fine-tuned here, but default values are recommended for the best snap).
7️⃣ Connector Splints
- Splint Joiner Count: Generate a batch of splints at once.
- Splint Tolerance: Adjusts the fit of the U-channel splints. A higher number makes them looser and easier to slide in. 0.0 provides a tight friction fit.
- Tip: The smaller the raceway, the more tollerance you may need
Boost Me (for free)
Enjoying the Generator? A Boost is greatly appreciated (and costs you nothing)! Happy printing!
License
You shall not share, sub-license, sell, rent, host, transfer, or distribute in any way the digital or 3D printed versions of this object, nor any other derivative work of this object in its digital or physical format (including - but not limited to - remixes of this object, and hosting on other digital platforms). The objects may not be used without permission in any way whatsoever in which you charge money, or collect fees.
Comment & Rating (2)