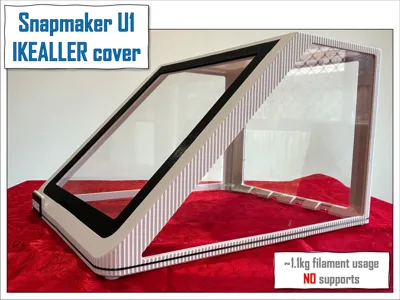
Snapmaker U1 IKEALLER top cover


Print Profile(1)

Description
Boost Me (for free)
BEST Snapmaker U1 cover.
Most VERSATILE design but also SIMPLEST and most COST effective to build.
YOUR support is crucial to keep the project alive.
IKEALLER cover (v2.3)
Snapmaker U1 enclosure by @AMelo
BEST Snapmaker U1 enclosure design. Similar filament usage, printing time and hardware cost of IKEA bulky adaptor solution BUT with much more functionalities and style. Designed to maximize build usage of acrylic panels (3mm thickness or thinner) and to minimize filament usage and printing time/hassle.
PLEASE READ ALL TOPICS BEFORE COMMITING TO THE PROJECT.
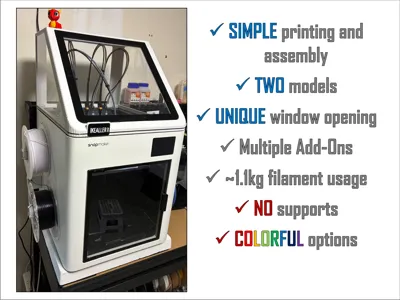
HIGHLIGHTS
- Easy printing: NO supports required for main model;
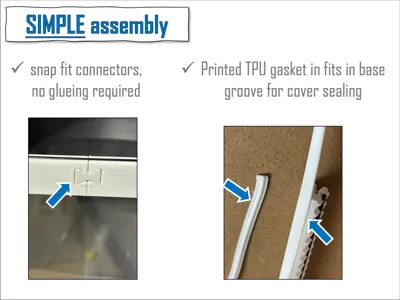
- SIMPLE assembly: SIX main parts with simple joints make assembly quick and intuitive;
- Acessible: NO extra hardware required (other than 1 acrylic sheet and 28 10x2mm magnets);
- Single spool project: ~900g filament usage for main body color, ~200g for window frame and front label.
- Refined exterior design - not just a cheap looking cover;
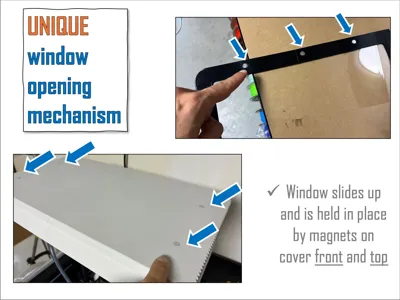
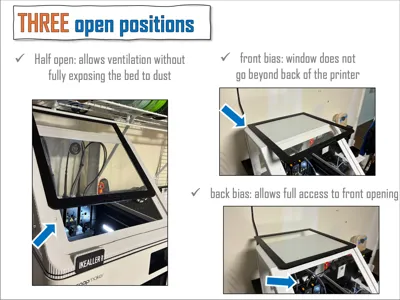
- UNIQUE and SMART window mechansim - Magnets allow 3 different opening positions!
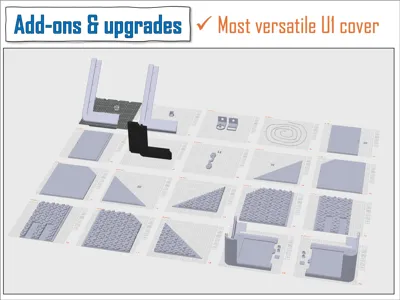
- most VERSATILE cover: multiple Add-ons and upgrade available - listed in ASSEMBLY;
- Three models:
- 600x600mm acrylic sheet, ~1.1kg (24x24 in 1/8' compatible, see further)
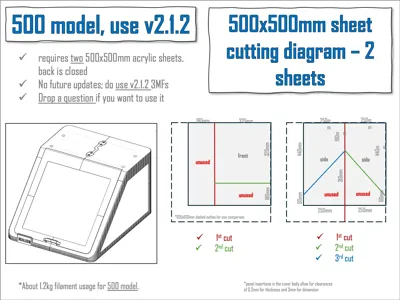
- 500x500mm acrylic sheet (uses 2), ~1.3kg (use v2.1.2)
- CLOSED (sides and back), ~1.6kg
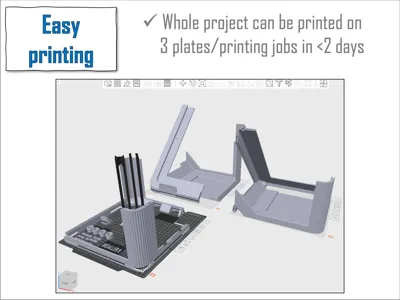
PRINTING
- dried PETG is recommended.
- Get in CURRENT_version folder (i) 3MF with main frame for your favourite model (600, 500 or CLOSED) + (ii) 3MF parts, containing all the remaining parts;
- 3MFs already contain recommended printing parameters including brim to the parts that need;
- to minimize warping issues 3MFs for 600 include 0.0mm brim distance and NO FAN cooling for first 100 slices;
- Above settings were not tested and not included for CLOSED model but I recommend adding them + increasing your bed temp by 10C if you are getting warping issues with it.
- Although the arragement provided is very effective - Please rearrange parts on bed and printing jobs as you wish if you frequently have bed adhesion issues;
- Supports are ONLY needed for the back parts for the 500 and CLOSED versions - already painted where required on these parts in the 3MFs.
- Floating parts warning in slicer relates to the connectors slots, you can print them without supports that the minor deformation does not affect their efficiency, but you are free to activate auto supports for these parts.
- I reduced speed for window frame to minimize VFAs, you should use your calibrated speeds and part orientation if you want to have a cleaner surface finish for these parts.
- Easiest and best solution for window frame is using fuzzy skin at the outward surface.
- The black horizontal line is removable in the slicer.
- Label should be printed flat then glued afterwards - editable label also provided;
- There is a front_left option with cleaner design - without label slot;
ASSEMBLY
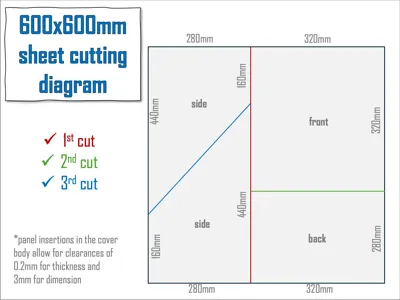
- Cutting diagram for acrylic sheets in model pictures.
- A version of window frame for 300x300mm uncut panel is also available - more suitable for CLOSED model.
- A 24x24in 1/8' acrylic panel IS compatible with the 600 model as long as you first cut off 9mm of 2 sides of the panel;
- Panels slide into the frame, NO glueing NOR taping of any sort is required.
- There are 3mm clearances for panel dimensions and 0.3mm for thickness;
- Assemble front and back around side panel - top goes after;
- Do the same for the other side and join both sides with the back panel in;
- Top join slides down to hold both halves tightly;
- For window cut four 15mm long filament portions for frame alignment then snap on the connectors;
- Join top halves and bottom halves of window frames first before assembling them around the front panel;
- Two 10x2mm magnet are used in each window slot. Here a drop of glue might be needed, a groove should help removing them if needed.
- Two magnets on front and four on top slots give enough window hold strenght;
- Optional: cut and insert TPU filament in the bottom groove for tighter bottom sealing but let super glue fully dry if you need using it;
- Remove the stock rubber cap from the U1 top to fit the printed IKEALLER feet;
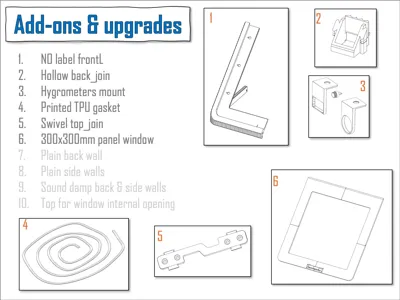
- Add-ons:
- NO label front_Left panel - if you want a cleaner look;
- Hollow back join - if you are using your auxilary port;
- Hygrometer mount - Coupled to the ceiling of the cover, with dedicated magnet screw;
- Printed TPU gasket - improved bottom sealing of the cover;
- Swivel top_join - for direct toolhead feed of extra flexibles, insert a small PTFE tube section for smooth feeding;
- 300x300mm window frame - option for window without cutting needed;
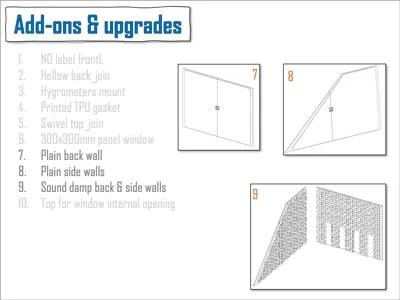
- Plain back wall - printed back panel, amenable to modifications for hardware upgrade;
- Plain side walls - SAME as above;
- Sound dampening walls - sound dampening pattern to further minimize sound (performance untested), easily substitute the acrylic panels for the 600 model;
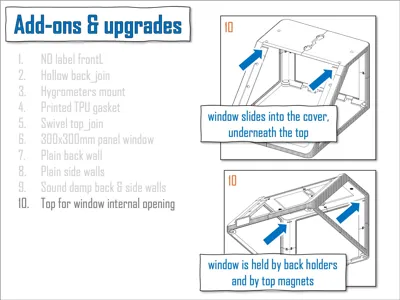
- Internal window opening - Redesiging of top parts allowing window opening when you have hardware on top of your IKEALLER. Window is held in place by top magnets and by back holder. Use a bit of superglue when putting the holders in - no supports needed for the holder slots when printing.
DISCLAIMERS
- NO printing profiles available for BambuStudio so far, select "download STL" and slice them in your computer Orca or SnOrca slicers;
- I DO NOT recommend using glass panels instead of acrylic ones. Although they would be compatible they pose a safety hazard including (but not limited to): (i) magnets are unlikely to fully handle the heavier window, (ii) even small cover bending can load directly on the glass panels when removing it off the printer.
- This is a very mature project and >90% of users have no problems at all however I recommend you checking all comments in MakerWorld and Printables and make your questions to fully understand it before commiting to it;
- Panels help making the cover less flimsy once it is fully built;
- Back acrylic panel touches the PTFE holders of the toolheads but it does NOT compromise printer durability or performance;
- Top is sturdy and can support spools and similar weights BUT the operation and capabilites of your specific set up is your reponsibility - Use it within common sense;
- Remember taking window out before flipping the cover up side down;
- Future part upgrades will be made compatible with the main body as much as possible to minimise reprint of the whole project.
- 3MF versions are slightly improved than version my very first version pictured - check makes by other users.
- HINGED version of window is available in an IKEALLER Remix by YANN in MakerWorld.
VERSIONS
- 26.apr.26 - v2.3 - Included add-ons and upgrades: (i) Plain side and back panels to enable hardware inclusion without having to modify your acrylic panels, (ii) Sound dampening side and back panels - untested/not validate aand (iii) IKEALLER top with gap for window opening if you have the cover top used by other things.
- 10.apr.26 - v2.2.1 - to avoid warping issues panel slots brought back to the original position and brim and cooling parameters were adjusted (Thanks to Andy and Sim for spotting that) (ii) included blank_top_join (now swivel one moved to add-ons);
- 1.apr.26 - v2.2 - V2.2 brings small design improves and Add-on upgrades: (i) improved TPU gasket, now tighter fit for the plain TPU filament, (ii) dedicated TPU gasket model for better bottom sealing, quick printing and version for v1 to v2.1.2 also available, (iii) back wall created if you need an alternative back panel for hardware modifications, (iv) hygrometre bracket, to be mounted in the magnet slots, (v) panel thickness clearence increased from 0.2mm to 0.3mm, enabling the usage of 1/8' thickness panels, (vi) single model for magnet slots (10mm only now), they are also no longer mirrored, making it simpler, (vii) panel slots were moved 0.8mm inwards making outter shell of panel slots thicker and more resistant (restored to original position in v2.2.1), (viii) for simplicity, ease of servicing and lack of community interested I am no longer supporting the 500 model, use v2.1.2. if you need this one;
- 22.mar.26 - v2.1.2 - Included mirrored magnet screws 3MF (2 for Left slots, 2 for Right slots) if you have already printed your top parts, included in "parts" 3MF" if you are starting your project now, (ii) back_join are model specific thus now within the respective model 3MFs, (iii) fixed panel border in the "top" parts for 600 model (Thanks to user_4021087682) and (vi) fixed wider window frame. (v) remove 300mm window for update.
- 20.mar.26 - v2.1.1 - Correct top parts for v2.1_600, I had by mistake top parts for 500 instead.
- 20.mar.26 - v2.1 - (i) fixed the horizontal line going into the panel gap causing "floating object error in slicer' (Big thanks to Manethon_Sega spotting that), (ii) extended the gap in the back frame in CLOSED version allowing better fitting of the toohead tubes, (iii) created frontL version with no label (NOlabel.3mf).
- 16.mar.26 - (i) Added Sturdy top upgrade for v1 users, (ii) window frame for 300x300mm acrylic sheet, (iii) slightly improved part positioning on plates to avoid slicer warnings.
- 15.mar.26 - v2 - detailed in pictures.
- 11.mar26 - V1.3.1_3mm: front window frame position corrected for proper 2 part printing. Saved in Orca for slicing compatibility to priters other than the U1.
- 9.mar26 - V1.3_3mm: fixed "line" and "main" order for proper line slicing of two back parts.
- 8.mar.26 - V1.2_3mm: window frame made 3 walls and 50% infill for extra strenght.
- 8.mar.26 - V1_3mm: 3mm thick acrylic sheet panels;
TIP
You can cut 3mm thickness acrylic sheets at home with the help of a sharp utility knife. You score it strongly about 15-20 times EACH SIDE then you snap it with the help of a wood plank for support ("Cut a Thin Acrylic Sheet Without a Saw", Youtube short, Hacks by Dad). Sanding is not needes for IKEALLER. Please be careful when working with sharps.
Please leave a like and share your print pictures if this was useful for you. I will keep supporting the project as long as I see community is still engaged with it.
Happy printing!
ALSO CONSIDER the matching IKEALLER toolbox
https://makerworld.com/en/models/2569138-ikealler-toolbox-for-snapmaker-u1-by-amelo
Comment & Rating (220)