Opel Vauxhall, GM Keyfob Button Replacement

Print Profile(2)

Description
After some years, the rubber used in the remote Keyfob buttons from many GM / Opel / Vauxhaul cars starts breaking. This is a simple replacement, printed from only PETG or TPU (90A in my case) and PETG, no disassembly of the key fob is required!
Now as V2, which keeps the clicky feeling of the button press!
Choose your material:
- The TPU + PETG print profile is recommended if you have a dual nozzle printer.
- The PETG only print profile is recomended if you have a single nozzle printer. Of corse, ABS or other materials work as well, but stay away from PLA as it will soften in a hot car. If you don't have an AMS, you can even print it with only one color if you don't mind missing symbols.
But we warned, to get the flex needed for the button action, the surface is only 0.4mm (2 layer) thin. Any more layers and its too stiff. Be careful when removing it from the print plate, print two if in doubt.
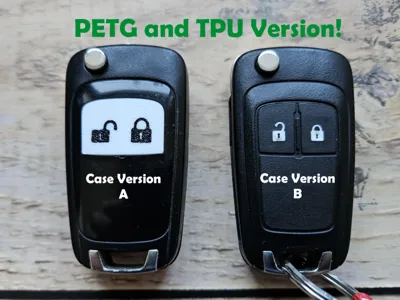
Choose your Keyfob version by choosing the right print plate within the print profile:
- Version A has a hard plastic lower half, it's button area is slightly bigger.
- Version B has a rubbery lower half, likely because there are versions with more buttons. It needs the slightly smaller version.
Please note that within the TPU print profile, the print bed temperature for the PETG is reduced to 35°C! Don't change that, and do this manual if you don't use my profile or the TPU will fuse to the print bed forever!
It should be compatible with: Astra, Insignia, Meriva, Zafira, Mokka, Chevrolet, Orlando, Aveo, Adam, Corsa and likely more.
Assembly:
- Cut the original button rubber from the keyfob. This is super easy using an X-Acto / Craft knife. All soft parts should be removed, don't cut the hard plastic! In the end, you should have a clean recessed area where the part fits perfectly.
- Check the fit and function of the printed part. If you use the PETG version, slightly bend it in the middle so it fits the contour better. If your part appears white after printing where it adhered on the print plate, you can restore the color by carefully heating the surface with a lighter or other heat source for a short amount of time.
- Apply a tiny drop of CA glue near the 4 corners, I recommend using a tooth pick or similar thin item to apply and spread the drop. Insert the new part and let it dry.
Please rate the print profiles, it helps a lot. Don't hesitate to comment if you have questions, I will read them. Thanks :)
Boost Me (for free)
Leave a boost if you like the model, it's free and encourages more designs!
License
You shall not share, sub-license, sell, rent, host, transfer, or distribute in any way the digital or 3D printed versions of this object, nor any other derivative work of this object in its digital or physical format (including - but not limited to - remixes of this object, and hosting on other digital platforms). The objects may not be used without permission in any way whatsoever in which you charge money, or collect fees.
Comment & Rating (19)