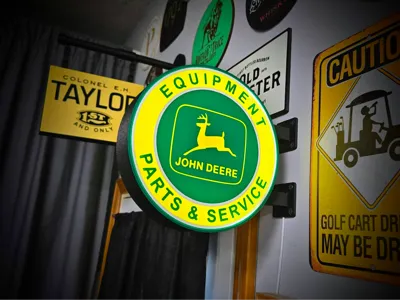
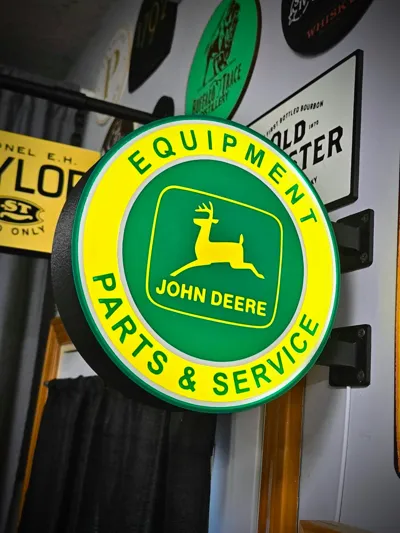
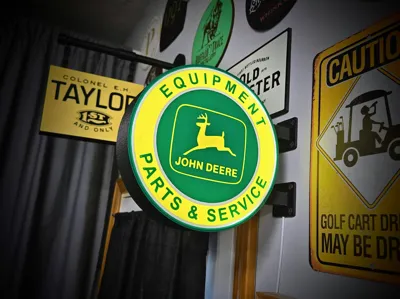
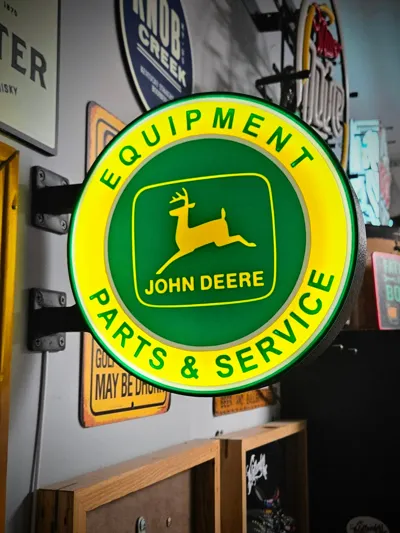
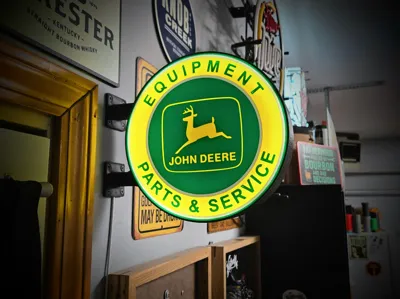
JOHN DEERE SERVICE - 2-Sided Station Lightbox Sign


Print Profile(1)


Description

All Compatible Lightbox Frames & Mounts Available Here!
🛠️ Recommended Gear
Check out my Amazon Storefront by clicking here!
Bed Adhesion (Fix First Layer Issues) Magnets (for optional mounts)
Recommended LED Light Strips Battery Powered LED Light Strips Double Sided Tape for Lens: Optional
Custom One-Off Designs Available - CLICK HERE
Printing tips are located at the bottom of this listing
___________________________________________________________________________
Bring back the golden era of full-service stations, porcelain signs, and real American garages.
This vintage-style round lightbox is inspired by classic illuminated service station signs and designed to mount perpendicular to the wall — just like the originals. Whether you're building a garage setup, bar corner, shop space, or man cave, this one makes a statement.
This model is fully 3D printable and designed for easy assembly and clean wiring.
Features:
• 224 mm diameter
• 50 mm total thickness
• Double-sided design (visible from both directions)
• Includes wall-mount brackets
• Hollow bracket arms for hidden LED wire routing
• Designed for LED strip lighting
• Clean, even light diffusion
Installation:
- The included mounting brackets are hollow, allowing you to run your LED wiring directly through the arm for a clean, professional install — no exposed wires hanging down the wall.
- Super easy to install by using the hole jig found on plate 4.
- Just use the jig to mark your holes.
- Mount the brackets using drywall screws or similar with the wiring tunnel facing up for top bracket and down for bottom bracket. (I found it easier to put my wire through before tightening the screws against the wall)
- Then slide the lightbox frame onto the mounts and push till it clicks into place.
- Next, just remove the adhesive backing strip and route your lights around the inside of the frame as many times as you would like.
- The design is intended to be used with your own LED light kit. The example shown was lit using a Cobb 5v wired strip like found here on amazon. https://a.co/d/0gaqt958
Printing Notes
- Printed in PLA for the example shown
- PETG or ABS will work as well if you prefer added durability.
Whether you’re lighting up your garage, bar, shop, or whiskey wall — this piece brings that old-school Americana glow.
FILAMENTS USED ON MY EXAMPLE:
- Bambu Basic PLA - Black
- Bambu Basic PLA - Mistletoe Green
- Bambu Basic PLA - Yellow
Bambu Basic PLA - Jade White
_________________________________________________________________________________________________
Thanks for downloading from Chopper Originals.
If this print earned a spot on your printer and you’re out of Boosts, consider buying me a coffee ☕ to help support future designs and releases.

___________________________________________________________________________________
Affiliate Disclosure
Some links in this listing are affiliate links. As an Amazon Associate, I earn from qualifying purchases at no extra cost to you.
____________________________________________________________________________________
Having issues getting that first layer to flow and stick good? Follow these steps, it helps! ***If using an enclosed printer, be sure to remove the lid and leave door open to avoid heat creep***

If using multiple brands/types of filament, you will need to save each as a Custom Filament setting. Otherwise the settings will change when your colors switch.
Comment & Rating (25)