Mighty wera-tool-check-plus-rugged-box Inlay


Print Profile(1)
Description
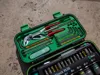
🔧 Wera Tool Check Plus Rugged Box Inlay – High-Quality Tools in a Compact Box! 📦
🔗 Original Box on MakerWorld (Note: The box itself is not included in this file!)
I love my little Wera Tool Check Plus and was thrilled to find a proper box for it. The original inlay didn’t quite meet my needs, so I designed my own—and used it as an opportunity to learn Fusion 360. Boy, did I learn a lot! I packed in as many tools as I could for furniture building and everyday tasks around the house.
✨ Features
- Lots of high-quality tools in a small box! 🎯
- Held securely by magnets—everything stays in place. 🧲
- No more searching—all your tools in one spot! 🏠
🛠️ The Process
I started with files from Thingiverse and built on them. Later (too late!), I found a better file here: Printables.
Since I’m still a beginner, I struggled with the mesh files in Fusion 360 and ended up rebuilding everything from scratch. The only 3D model I used was for the Victorinox knife from Sketchfab, but even that wasn’t perfect—it wasn’t a solid object when converted, and getting the size right was tricky.
📋 What’s Inside
You’ll need the Wera Tool Check Box (see link above) plus:
- 15 x 2mm magnets (13–14+ pieces; you may want to stack them for better hold)
- 6 x 2mm magnets (7 pieces for extra strength where space is limited)
Tools in the box:
- KNIPEX Cobra (125 mm, chrome-plated, non-slip): "KNIPEX Cobra Hightech-Wasserpumpenzange verchromt mit rutschhemmendem Kunststoff überzogen 125 mm, 87 03 125"
- Wera Bit Holder (100 mm): "Wera 899/4/1 Universalhalter, 1/4 Zoll x 100 mm x 1/4 Zoll, Wera 05053459001"
- Wera PZ1 Bit (89 mm): "Wera 855/4 Z SB PZ1, Langbit, PZ 1 x 89 mm, 05073523001"
- Wera PZ2 Bit (89 mm): "Wera 855/4 Z SB PZ2, Langbit, PZ 2 x 89 mm, 05073524001"
- Wera Hex Key Set (up to size #5): "Wera 05133164001 950/9 Hex-Plus Multicolour 2 Winkelschlüsselsatz, metrisch, BlackLaser, 9-teilig" (Note: There’s a longer Wera set, but you need the shorter one for this inlay!)
- Victorinox Classic SD Alox (small Swiss Army knife): "Victorinox Schweizer Taschenmesser, Klein, Classic SD Alox, Multitool, Swiss Army Knife, 5 Funktionen, Klinge, Nagelfeile"
💡 Tip: If possible, buy these tools from your local hardware store—I intentionally avoided Amazon or affiliate links.
🔨 Assembly
- Test the fit of your tools and place the magnets temporarily.
- Empty the tray and lay it face down on the table.
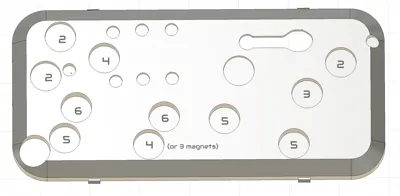
- Insert the magnets (and printed magnet holders, if applicable). (Check the image for correct sizes!)
- Place the upper part of the box onto the inlay and press it in. (Note: For me, this fit extremely snugly—almost too well!)
💡 Possible Improvements
- Inserting magnets during printing: I tried pausing the print to add magnets, but a small part broke off. If that happens, I’d want to reuse the magnets and reprint the inlay.
- Screw system for magnets: This might be more secure, but I didn’t have the patience to implement it. The magnets hold well as-is!
- Empty bit slots: I used them for temporary upright bit storage while working—maybe you have a better idea?
- Quality over quantity: Cheap tools often break or disappear quickly. This setup is expensive—don’t lose it!
- Ultimate version: I wanted to fit my SwissTool, but it was too thick. A slightly larger box could also hold:
- Thicker hex keys
- A small flashlight
- A mini electric screwdriver (e.g., Bosch Go 3)
🙌 Thanks & Feedback
Thanks to everyone who shared similar projects before me! I’m not looking to make money—this Fusion file is from a rookie, and it was a learning experience. 😊 Feel free to improve it and show me how I can do better, especially with meshes—I struggled with those! (Fusion F3d file has been uploaded and can be downloaded above)
Enjoy building, and happy making! 🚀

Comment & Rating (9)