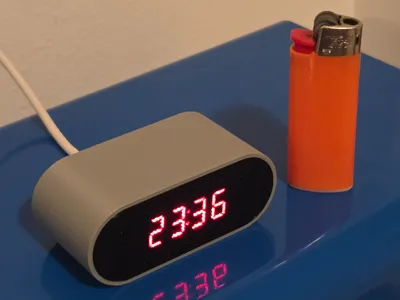
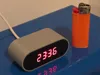
ESP Minimalist Clock


Print Profile(1)
Description
A sleek, 3D-printable minimalist desk clock powered by an ESP32-C3 Super Mini. It automatically connects to Wi-Fi to fetch the exact atomic time and detects your local timezone based on your IP address. Once synced, it turns off the Wi-Fi to save energy and keep the microcontroller running completely cool.
🌟 Features
- Auto-Timezone: No hardcoded timezones. It detects where you are automatically.
- Energy Efficient: Connects to Wi-Fi once at boot, gets the time, and completely shuts off the radio module.
- Easy Setup: Uses a captive portal. If it can't find your Wi-Fi, it creates an Access Point named "RELOJ" for easy phone setup.
- No-Screw Assembly: Snap-fit design that holds itself together perfectly.
🛠️ Hardware Required
- 1x ESP32-C3 Super Mini (Ultra-compact microcontroller).
- 1x TM1637 4-Digit Display (7-segment display module).
- 4x Short wires (under 10cm / 4 inches).
- (Optional) 2x M3x6 screws (The case closes securely by friction, but you can add screws for extra hold).
🔌 Wiring Guide
Wiring requires soldering directly to the boards to save space.
| TM1637 Display | ESP32-C3 Super Mini |
|---|---|
VCC | 5V |
GND | GND |
CLK | GPIO 6 |
DIO | GPIO 7 |
Note: You can power the display from the 3.3V pin, but 5V provides much better brightness.

⚠️ Important Soldering Tips
- The Display: The TM1637 usually comes with pre-soldered pins on the front side that interfere with the design. Do not try to desolder them (it's very difficult and you might damage the board). Simply cut the pins flush with some wire cutters and solder your wires directly to the pads on the back.
- The ESP32: Solder the wires directly to the ESP32-C3 holes. Do not use pin headers, as they will take up too much space inside the case.
- Wire Length: Keep your wires short—less than 10cm (4 inches) is ideal so everything tucks in neatly.
🖨️ 3D Printing & Assembly
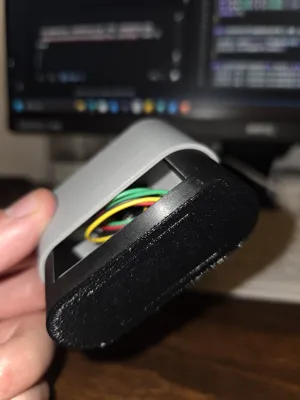
The enclosure is designed with simplicity in mind. It consists of only two interlocking parts: the main body and the back cover.
- Print both parts (no supports needed if oriented correctly).
- 💡 Material Tip: PLA works perfectly for the main case, but using PETG for the display part gives it an excellent finish and looks really good!
- Solder the components following the tips above.
- TEST BEFORE CLOSING: Power up the ESP32 and ensure the display is working correctly. Double-check the screen orientation before putting it inside the case!
- Neatly tuck the electronics inside the main body.
- Push the back cover in. It is designed with tight tolerances to close by friction fit.
- (Optional) Use the two provided holes to secure it with M3x6 screws for a permanent closure.
💡 Disassembly Trick: If you ever need to open the case after snapping it shut, do not pry the edges. Simply insert pointy tweezers or a small tool through the screw holes in the back and push the cover out.
💻 Software & Setup
- Flash the provided code code using the Arduino IDE. Make sure to install the required libraries: WiFiManager, ArduinoJson, and TM1637Display.
- Plug the clock into a USB power source. The display will show ----.
- Look for a new Wi-Fi network on your phone called "RELOJ" and connect to it.
- A popup will appear automatically. Select your home Wi-Fi network and enter your password.
- 💡 Pro-Tip: If the configuration popup doesn't open automatically, open your phone's web browser and go to http://192.168.4.1
- The display will show Conn, sync the time, and start working!
📜 Source Code
#include <WiFi.h>
#include <WiFiManager.h>
#include <HTTPClient.h>
#include <ArduinoJson.h>
#include <TM1637Display.h>
#include <time.h>
TM1637Display display(6, 7);
bool time_configured = false;
void setup() {
delay(2000); // Power stabilization
display.setBrightness(0x0f);
uint8_t init_data[] = {0x40, 0x40, 0x40, 0x40}; // Show "----"
display.setSegments(init_data);
WiFi.mode(WIFI_STA);
WiFi.setTxPower(WIFI_POWER_8_5dBm); // Prevent ESP32-C3 crashes
WiFiManager wm;
wm.setConfigPortalTimeout(180);
if (!wm.autoConnect("RELOJ")) ESP.restart();
uint8_t conn_data[] = {0x39, 0x5c, 0x54, 0x54}; // Show "Conn"
display.setSegments(conn_data);
delay(1500);
// Get timezone offset via IP
HTTPClient http;
http.begin("http://ip-api.com/json/?fields=offset");
int httpCode = http.GET();
long offset = 0;
if (httpCode == HTTP_CODE_OK) {
JsonDocument doc;
deserializeJson(doc, http.getString());
offset = doc["offset"] | 0;
}
http.end();
// Sync NTP Time
configTime(offset, 0, "pool.ntp.org", "time.nist.gov");
int retries = 0;
while (time(nullptr) < 100000 && retries++ < 20) delay(500);
time_configured = (time(nullptr) > 100000);
// Turn off Wi-Fi
WiFi.disconnect(true);
WiFi.mode(WIFI_OFF);
}
void loop() {
if (!time_configured) {
uint8_t err_data[] = {0x79, 0x50, 0x50, 0}; // Show "Err "
display.setSegments(err_data);
delay(5000);
ESP.restart();
}
static unsigned long lastUpdate = 0;
static bool colonState = false;
if (millis() - lastUpdate >= 500) {
lastUpdate = millis();
colonState = !colonState;
time_t now = time(nullptr);
struct tm timeinfo;
localtime_r(&now, &timeinfo);
int displayTime = timeinfo.tm_hour * 100 + timeinfo.tm_min;
display.showNumberDecEx(displayTime, colonState ? 0x40 : 0, true);
}
}
License
You may create derivative works based on this object, provided that all such derivative works are published exclusively on the MakerWorld platform and include proper attribution to the original creator. You may not share, upload, host, distribute, or publish this object—or any derivative work of this object—on any other digital platform, marketplace, or distribution channel. Commercial use of this object and any derivative works is strictly prohibited. This includes, but is not limited to, selling, renting, sublicensing, or using the object in any context in which you receive monetary compensation or other financial benefits.
Comment & Rating (12)