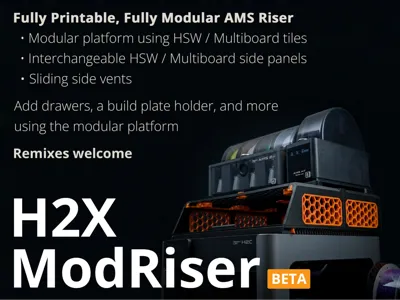
H2X ModRiser - Fully Printable Modular AMS Riser


Print Profile(10)


Description
Boost Me (for free)
If you like this model, please consider giving me a boost. It's free! I would really appreciate it :)
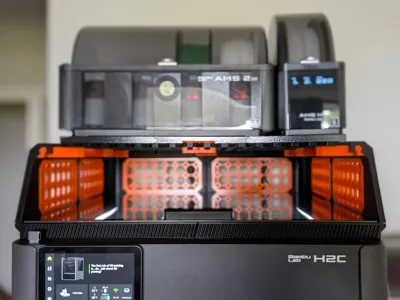
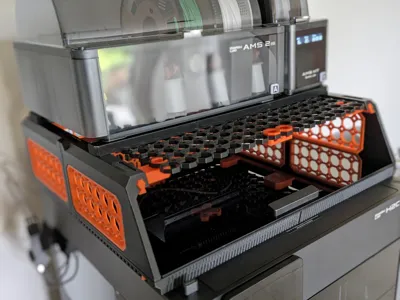
H2X ModRiser is a fully printable modular riser for Bambu Lab H2-series printers, built to hold an AMS or AMS 2 Pro together with an AMS HT, with no screws or extra hardware required for the riser itself.
I designed this because I couldn't find a riser option that had the premium, integrated look I wanted. A lot of existing designs work well functionally, but many of them bulge outward from the sides in a way that feels visually disconnected from the printer itself. With H2X ModRiser, the base was designed to sit perfectly flush with the sides of the printer, creating a cleaner and more intentional silhouette.
To achieve that look, the base uses a flat outer lip that lines up with the printer body exactly, then transitions into the wider upper riser using mostly straight lines and chamfers rather than curves. The only exception is the two rear corners, which are curved to better match the top profile of the printer. The goal was to make it feel less like an add-on and more like something that belongs there.
Another major goal was to keep the build fully printable. The core system is designed to go together without screws or additional hardware, which keeps assembly simple and makes the design more accessible to print and build.
This design should still be considered beta. I have been using it for weeks and it has been completely stable in my own setup, but I am sure many of you will have good ideas, suggestions, and feedback as you start printing and using it yourselves.
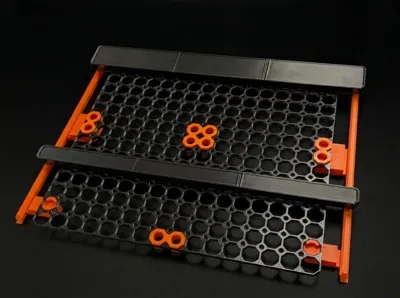
Modular by design
Rather than locking you into one fixed top platform, H2X ModRiser is built around existing modular storage ecosystems. The upper platform can be configured using standard HSW or Multiboard tiles, letting you choose the system you already use or prefer.
The platform is wide enough for an AMS or AMS 2 Pro plus an AMS HT side by side, while still keeping the overall design visually balanced with the printer below.
For users who want a tighter integrated fit, custom HSW platform tiles are also included.
Reinforced for horizontal use
HSW and Multiboard tiles are normally intended for vertical wall use, not for supporting weight horizontally. Because of that, the platform is reinforced from both above and below.
From below, the tiles are supported by the integrated connector slider rod assemblies. From above, the platform is strengthened by two crossbars, one at the front and one at the back, which insert into the tiles and help brace the platform for the weight of the AMS setup.
To keep the system modular, the platform support uses two slider rods assemblies, one for the left side and one for the right side. Each assembly combines the rod and tile connector structure into a single printable part that slides into the top of the riser, making it easy to swap between HSW and Multiboard platform versions without redesigning the rest of the build.
The rear of the riser also includes a slot for an optional slider rod. This leaves room for someone to design an additional rear support piece for the platform tiles if they want it. I haven't found rear support to be necessary in my own use, but the slot is there for future expansion.
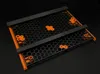
Side panels, rear panels, and expansion
The modularity continues through the rest of the design. The two side panels on each side and the two rear panels are available in both HSW and Multiboard versions, so the full riser can match the platform style you choose.
These panels are not just decorative. They also let you make use of accessories that already exist in those ecosystems. Depending on which panel system you use, you can attach compatible hooks, bins, and other panel-mounted accessories to the sides and rear of the riser.
The left and right sides also include sliding vents, so airflow can be opened or closed as needed.
Drawers and future expansion
A lot of existing risers include integrated drawers, and that is something I may add here as well if there is enough interest, most likely using Multiconnect.
In the meantime, the design already leaves room for expansion using what exists today.
People can use the Multiconnect system, or other compatible parts from the HSW and Multiboard ecosystems, to add drawers or other storage solutions. It will not have quite the same first-party integrated look as a purpose-built drawer system designed directly into the riser, but it does make the design much more flexible right away.
If someone wants to take on the challenge of designing a more integrated drawer solution around the modular platform, I would be very interested to see it.
Features
- Designed for Bambu Lab H2-series printers
- Supports an AMS or AMS 2 Pro plus an AMS HT at the same time
- Fully printable core system, no screws or additional hardware required for the riser itself
- Base sits flush with the printer sides for a cleaner, more integrated look
- Top platform can be built using standard HSW or Multiboard tiles
- Platform is reinforced from below by the integrated connector rod assemblies and from above by 2 crossbars
- Custom-fit HSW platform tiles included
- Side and rear panels available in both HSW and Multiboard styles
- Compatible with ecosystem accessories like hooks, bins, and other panel-mounted add-ons
- Compatible with Multiconnect-based drawer or storage expansions
- Sliding vents on the left and right sides
- STEP files included for remixing
PETG shrinkage and dimensional accuracy
Dimensional accuracy matters for this build, especially because several parts rely on snug fits, sliding fits, and clean alignment across the assembled riser. If you are printing in PETG, I strongly recommend calibrating shrinkage for your material first before committing to the full build.
A good calibration model for this is Alex_VG's ShrinkingTest V4.1.
Platform Assembly
The platform tiles should be connected in the standard way:
- 2 dual inserts for the front and back (the sliding rods act as dual inserts for the sides)
- 1 quad insert in the center where the 4 tiles meet
For HSW, I recommend inserting the connectors from the top rather than from below, as this makes the platform more rigid in this application.
I will also link a bridge designed by another creator that adds extra reinforcement from below for the HSW setup.
For Multiboard, I have found the standard connectors to already be sturdy enough that this extra reinforcement is not necessary once the AMS crossbars are installed.
Recommended insert files:
- HSW dual insert: “insert-hollow-dual” from Honeycomb storage wall by RostaP
- HSW quad insert: “insert-hollow-for” from Honeycomb storage wall by RostaP
- Honeycomb Bridges
- Multiboard dual insert: part A, part B
- Multiboard quad insert: part A, part B
Once the platform has been assembled, you can assemble the crossbar (front and back) and snap it into place on the tiles. Refer to the photos for the recommended positioning. Be warned that the crossbar joints are a tight fit and will likely require light hammering to assemble.
Riser Assembly
The base is made from 4 pieces connected using vertical dovetail joints.
These base dovetail joints are tapered toward the top, so they can only be inserted from the bottom. Make sure each piece is oriented correctly before sliding them together.
The riser itself also uses dovetail joints, but these are not tapered. They are designed to be slightly flexible for a snug fit. When assembling the riser, make sure the pieces stay perfectly parallel while sliding them together. If needed, use light tapping with a rubber mallet to fully seat the parts and make sure the assembled sections are perfectly level.
Once the riser is assembled, it can be placed into the groove that runs all the way around the top of the base. This should be a snug fit.
The side and rear panels are also designed as a tight friction fit, so they may take a bit of working to insert fully. Each panel has an inner lip that helps retain it against outward force, such as when hooks or other accessories are mounted on the outside of the riser.
When pushing attachments into the panels themselves, it is a good idea to support the panel from behind, since the panel is still held in place by friction fit rather than a hard mechanical lock.
For the modular top platform, I recommend assembling the tiles and related platform parts first before installing them into the riser. This makes the process much easier than trying to build the platform in place.
The sliding rod assemblies are inserted from the front of the riser. Each side of the riser has a rail-like cutout that guides the rod from the front all the way toward the back. Because the fit is intentionally snug, I recommend applying a small amount of lubricant along the rod before insertion. Depending on your tolerances and material shrinkage, this can make installation much easier and helps avoid the rod getting stuck partway through.
Optional magnet for lid warning bypass
At the bottom of the riser base, near the front right, there is a circular cutout / debossed area sized for a 6x2 mm magnet. A magnet can be superglued there to deactivate the top-lid open warning.
This magnet should be superglued in place, not press-fit. By design, the recess is not deep enough to fully sink the magnet flush into the part, similar to how the magnet on the glass lid itself is also not fully flush.
Included / Supported Variants
- HSW platform setup
- Multiboard platform setup
- Custom-fit HSW platform tiles
- HSW side panels
- Multiboard side panels
- HSW rear panels
- Multiboard rear panels
Notes
This design was made to be modular, printable, and easy to adapt. You can build it around the tile system you already use, reuse existing accessories from those ecosystems, and customize the setup without being locked into one layout.
STEP files are included for anyone who wants to remix the design, adapt it, or create compatible add-ons.
OpenGrid versions of the platform and side panels may be added later if there is enough interest.
Community Accessories & Mods
 |  | [Blank] |
 [Blank] | Leave a comment or DM me to add yours to this list! |
License
You may create derivative works based on this object, provided that all such derivative works are published exclusively on the MakerWorld platform and include proper attribution to the original creator. You may not share, upload, host, distribute, or publish this object—or any derivative work of this object—on any other digital platform, marketplace, or distribution channel. Commercial use of this object and any derivative works is strictly prohibited. This includes, but is not limited to, selling, renting, sublicensing, or using the object in any context in which you receive monetary compensation or other financial benefits.
Comment & Rating (108)