The Meridian Double Sided Wall Clock (No AMS Reqd)


Print Profile(3)


Description
Boost Me (for free)
Have a boost token? Boost me for free and keep me designing models for free on Maker World! Thank you!
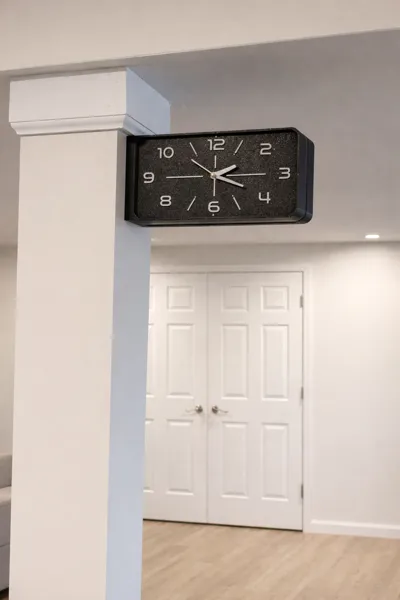
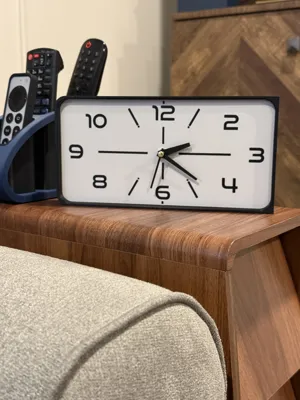
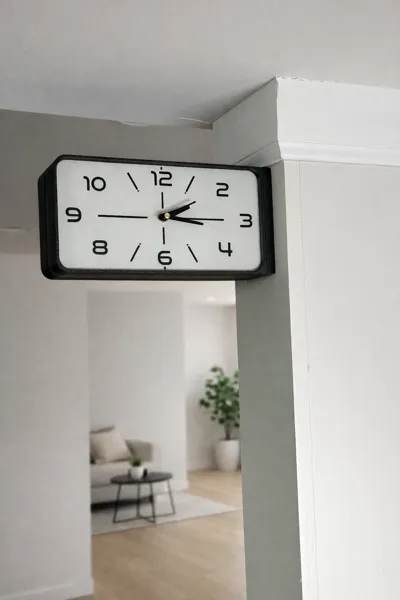
The Meridian – Mid-Century Station Wall Clock
The Meridian is a modern, station-style wall clock inspired by mid-century industrial design. Defined by its clean rectangular face, balanced proportions, and subtle detailing, it blends architectural restraint with functional clarity. Designed specifically for 3D printing, The Meridian is both a statement piece and a practical everyday timekeeper.
The clock face features softly radiused corners and carefully positioned numerals for a refined, intentional layout. Minimal hour markers complement the bold numbers, creating a composition that feels structured yet calm. The overall form is streamlined and modern, making it equally at home in a workshop, office, kitchen, or living space.
You can use different build plate patterns and styles to get a different finish on your clock face if you are printing with the clock face facing down. The textured PEI plates give a great finish on these clock faces.
Design Features
- Can be used as a wall clock or taken off the wall mount to use as a desk clock
- Rectangular mid-century inspired silhouette
- Raised numeral layout with clean indexing
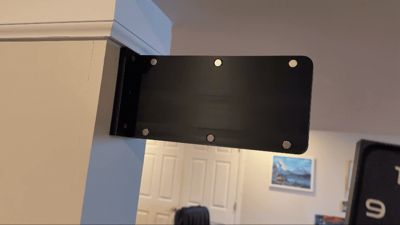
- Integrated magnet mounting system
- Optimized proportions for balanced wall presence
- Designed for standard quartz clock movements
- AMS and no AMS versions available
- Flat or “applied” numerals
Printing Notes
- Colors of the clock face, hands, markers/numerals, etc can be customized easily by changing the filament colors or using the painting tool in Bambu Studio
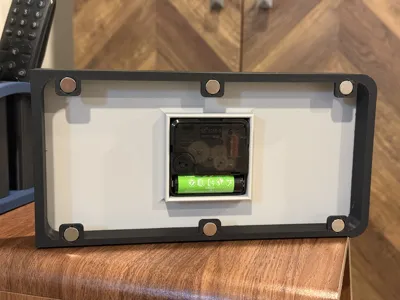
- Face, cases, wall mount, and numerals/markers print as single parts
- Supports are required for some parts
- Recommended layer height: 0.16mm, but will print perfect with other layer heights
- Raised details print cleanly at 0.8–1.2 mm height
Assembly
Depending on the version you choose, there are several ways to assemble clock. Regardless of the version you choose to print, there are a few common items required.
- A clock movement. I use these from Amazon. A 6mm threaded shaft (as seen in the description of these movements) gives the best hand height with the thickness of the clock face.
- You will need to use the pin from the seconds hands that come with the clock movement.
- 10 x 2.3mm magnets. I use these from Amazon. These provide a solid pull for the clock case and hold it perfectly aligned with the wall mount.
- Pay attention to the polarity of your magnets as you install them.
The Print profiles are labeled as below:
- The Meridian AMS - Applied
- The clock face prints face up. The movement holder prints as a separate piece. The back of the clock face features a colored square to align the movement holder when gluing.
- The clock cases require supports so the lips that grip on to the wall mount look clean. The supports have been designed for easy removal
- If the hands do not fit your movement, adjust the scale in 1-2% increments until they fit snugly without snapping
- The Meridian AMS - Flat
- This is the simplest version of the clock to print. The clock face required no assembly except for the movement
- The Meridian No AMS - Applied
- This is the most complex, yet best looking of the clock designs.
- The face prints face down and required support removal of the markers and numerals. The supports come out fairly easily. A small tool like a dental pick, knife (be careful), or other strong, thin object will help in getting the supports out
- The markers and numerals glue in with enough tolerance to allow for ease when setting them in
When installing the clock movement, follow these instructions:
- Install the movement in the back of the face
- Use the hexagon nut from the movement to secure the movement to the clock face
- Install the hour hand onto the movement. The hand should fit snugly (see note above about scaling the hands). Apply even pressure so the hands don't snap.
- When installing the minute hand, align the hour hand with any hour and install the minute hand so it is pointing at 12 o'clock. This ensures proper hand alignment.
- Remove the pin from one of the hands hand in the movement kit. Apply a small drop of glue to the pin and mount the minute hand on it. The pin pushes into the middle of the hand stack on the movement. (This video on YouTube [start at 3:12] provides a good tutorial if you need help)
License
You shall not share, sub-license, sell, rent, host, transfer, or distribute in any way the digital or 3D printed versions of this object, nor any other derivative work of this object in its digital or physical format (including - but not limited to - remixes of this object, and hosting on other digital platforms). The objects may not be used without permission in any way whatsoever in which you charge money, or collect fees.
Comment & Rating (4)