Router Jig for Ford Rear Upper Control Arm Camber


Print Profile(1)
Bill of Materials


Description
This is a Jig that allow you to more easily extend the slot of your rear upper control arm to correct the camber angle of your wheel alignment.
correcting your camber ( making the tire stand straight up rather than leaning over at an angle ) is often needed when you put lowering springs on your car.
this allows you to use a standard Dremel router head that you can get off of amazon, or you can download and print my router head design. the fence of this jig is designed specifically for the offset of a 1/8th" cutting tool preferably carbide tool for the high rpm of a Dremel tool used on steel. take short light cuts to control the heat on your cutting tool wen using.
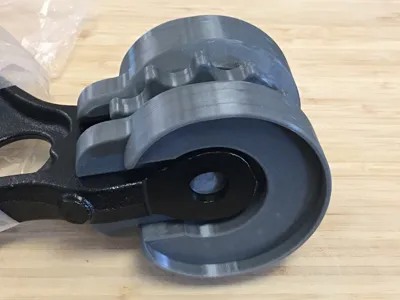
With the router head that I designed this Jig allows you to extend the slot ¼" that is a lot. may be more than you really need. but if you use the smaller router attachment sold by Dremel and other places you can go farther which means more than likely to far. so this jig is designed to prevent the slot from being extended more than an extra ¼" (.250) the slot from factory already has 0.075" (2mm) of slot length in the bolt hole meaning the factory 16mm bolt for camber adjustment can already move that distance in or out before extending it another 0.250" (~6.35mm). obviously it only extends one side of the slot for correcting camber that is causing the tires to be tilted in towards the center of the car from lowering springs changing the resting alignment geometry of the suspension on the car.
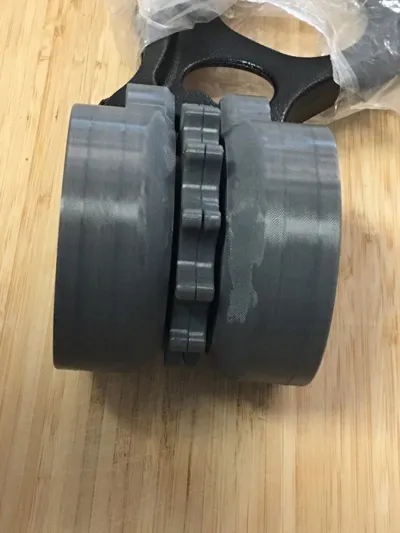
the parts are labeled left and right with the letters L & R because one side has left hand threads and the other side has right hand threads, and both halves are held together by a single right hand threaded stubby screw. this creates a turn buckle style clamping mechanism. when you mount the jig into the yolk of the upper control arm, carefully align the oval shaped lugs into the factory slotted holes. then turn the wheel in the middle to press the left and right side router jigs firmly into place. then you can begin taking light cuts at .025" step height increments until you have cut the full depth of each ear of the rear upper control arm.
note that with a carbide 1/8" tool you can use the smooth part of the shank as a guide for the finishing pas to avoid cutting the 3D printed jig. this is a bit of an advanced Dremel user technique but other wise cutting the plastic tool lug will not hurt anything. but if you use it again you may need to make sure that you push the lugs all the way back before tightening so that you don't change how far the jig allows you to extend the slot. because the lug prevents the jig from sliding forward unless you cut the lug away when finishing the full depth of the cut to extend the slot on the rear upper control arm.
of course modifying your OEM suspension components is not safe and this is to be done for off road and or experimental automobiles, no warranty or liability expressed or implied, use this model at your own risk, if you crash into a mini van full of nuns and d!e or even brake a leg don't come running to me to complain.
NOTE: Use a Sharp new 1/8' carbide cutter (not a drill bit) and take light cuts or else the Upper control arm steel will get hot and cause the jig cup to get soft. or else use higher temp material to print the jig
Boost Me (for free)
If yo are one of the rare ones that finds this and is satisfied with this tool please do give this model a boost. also please post a picture of your car I love the engagement with fellow car enthusiasts!
if you need new bushings anyway on your rear upper control arms you can buy them here or by clicking on the component photo…

As an Amazon Associate I earn from qualifying purchases. This post contains affiliate links, which means if you make a purchase through one of these links (at no extra cost to you), I may receive a small commission. Thank you for your support!
You may find grease and or oil useful for helping the threads to operate smoothly. you can find those lubricants in the BOM.
Click on the photos below to print the Router Attachment for Dremel. it's a universal accessory that can be use for a lot of Dremel routing applications as well.


Also please Check out my other super cool models here!
Boost Me (for free)
Thank you for Printing My Model, If you found it Enjoyable and you were satisfied with the results of this design please give it a boost or two! I really do appreciate it, and it helps me to make more cool stuff for you to print! come back on Monday and boost again if you really enjoy this model
Please post pictures and comments, I love the feedback on how you're using this model and enjoying it!
Enjoy!
If their are Amazon links on this page I must tell you: As an Amazon Associate, I earn commission from qualifying purchases. Thank you for using my Amazon Associate links.
License
You shall not share, sub-license, sell, rent, host, transfer, or distribute in any way the digital or 3D printed versions of this object, nor any other derivative work of this object in its digital or physical format (including - but not limited to - remixes of this object, and hosting on other digital platforms). The objects may not be used without permission in any way whatsoever in which you charge money, or collect fees.
Comment & Rating (0)